Kafka is a distributed, partitioned, replicated commit log service. It provides the functionality of a messaging system, but with a unique design.
为什么要有 Kafka?
分布式
具备经济、快速、可靠、易扩充、数据共享、设备共享、通讯方便、灵活等,分布式所具备的特性
高吞吐量
同时为数据生产者和消费者提高吞吐量
高可靠性
支持多个消费者,当某个消费者失败的时候,能够自动负载均衡
离线 & 实时性
能将消息持久化,进行批量处理
解耦
作为各个系统连接的桥梁,避免系统之间的耦合
Kafka 工作机制
一些主要概念
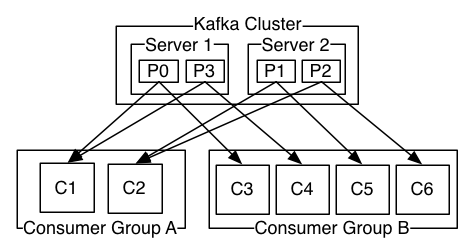
Topic(主题) A topic is a category or feed name to which messages are published.
Producers(发布者) Producers publish data to the topics of their choice. The producer is responsible for choosing which message to assign to which partition within the topic.
Consumers(订阅者) Consumers label themselves with a consumer group name, and each record published to a topic is delivered to one consumer instance within each subscribing consumer group. Consumer instances can be in separate processes or on separate machines.
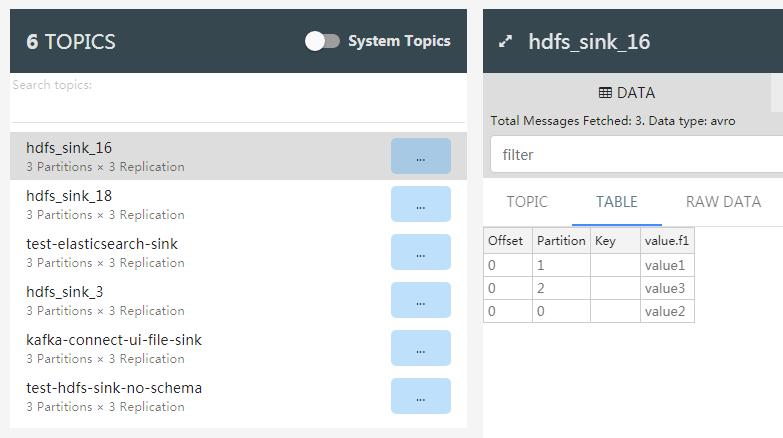
$ ./bin/kafka-avro-console-producer --broker-list localhost:9092 --topic test --property value.schema='{"type":"int"}' # 输入以下一行 JSON 串 {"f1":"value1"} # 获得如下报错 org.apache.kafka.common.errors.SerializationException: Error deserializing json {"f1":"value1"} to Avro of schema "int" Caused by: org.apache.avro.AvroTypeException: Expected int. Got START_OBJECT at org.apache.avro.io.JsonDecoder.error(JsonDecoder.java:698) at org.apache.avro.io.JsonDecoder.readInt(JsonDecoder.java:172) at org.apache.avro.io.ValidatingDecoder.readInt(ValidatingDecoder.java:83) at org.apache.avro.generic.GenericDatumReader.readInt(GenericDatumReader.java:503) at org.apache.avro.generic.GenericDatumReader.readWithoutConversion(GenericDatumReader.java:183) at org.apache.avro.generic.GenericDatumReader.read(GenericDatumReader.java:153) at org.apache.avro.generic.GenericDatumReader.read(GenericDatumReader.java:145) at io.confluent.kafka.formatter.AvroMessageReader.jsonToAvro(AvroMessageReader.java:191) at io.confluent.kafka.formatter.AvroMessageReader.readMessage(AvroMessageReader.java:158) at kafka.tools.ConsoleProducer$.main(ConsoleProducer.scala:58) at kafka.tools.ConsoleProducer.main(ConsoleProducer.scala)
停止
1 2 3 4 5 6 7
$ confluent stop schema-registry Stopping connect connect is [DOWN] Stopping kafka-rest kafka-rest is [DOWN] Stopping schema-registry schema-registry is [DOWN]
$ confluent start zookeeper is already running. Try restarting if needed kafka is already running. Try restarting if needed Starting schema-registry schema-registry is [UP] Starting kafka-rest kafka-rest is [UP] Starting connect connect is [UP]
查看 connect 日志
1 2 3 4 5 6
$ confluent log connect $ confluent current /tmp/confluent.A8TzcjSE
$ cd /tmp/confluent.A8TzcjSE $ less connect/connect.stderr
$ vim ~/.bashrc export HIVE_HOME=/usr/local/hadoop/hive export PATH=$HIVE_HOME/bin:$HIVE_HOME/conf:$PATH
c) 修改配置文件
1 2 3 4 5 6 7 8
$ vim hive-env.sh export HADOOP_HEAPSIZE=1024 # Set HADOOP_HOME to point to a specific hadoop install directory HADOOP_HOME=/usr/local/hadoop # Hive Configuration Directory can be controlled by: export HIVE_CONF_DIR=/usr/local/hadoop/hive/conf # Folder containing extra ibraries required for hive compilation/execution can be controlled by: export HIVE_AUX_JARS_PATH=/usr/local/hadoop/hive/lib
Connector 支持 batch 和 pipeline 两种写入 ES 的模式,以此来增加吞吐量。batch 模式下,允许并行地处理多个 batch 通过使用分区级 Kafka 偏移量作为 ES 文档版本,并使用 version_mode = external 配置,来确保文档级(Document-level)更新顺序
Reindexing with Zero Downtime
利用 ES 的 Index Aliases 接口,可以完成零停机 reindexing 操作(ES 本身提供了 Reindex 接口,不过性能不高),具体对 ES 集群操作的步骤如下
Create an alias for the index with the old mapping.
The applications that uses the index are pointed to the alias.
Create a new index with the updated mapping.
Move data from old to the new index.
Atomically move the alias to the new index.
Delete the old index.
为了保证用户无感知,需要在 reindexing 期间,仍然可以处理写数据的请求。但是别名是无法同时往新旧 index 写入数据的。为了解决这个问题,可以使用两个 Elasticsearch Connector 同时将相同的数据,写入到新旧 index 中,具体对 ES Connector 的操作步骤如下
The connector job that ingest data to the old indices continue writing to the old indices.
Create a new connector job that writes to new indices. This will copy both some old data and new data to the new indices as long as the data is in Kafka.
Once the data in the old indices are moved to the new indices by the reindexing process, we can stop the old connector job.
[2017-12-04 11:32:18,607] INFO Rebalance started (org.apache.kafka.connect.runtime.distributed.DistributedHerder:1187) [2017-12-04 11:32:18,608] INFO Finished stopping tasks in preparation for rebalance (org.apache.kafka.connect.runtime.distributed.DistributedHerder:1217) [2017-12-04 11:32:18,608] INFO (Re-)joining group connect-cluster (org.apache.kafka.clients.consumer.internals.AbstractCoordinator:442) [2017-12-04 11:32:18,612] INFO Successfully joined group connect-cluster with generation 2 (org.apache.kafka.clients.consumer.internals.AbstractCoordinator:409) [2017-12-04 11:32:18,612] INFO Joined group and got assignment: Assignment{error=0, leader='connect-1-efb9e92c-27a6-4062-9fcc-92480f8e9e03', leaderUrl='http://192.168.1.101:8083/', offset=-1, connectorIds=[], taskIds=[]} (org.apache.kafka.connect.runtime.distributed.DistributedHerder:1166) [2017-12-04 11:32:18,612] INFO Starting connectors and tasks using config offset -1 (org.apache.kafka.connect.runtime.distributed.DistributedHerder:815) [2017-12-04 11:32:18,613] INFO Finished starting connectors and tasks (org.apache.kafka.connect.runtime.distributed.DistributedHerder:825)
$ cd /home/connect/software/confluent $ vim ./etc/kafka/server.properties zookeeper.connect=192.168.1.101:2181,192.168.1.102:2181,192.168.1.103:2181 zookeeper.connection.timeout.ms=6000
$ vim ./etc/schema-registry/connect-avro-distributed.properties id=kafka-rest-test-server schema.registry.url=http://localhost:8081 zookeeper.connect=192.168.1.101:2181,192.168.1.102:2181,192.168.1.103:2181
$ cd /home/connect/software/confluent $ vim etc/kafka-rest/kafka-rest.properties id=kafka-rest-test-server schema.registry.url=http://192.168.1.103:8081 zookeeper.connect=192.168.1.101:2181,192.168.1.102:2181,192.168.1.103:2181
$ cd /home/connect/software/confluent $ vim etc/schema-registry/schema-registry.properties listeners=http://0.0.0.0:8081 kafkastore.connection.url=192.168.1.101:2181,192.168.1.102:2181,192.168.1.103:2181 kafkastore.topic=_schemas debug=false
Timed out while checking for or creating topic(s) ‘connect-offsets’
描述
1
2
3
4
5
6
7
8
9
10
11
12
13
14
15
[2017-12-0117:39:13,503] ERROR Uncaught exception in herder work thread, exiting: (org.apache.kafka.connect.runtime.distributed.DistributedHerder:206) org.apache.kafka.connect.errors.ConnectException: Timed out while checking for or creating topic(s)'connect-offsets'. This could indicate a connectivity issue, unavailable topic partitions, or ifthis is your first use of the topic it may have taken too long to create. at org.apache.kafka.connect.util.TopicAdmin.createTopics(TopicAdmin.java:243) at org.apache.kafka.connect.storage.KafkaOffsetBackingStore$1.run(KafkaOffsetBackingStore.java:99) at org.apache.kafka.connect.util.KafkaBasedLog.start(KafkaBasedLog.java:126) at org.apache.kafka.connect.storage.KafkaOffsetBackingStore.start(KafkaOffsetBackingStore.java:109) at org.apache.kafka.connect.runtime.Worker.start(Worker.java:146) at org.apache.kafka.connect.runtime.AbstractHerder.startServices(AbstractHerder.java:99) at org.apache.kafka.connect.runtime.distributed.DistributedHerder.run(DistributedHerder.java:194) at java.util.concurrent.Executors$RunnableAdapter.call(Executors.java:511) at java.util.concurrent.FutureTask.run(FutureTask.java:266) at java.util.concurrent.ThreadPoolExecutor.runWorker(ThreadPoolExecutor.java:1142) at java.util.concurrent.ThreadPoolExecutor$Worker.run(ThreadPoolExecutor.java:617) at java.lang.Thread.run(Thread.java:748) Caused by: org.apache.kafka.common.errors.TimeoutException: Timed out waiting to send the call.
Request to leader to reconfigure connector tasks failed
[2018-03-1310:30:28,303] ERROR Unexpected error during connector task reconfiguration: (org.apache.kafka.connect.runtime.distributed.DistributedHerder:933) [2018-03-1310:30:28,303] ERROR Task reconfiguration for FileStreamSinkConnector failed unexpectedly, this connector will not be properly reconfigured unless manually triggered. (org.apache.kafka.connect.runtime.distributed.DistributedHerder:934) [2018-03-1310:30:28,306] INFO 192.168.1.102 - - [13/Mar/2018:02:30:28 +0000] "POST /connectors/FileStreamSinkConnector/tasks?forward=false HTTP/1.1"4091131 (org.apache.kafka.connect.runtime.rest.RestServer:60) [2018-03-1310:30:28,307] INFO 192.168.1.102 - - [13/Mar/2018:02:30:28 +0000] "POST /connectors/FileStreamSinkConnector/tasks?forward=true HTTP/1.1"4091133 (org.apache.kafka.connect.runtime.rest.RestServer:60) [2018-03-1310:30:28,307] INFO 192.168.1.102 - - [13/Mar/2018:02:30:28 +0000] "POST /connectors/FileStreamSinkConnector/tasks HTTP/1.1"4091134 (org.apache.kafka.connect.runtime.rest.RestServer:60) [2018-03-1310:30:28,307] ERROR Request to leader to reconfigure connector tasks failed(org.apache.kafka.connect.runtime.distributed.DistributedHerder:996) org.apache.kafka.connect.runtime.rest.errors.ConnectRestException: Cannot complete request because of a conflicting operation(e.g. worker rebalance) at org.apache.kafka.connect.runtime.rest.RestServer.httpRequest(RestServer.java:229) at org.apache.kafka.connect.runtime.distributed.DistributedHerder$18.run(DistributedHerder.java:993) at java.util.concurrent.Executors$RunnableAdapter.call(Executors.java:511) at java.util.concurrent.FutureTask.run(FutureTask.java:266) at java.util.concurrent.ThreadPoolExecutor.runWorker(ThreadPoolExecutor.java:1142) at java.util.concurrent.ThreadPoolExecutor$Worker.run(ThreadPoolExecutor.java:617) at java.lang.Thread.run(Thread.java:748) [2018-03-1310:30:28,307] ERROR Failed to reconfigure connector´s tasks, retrying after backoff: (org.apache.kafka.connect.runtime.distributed.DistributedHerder:922) org.apache.kafka.connect.runtime.rest.errors.ConnectRestException: Cannot complete request because of a conflicting operation(e.g. worker rebalance) at org.apache.kafka.connect.runtime.rest.RestServer.httpRequest(RestServer.java:229) at org.apache.kafka.connect.runtime.distributed.DistributedHerder$18.run(DistributedHerder.java:993) at java.util.concurrent.Executors$RunnableAdapter.call(Executors.java:511) at java.util.concurrent.FutureTask.run(FutureTask.java:266) at java.util.concurrent.ThreadPoolExecutor.runWorker(ThreadPoolExecutor.java:1142) at java.util.concurrent.ThreadPoolExecutor$Worker.run(ThreadPoolExecutor.java:617) at java.lang.Thread.run(Thread.java:748) [2018-03-1310:30:28,557] INFO SinkConnectorConfig values: connector.class = org.apache.kafka.connect.file.FileStreamSinkConnector key.converter = null name= FileStreamSinkConnector tasks.max = 1 topics = [kafka-connect-ui-file-sink] transforms = null value.converter = null (org.apache.kafka.connect.runtime.SinkConnectorConfig:223) [2018-03-1310:30:28,558] INFO EnrichedConnectorConfig values: connector.class = org.apache.kafka.connect.file.FileStreamSinkConnector key.converter = null name= FileStreamSinkConnector tasks.max = 1 topics = [kafka-connect-ui-file-sink] transforms = null value.converter = null
解决
1 2 3 4 5 6 7 8 9 10
$ vim etc/kafka/connect-distributed.properties # These are provided to inform the user about the presence of the REST host and port configs # Hostname & Port for the REST API to listen on. If this is set, it will bind to the interface used to listen to requests. rest.host.name=0.0.0.0 rest.port=8083
# 增加如下两个配置 # The Hostname & Port that will be given out to other workers to connect to i.e. URLs that are routable from other servers. rest.advertised.host.name=192.168.1.101 # 当前机器 IP 地址 rest.advertised.port=8083
[2018-03-1310:48:24,211] ERROR Failed to send HTTP request to endpoint: http://localhost:8081/subjects/kafka-connect-ui-file-sink-value/versions (io.confluent.kafka.schemaregistry.client.rest.RestService:156) java.net.ConnectException: Connection refused(Connection refused) at java.net.PlainSocketImpl.socketConnect(Native Method) at java.net.AbstractPlainSocketImpl.doConnect(AbstractPlainSocketImpl.java:350) at java.net.AbstractPlainSocketImpl.connectToAddress(AbstractPlainSocketImpl.java:206) at java.net.AbstractPlainSocketImpl.connect(AbstractPlainSocketImpl.java:188) at java.net.SocksSocketImpl.connect(SocksSocketImpl.java:392) at java.net.Socket.connect(Socket.java:589) at java.net.Socket.connect(Socket.java:538) at sun.net.NetworkClient.doConnect(NetworkClient.java:180) at sun.net.www.http.HttpClient.openServer(HttpClient.java:463) at sun.net.www.http.HttpClient.openServer(HttpClient.java:558) at sun.net.www.http.HttpClient.<init>(HttpClient.java:242) at sun.net.www.http.HttpClient.New(HttpClient.java:339) at sun.net.www.http.HttpClient.New(HttpClient.java:357)
WARNING: bridge-nf-call-iptables is disabled WARNING: bridge-nf-call-ip6tables is disabled
解决
1 2 3 4 5 6 7 8
# 添加内核配置参数 $ sudo tee -a /etc/sysctl.conf <<-EOF net.bridge.bridge-nf-call-ip6tables = 1 net.bridge.bridge-nf-call-iptables = 1 EOF
# 重新加载 sysctl.conf $ sudo sysctl -p
常用配置
Worker 通用配置
bootstrap.servers
1 2 3
# 建立到 Kafka 的初始连接 # Bootstrap Kafka servers. If multiple servers are specified, they should be comma-separated. bootstrap.servers=localhost:9092
[key | value].converter
1 2 3 4 5 6 7 8
# 指定 Kafka 中的数据如何转为到 Connect # The converters specify the format of data in Kafka and how to translate it into Connect data. # Every Connect user will need to configure these based on the format they want their data in # when loaded from or stored into Kafka key.converter=io.confluent.connect.avro.AvroConverter key.converter.schema.registry.url=http://localhost:8081 value.converter=io.confluent.connect.avro.AvroConverter value.converter.schema.registry.url=http://localhost:8081
internal.[key | value].converter
1 2 3 4 5 6 7 8
# 指定 Connect 内部的数据转化 # The offsets, status, and configurations are written to the topics using converters specified through the following required properties. # Most users will always want to use the JSON converter without schemas. # Offset and config data is never visible outside of Connect in this format. internal.key.converter=org.apache.kafka.connect.json.JsonConverter internal.value.converter=org.apache.kafka.connect.json.JsonConverter internal.key.converter.schemas.enable=false internal.value.converter.schemas.enable=false
rest.host.name & rest.port
1 2 3 4 5
# 配置 RESTful 服务的 IP 和 Port # These are provided to inform the user about the presence of the REST host and port configs # Hostname & Port for the REST API to listen on. If this is set, it will bind to the interface used to listen to requests. rest.host.name=0.0.0.0 rest.port=8083
plugin.path
1 2 3 4 5 6 7 8 9
# Set to a list of filesystem paths separated by commas (,) to enable class loading isolation for plugins # (connectors, converters, transformations). The list should consist of top level directories that include # any combination of: # a) directories immediately containing jars with plugins and their dependencies # b) uber-jars with plugins and their dependencies # c) directories immediately containing the package directory structure of classes of plugins and their dependencies # Examples: # plugin.path=/usr/local/share/java,/usr/local/share/kafka/plugins,/opt/connectors, plugin.path=/home/connect/plugins
分布式 Worker 配置
group.id
1 2
# The group ID is a unique identifier for the set of workers that form a single Kafka Connect cluster group.id=connect-cluster
[config | offset | status].storage.topic
1 2 3 4 5 6 7 8 9 10 11 12 13 14
# Internal Storage Topics. # # Kafka Connect distributed workers store the connector and task configurations, connector offsets, # and connector statuses in three internal topics. These topics MUST be compacted. # When the Kafka Connect distributed worker starts, it will check for these topics and attempt to create them # as compacted topics if they don't yet exist, using the topic name, replication factor, and number of partitions # as specified in these properties, and other topic-specific settings inherited from your brokers' # auto-creation settings. If you need more control over these other topic-specific settings, you may want to # manually create these topics before starting Kafka Connect distributed workers. # # The following properties set the names of these three internal topics for storing configs, offsets, and status. config.storage.topic=connect-configs offset.storage.topic=connect-offsets status.storage.topic=connect-statuses
# The following properties set the replication factor for the three internal topics, defaulting to 3 for each # and therefore requiring a minimum of 3 brokers in the cluster. Since we want the examples to run with # only a single broker, we set the replication factor here to just 1. That´s okay for the examples, but # ALWAYS use a replication factor of AT LEAST 3 for production environments to reduce the risk of # losing connector offsets, configurations, and status. config.storage.replication.factor=1 offset.storage.replication.factor=1 status.storage.replication.factor=1
[offset | status].storage.partitions
1
2
3
4
5
6
7
# The config storage topic must have a single partition, and this cannot be changed via properties. # Offsets for all connectors and tasks are written quite frequently and therefore the offset topic # should be highly partitioned; by default it is created with 25 partitions, but adjust accordingly # with the number of connector tasks deployed to a distributed worker cluster. Kafka Connect records # the status less frequently, and so by default the topic is created with 5 partitions. offset.storage.partitions=25 status.storage.partitions=5
Connector 配置
说明
1 2 3 4 5 6 7 8 9 10 11 12 13 14
# Unique name for the connector. Attempting to register again with the same name will fail. name # The Java class for the connector connector.class # The maximum number of tasks that should be created for this connector. The connector may create fewer tasks if it cannot achieve this level of parallelism. tasks.max # (optional) Override the default key converter class set by the worker. key.converter # (optional) Override the default value converter class set by the worker. value.converter
# Sink connectors also have one additional option to control their input # A list of topics to use as input for this connector topics
Since Kafka Connect is intended to be run as a service, it also provides a REST API for managing connectors. By default, this service runs on port 8083.
The following are the currently supported endpoints:
GET /connectors - return a list of active connectors
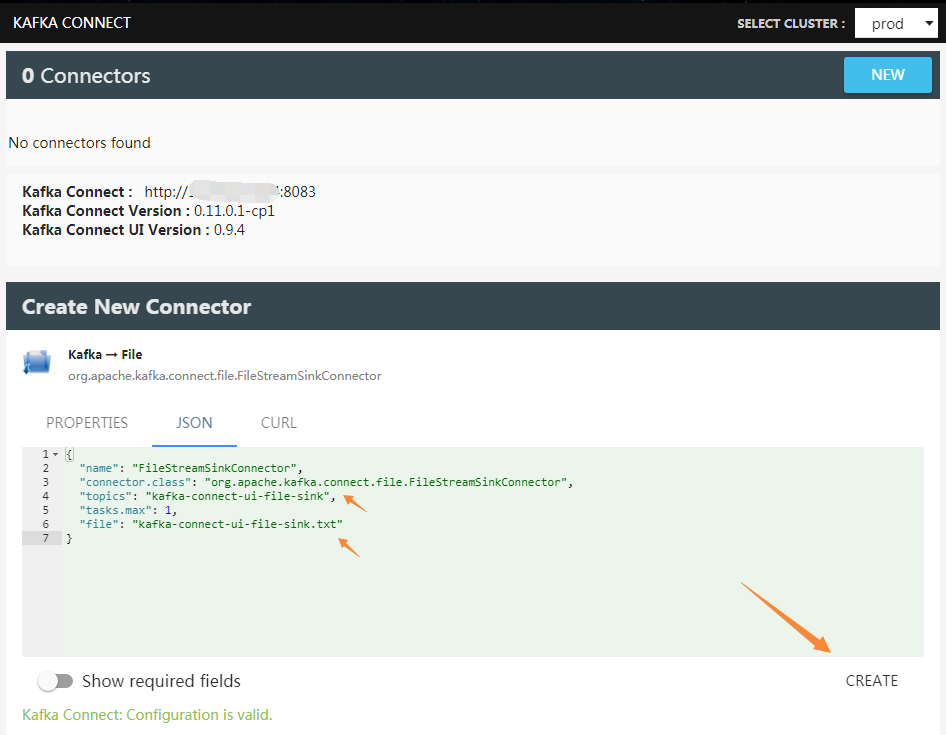
POST /connectors - create a new connector; the request body should be a JSON object containing a string name field and an object config field with the connector configuration parameters
GET /connectors/{name} - get information about a specific connector
GET /connectors/{name}/config - get the configuration parameters for a specific connector
PUT /connectors/{name}/config - update the configuration parameters for a specific connector
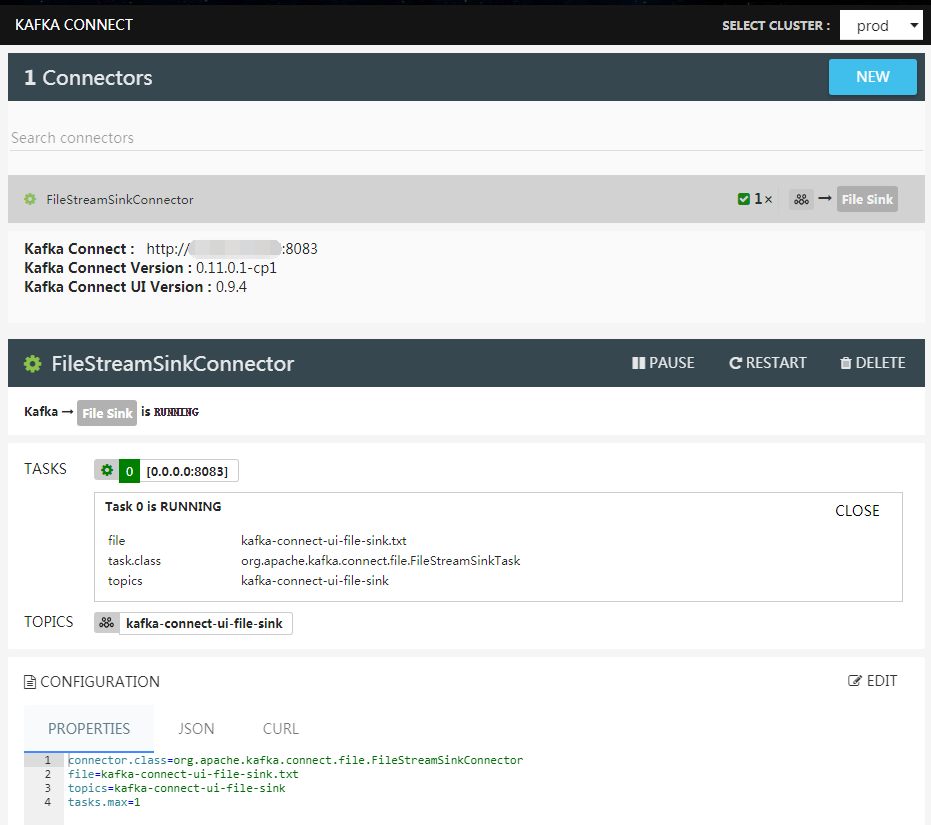
GET /connectors/{name}/status - get current status of the connector, including if it is running, failed, paused, etc., which worker it is assigned to, error information if it has failed, and the state of all its tasks
GET /connectors/{name}/tasks - get a list of tasks currently running for a connector
GET /connectors/{name}/tasks/{taskid}/status - get current status of the task, including if it is running, failed, paused, etc., which worker it is assigned to, and error information if it has failed
PUT /connectors/{name}/pause - pause the connector and its tasks, which stops message processing until the connector is resumed
PUT /connectors/{name}/resume - resume a paused connector (or do nothing if the connector is not paused)
POST /connectors/{name}/restart - restart a connector (typically because it has failed)
POST /connectors/{name}/tasks/{taskId}/restart - restart an individual task (typically because it has failed)
DELETE /connectors/{name} - delete a connector, halting all tasks and deleting its configuration
Kafka Connect also provides a REST API for getting information about connector plugins:
GET /connector-plugins- return a list of connector plugins installed in the Kafka Connect cluster. Note that the API only checks for connectors on the worker that handles the request, which means you may see inconsistent results, especially during a rolling upgrade if you add new connector jars
PUT /connector-plugins/{connector-type}/config/validate - validate the provided configuration values against the configuration definition. This API performs per config validation, returns suggested values and error messages during validation.
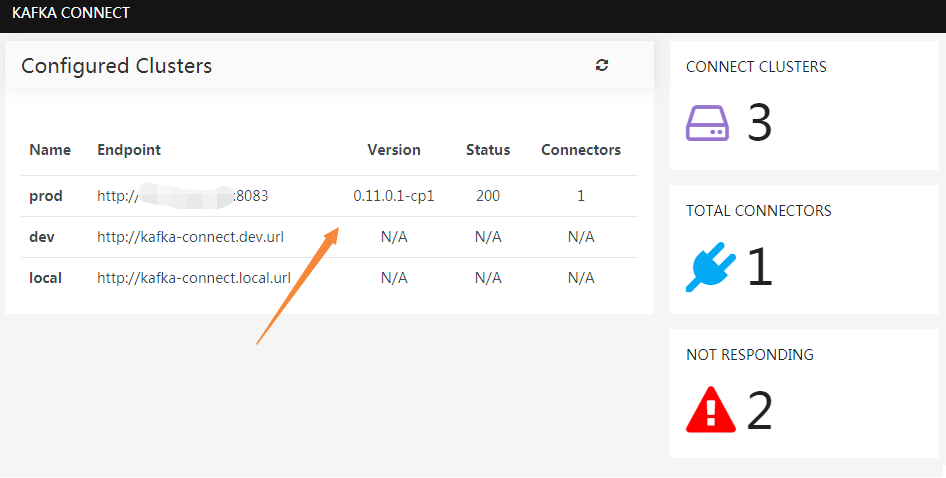
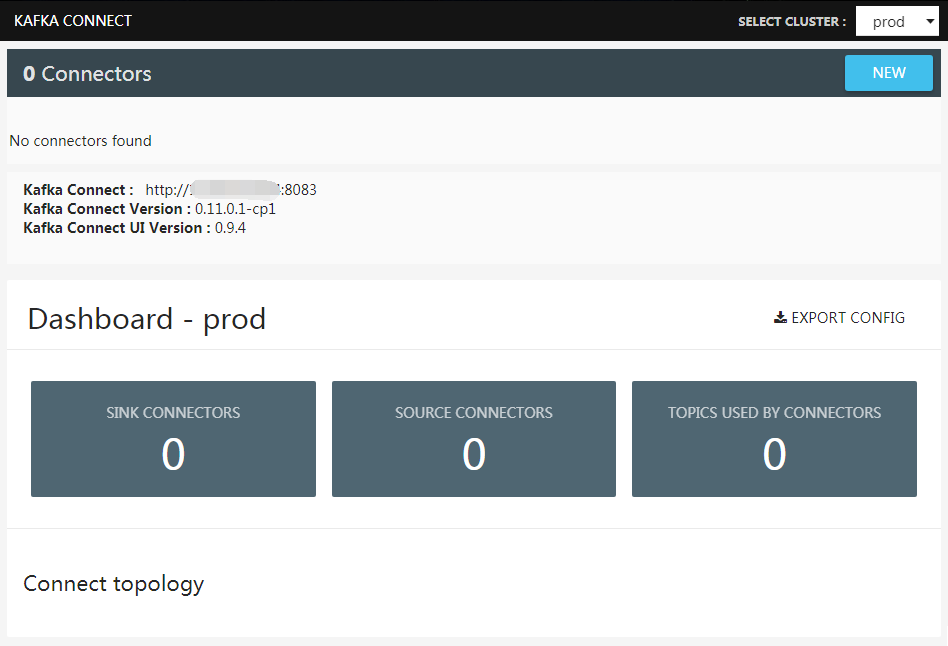
# 打开 REST 接口 $ cd software/confluent $ vim ./etc/kafka/connect-distributed.properties # These are provided to inform the user about the presence of the REST host and port configs # Hostname & Port for the REST API to listen on. If this is set, it will bind to the interface used to listen to requests. rest.host.name=0.0.0.0 rest.port=8083 # 如果不设置这两个配置,Worker 节点之间将无法互相识别 # The Hostname & Port that will be given out to other workers to connect to i.e. URLs that are routable from other servers. rest.advertised.host.name=192.168.1.101 # 当前机器 IP 地址 rest.advertised.port=8083 # 如果不设置这两个配置,页面上将会看到 prod http://xxxx:8083 N/A N/A N/A access.control.allow.methods=GET,POST,PUT,DELETE,OPTIONS access.control.allow.origin=*
val precision = schema.getJsonProp("precision") val scale = schema.getJsonProp("scale") val logicalType = LogicalTypes.decimal(precision.toString.toInt, scale.toString.toInt) val d: java.math.BigDecimal = decimalConversion.fromBytes(trans.getSale, schema, logicalType)
Command line utility that runs Kafka Connect in distributed mode. In this mode, the process joints a group of other workers and work is distributed among them. This is useful for running Connect as a service, where connectors can be submitted to the cluster to be automatically executed in a scalable, distributed fashion. This also allows you to easily scale out horizontally, elastically adding or removing capacity simply by starting or stopping worker instances.
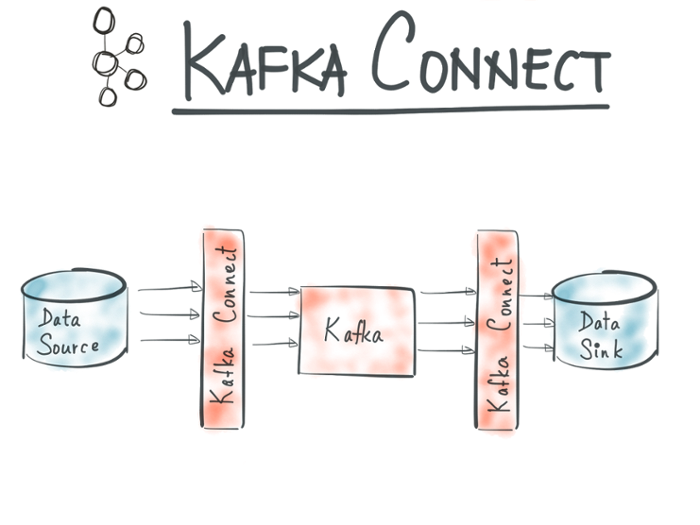
Connect
This class ties together all the components of a Kafka Connect process (herder, worker, storage, command interface), managing their lifecycle.
Connector
Connectors manage integration of Kafka Connect with another system, either as an input that ingests data into Kafka or an output that passes data to an external system. Implementations should not use this class directly; they should inherit from SourceConnector or SinkConnector.
Connectors have two primary tasks. First, given some configuration, they are responsible for creating configurations for a set of {@link Task}s that split up the data processing. For example, a database Connector might create Tasks by dividing the set of tables evenly among tasks. Second, they are responsible for monitoring inputs for changes that require reconfiguration and notifying the Kafka Connect runtime via the ConnectorContext. Continuing the previous example, the connector might periodically check for new tables and notify Kafka Connect of additions and deletions. Kafka Connect will then request new configurations and update the running Tasks.
SinkConnector
SourceConnectors implement the connector interface to pull data from another system and send it to Kafka.
SourceConnector
SinkConnectors implement the Connector interface to send Kafka data to another system.
Herder
The herder interface tracks and manages workers and connectors. It is the main interface for external components to make changes to the state of the cluster. For example, in distributed mode, an implementation of this class knows how to accept a connector configuration, may need to route it to the current leader worker for the cluster so the config can be written to persistent storage, and then ensures the new connector is correctly instantiated on one of the workers.
This class must implement all the actions that can be taken on the cluster (add/remove connectors, pause/resume tasks, get state of connectors and tasks, etc). The non-Java interfaces to the cluster (REST API and CLI) are very simple wrappers of the functionality provided by this interface.
In standalone mode, this implementation of this class will be trivial because no coordination is needed. In that case, the implementation will mainly be delegating tasks directly to other components. For example, when creating a new connector in standalone mode, there is no need to persist the config and the connector and its tasks must run in the same process, so the standalone herder implementation can immediately instantiate and start the connector and its tasks.
Worker
Worker runs a (dynamic) set of tasks in a set of threads, doing the work of actually moving data to/from Kafka.
Since each task has a dedicated thread, this is mainly just a container for them.
Task
Tasks contain the code that actually copies data to/from another system. They receive a configuration from their parent Connector, assigning them a fraction of a Kafka Connect job´s work. The Kafka Connect framework then pushes/pulls data from the Task. The Task must also be able to respond to reconfiguration requests.
Task only contains the minimal shared functionality between {@link org.apache.kafka.connect.source.SourceTask} and {@link org.apache.kafka.connect.sink.SinkTask}.
SourceTask
SourceTask is a Task that pulls records from another system for storage in Kafka.
SinkTask
SinkTask is a Task that takes records loaded from Kafka and sends them to another system. Each task instance is assigned a set of partitions by the Connect framework and will handle all records received from those partitions. As records are fetched from Kafka, they will be passed to the sink task using the {@link #put(Collection)} API, which should either write them to the downstream system or batch them for later writing. Periodically, Connect will call {@link #flush(Map)} to ensure that batched records are actually pushed to the downstream system..
状态机
Initialization
SinkTasks are first initialized using {@link #initialize(SinkTaskContext)} to prepare the task´s context and {@link #start(Map)} to accept configuration and start any services needed for processing.
Partition Assignment
After initialization, Connect will assign the task a set of partitions using {@link #open(Collection)}. These partitions are owned exclusively by this task until they have been closed with {@link #close(Collection)}.
Record Processing
Once partitions have been opened for writing, Connect will begin forwarding records from Kafka using the {@link #put(Collection)} API. Periodically, Connect will ask the task to flush records using {@link #flush(Map)} as described above.
Partition Rebalancing
Occasionally, Connect will need to change the assignment of this task. When this happens, the currently assigned partitions will be closed with {@link #close(Collection)} and the new assignment will be opened using {@link #open(Collection)}.
Shutdown
When the task needs to be shutdown, Connect will close active partitions (if there are any) and stop the task using {@link #stop()}
Storage
OffsetBackingStore
OffsetBackingStore is an interface for storage backends that store key-value data. The backing store doesn´t need to handle serialization or deserialization. It only needs to support reading/writing bytes. Since it is expected these operations will require network operations, only bulk operations are supported.
Since OffsetBackingStore is a shared resource that may be used by many OffsetStorage instances that are associated with individual tasks, the caller must be sure keys include information about the connector so that the shared namespace does not result in conflicting keys.
KafkaOffsetBackingStore
1 2 3
Implementation of OffsetBackingStore that uses a Kafka topic to store offset data.
Internally, this implementation both produces to and consumes from a Kafka topic which stores the offsets. It accepts producer and consumer overrides via its configuration but forces some settings to specific values to ensure correct behavior (e.g. acks, auto.offset.reset).
StatusBackingStore
KafkaStatusBackingStore
1 2 3 4 5 6 7 8 9
StatusBackingStore implementation which uses a compacted topic for storage of connector and task status information. When a state change is observed, the new state is written to the compacted topic. The new state will not be visible until it has been read back from the topic.
In spite of their names, the putSafe() methods cannot guarantee the safety of the write (since Kafka itself cannot provide such guarantees currently), but it can avoid specific unsafe conditions. In particular, we putSafe() allows writes in the following conditions:
1) It is (probably) safe to overwrite the state if there is no previous value. 2) It is (probably) safe to overwrite the state if the previous value was set by a worker with the same workerId. 3) It is (probably) safe to overwrite the previous state if the current generation is higher than the previous .
Basically all these conditions do is reduce the window for conflicts. They obviously cannot take into account in-flight requests.
Provides persistent storage of Kafka Connect connector configurations in a Kafka topic.
This class manages both connector and task configurations. It tracks three types of configuration entries:
1. Connector config: map of string -> string configurations passed to the Connector class, with support for expanding this format if necessary. (Kafka key: connector-[connector-id]). These configs are *not* ephemeral. They represent the source of truth. If the entire Connect cluster goes down, this is all that is really needed to recover.
2. Task configs: map of string -> string configurations passed to the Task class, with support for expanding this format if necessary. (Kafka key: task-[connector-id]-[task-id]). These configs are ephemeral; they are stored here to a) disseminate them to all workers while ensuring agreement and b) to allow faster cluster/worker recovery since the common case of recovery (restoring a connector) will simply result in the same configuration as before the failure.
3. Task commit "configs": records indicating that previous task config entries should be committed and all task configs for a connector can be applied. (Kafka key: commit-[connector-id]. This config has two effects. First, it records the number of tasks the connector is currently running (and can therefore increase/decrease parallelism). Second, because each task config is stored separately but they need to be applied together to ensure each partition is assigned to a single task, this record also indicates that task configs for the specified connector can be "applied" or "committed".
This configuration is expected to be stored in a *single partition* and *compacted* topic. Using a single partition ensures we can enforce ordering on messages, allowing Kafka to be used as a write ahead log. Compaction allows us to clean up outdated configurations over time. However, this combination has some important implications for the implementation of this class and the configuration state that it may expose.
Connector configurations are independent of all other configs, so they are handled easily. Writing a single record is already atomic, so these can be applied as soon as they are read. One connectors config does not affect any others, and they do not need to coordinate with the connector's task configuration at all. The most obvious implication for task configs is the need for the commit messages. Because Kafka does not currently have multi-record transactions or support atomic batch record writes, task commit messages are required to ensure that readers do not end up using inconsistent configs. For example, consider if a connector wrote configs for its tasks, then was reconfigured and only managed to write updated configs for half its tasks. If task configs were applied immediately you could be using half the old configs and half the new configs. In that condition, some partitions may be double-assigned because the old config and new config may use completely different assignments. Therefore, when reading the log, we must buffer config updates for a connector's tasks and only apply atomically them once a commit message has been read.
However, there are also further challenges. This simple buffering approach would work fine as long as the entire log was always available, but we would like to be able to enable compaction so our configuration topic does not grow indefinitely. Compaction may break a normal log because old entries will suddenly go missing. A new worker reading from the beginning of the login order to build up the full current configuration will see task commits, but some records required for those commits will have been removed because the same keys have subsequently been rewritten. For example, if you have a sequence of record keys "[connector-foo-config, task-foo-1-config, task-foo-2-config, commit-foo (2 tasks), task-foo-1-config, commit-foo (1 task)]", we can end up with a compacted log containing "[connector-foo-config, task-foo-2-config, commit-foo (2 tasks), task-foo-1-config, commit-foo (1 task)]". When read back, the first commit will see an invalid state because the first task-foo-1-config has been cleaned up.
Compaction can further complicate things if writing new task configs fails mid-write. Consider a similar scenario as the previous one, but in this case both the first and second update will write 2 task configs. However, the second write fails half of the way through: "[connector-foo-config, task-foo-1-config, task-foo-2-config, commit-foo (2 tasks), task-foo-1-config]". Now compaction occurs and we are left with "[connector-foo-config, task-foo-2-config, commit-foo (2 tasks), task-foo-1-config]". At the first commit, we donot have a complete set of configs. And because of the failure, there is no second commit. We are left in an inconsistent state with no obvious way to resolve the issue -- we can try to keep on reading, but the failed node may never recover and write the updated config. Meanwhile, other workers may have seen the entire log; they will see the second task-foo-1-config waiting to be applied, but will otherwise think everything is ok -- they have a valid set of task configs for connector "foo".
Because we can encounter these inconsistencies and addressing them requires support from the rest of the system (resolving the task configuration inconsistencies requires support from the connector instance to regenerate updated configs), this class exposes not only the current set of configs, but also which connectors have inconsistent data. This allows users of this class (i.e., Herder implementations) to take action to resolve any inconsistencies. These inconsistencies should be rare (as described above, due to compaction combined with leader failures in the middle of updating task configurations).
Note that the expectation is that this config storage system has only a single writer at a time. The caller (Herder) must ensure this is the case. In distributed mode this will require forwarding config change requests to the leader in the cluster (i.e. the worker group coordinated by the Kafka broker).
Since processing of the config log occurs in a background thread, callers must take care when using accessors. To simplify handling this correctly, this class only exposes a mechanism to snapshot the current state of the cluster. Updates may continue to be applied (and callbacks invoked) in the background. Callers must take care that they are using a consistent snapshot and only update when it is safe. In particular, if task configs are updated which require synchronization across workers to commit offsets and update the configuration, callbacks and updates during the rebalance must be deferred.
RestServer
Embedded server for the REST API that provides the control plane for Kafka Connect workers.
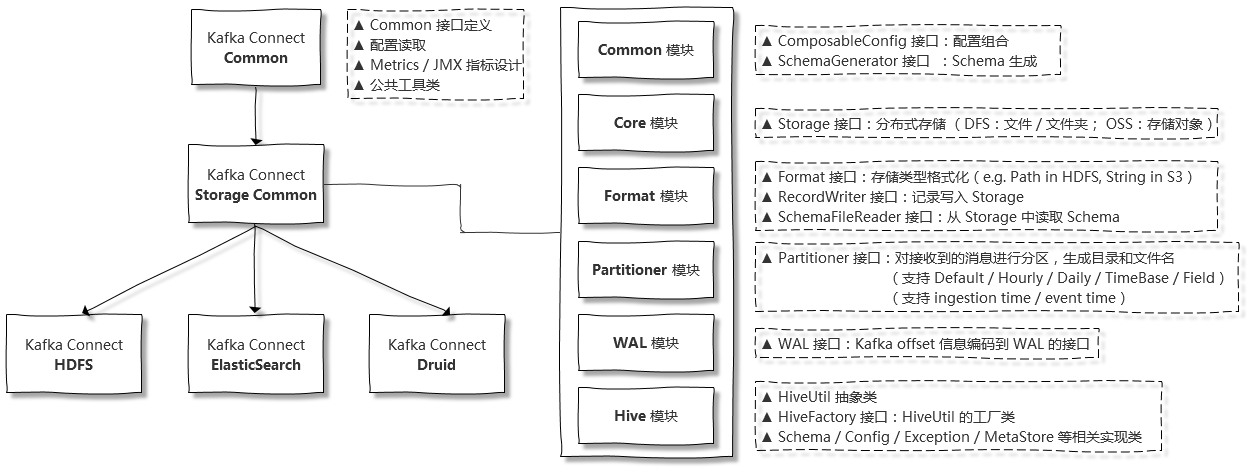
官方对该项目定位描述为简单的一句话:”Kafka Connect common packages for connectors transferring data between Kafka and distributed filesystems or cloud storage”。实际包含了很多实质性内容,Common 模块、Core 模块、Format 模块、Partitioner 模块、WAL 模块、Hive 模块 等