什么是 JVM? A J ava V irtual M achine(JVM)is an abstract computing machine that enables a computer to run a Java program.
为什么要有 JVM? 跨平台性 JVM 的存在,使得 Java 程序 能够轻易地在多平台上移植,基本上脱离了对硬件的依赖性(这也满足了 David Parnas 的 “信息隐藏 ” 准则)
多语言性 因为底层 JIT 编译优化、高效 GC、JUC 对多线程并发编程的支持,以及社区中海量成熟的库 等优点,使得很多语言 都开发出可运行在 JVM 上的版本
同时,多语言混合编程成为一种趋势,在需要快速开发、灵活部署 和 针对特定问题的 DSL 等场景下,选择恰当的 JVM-hosted language,可以最大化原有代码的价值
那么,在日常的开发过程中,究竟应该如何运用 JVM 的知识,来逐步提高实际编程水平呢? 上下而求索后,找到了以下几个层面作为出发点
编码层面 递归 vs 尾递归 循环调用 1 2 3 4 5 6 7 8 9 10 11 12 13 14 15 16 17 18 19 20 21 22 def inc Int ): Int = i + 1 # 10 亿次 for 循环调用 0 : aload_0 | 从局部变量 0 中装载引用类型值1 : getfield #29 4 : getstatic #33 7 : aload_0 | 从局部变量 0 中装载引用类型值8 : getfield #29 11 : getfield #38 14 : invokevirtual #42 17 : putfield #38 20 : return | 从方法中返回,返回值为 void# 被调用的累加方法 0 : iload_1 | 从局部变量 1 中装载 int 类型值入栈1 : iconst_1 | 1 (int) 值入栈2 : iadd | 将栈顶两 int 类型数相加,结果入栈3 : ireturn | 返回 int 类型值10 亿次循环,大约 4014 ms
递归 1 2 3 4 5 6 7 8 9 10 11 12 13 14 15 16 17 18 19 20 21 22 def rec Int ): Int = { if (i == 1 ) return 1 rec(i - 1 ) + 1 } 0 : iload_1 | 从局部变量 1 中装载 int 类型值1 : iconst_1 | 1 (int) 值入栈2 : if_icmpne 7 | 若栈顶两 int 类型值前小于等于后则跳转5 : iconst_1 | 1 (int) 值入栈6 : ireturn | 返回 int 类型值7 : aload_0 | 从局部变量 0 中装载引用类型值8 : iload_1 | 从局部变量 1 中装载 int 类型值9 : iconst_1 | 1 (int) 值入栈10 : isub | 将栈顶两 int 类型数相减,结果入栈11 : invokevirtual #24 14 : iconst_1 | 1 (int) 值入栈15 : iadd | 将栈顶两 int 类型数相加,结果入栈16 : ireturn | 返回 int 类型值1 万次递归,耗时 1 ms,速度低下的同时,超过一定数量(≈14940 ),还会报错 StackOverflowError
尾递归 1 2 3 4 5 6 7 8 9 10 11 12 13 14 15 16 17 18 19 20 21 22 23 24 @tailrec def tailRec Int , iterator: Int ): Int = if (iterator > 0 ) tailRec(i + 1 , iterator - 1 ) else i 0 : iload_2 | 从局部变量 2 中装载 int 类型值入栈1 : iconst_0 | 0 (int) 值入栈2 : if_icmple 16 | 若栈顶两 int 类型值前小于等于后则跳转5 : iload_1 | 从局部变量 1 中装载 int 类型值入栈6 : iconst_1 | 1 (int) 值入栈7 : iadd | 将栈顶两 int 类型数相加,结果入栈8 : iload_2 | 从局部变量 2 中装载 int 类型值入栈9 : iconst_1 | 1 (int) 值入栈10 : isub | 将栈顶两 int 类型数相减,结果入栈11 : istore_2 | 将栈顶 int 类型值保存到局部变量 2 中12 : istore_1 | 将栈顶 int 类型值保存到局部变量 1 中13 : goto 0 | 无条件跳转到指定位置16 : iload_1 | 从局部变量 1 中装载 int 类型值入栈17 : ireturn | 返回 int 类型值10 亿次尾递归,大约 1 ms
通过以上 Scala 代码 和 对应的 Bytecode 可以分析得出,尾递归 作为递归的一种特殊情况,既保证了 代码的 简洁性
也因为,尾递归的调用处于函数的末尾,之前函数累计下的所有信息都可以抹除掉。不需要像递归一样,在每次调用之后,都要存储 寄存器值、返回地址 等信息,从而可以避免 栈空间上的消耗,即同时保证了程序的 高效性
Tips: Full code is here .
并发编程 ReentrantReadWriteLock 锁的公平性 提到并发编程,里面可以涉及的东西,包括 线程、锁、多线程、互斥同步、并行、并发(模型)、线程安全、内存模型 等等,足以写成好几本书。但是,这里我们只就一点来讨论,ReentrantReadWriteLock 锁的公平性
首先,我们需要明确 公平锁(Fair)和 非公平锁(Nonfair)两者在锁机制上有什么区别?前者,加锁前检查是否有排队等待的线程,优先执行已经在排队等待的线程,保证先来先得;后者,则是加锁时不考虑队列中等待的线程,直接尝试获取锁,获取不到再加到队尾等待
因此,重入读写锁默认的 非公平锁 ,可以避免 ReentrantLock 独占锁带来的吞吐量问题
那么,进一步思考之后,新问题来了:在什么样的场景下,ReentrantReadWriteLock 的公平锁反而会是更佳的选择呢,为什么,又该怎么做?
1 2 3 4 5 6 7 8 9 10 11 12 13 14 15 16 17 18 19 20 21 22 23 24 25 26 27 28 29 30 31 32 33 34 35 36 37 38 39 40 41 42 43 44 45 46 47 48 49 50 51 52 53 54 55 56 57 58 59 60 class ReentrantLockFairness { static Lock FAIR_LOCK = new ReentrantLock (true ); static Lock UNFAIR_LOCK = new ReentrantLock (); static class Fairness implements Runnable { private Lock lock; Fairness(Lock lock) { this .lock = lock; } @Override public void run () { for (int i = 0 ; i < 5 ; i++) { lock.lock(); try { System.out.print(Thread.currentThread().getName()); } finally { lock.unlock(); } } } } } @Test public void fair () throws Exception { Thread thread; for (int i = 0 ; i < 5 ; i++) { thread = new Thread (new ReentrantLockFairness .Fairness(ReentrantLockFairness.FAIR_LOCK)); thread.setName(i + " " ); thread.start(); } Thread.sleep(1000 ); } @Test public void unfair () throws Exception { Thread thread; for (int i = 0 ; i < 5 ; i++) { thread = new Thread (new ReentrantLockFairness .Fairness(ReentrantLockFairness.UNFAIR_LOCK)); thread.setName(i + " " ); thread.start(); } Thread.sleep(1000 ); }
实际在使用的时候,公平锁 只需要在构造参数中设置即可,内部 AQS (A bstractQ ueuedS ynchronizer)中,利用 相对 ALock 而言空间复杂度更低的 CLH 队列锁 来实现公平性
同时,共享锁 和 独占锁 分别实现了 读写操作,从而读操作之间是没有竞争冲突的,因此 ReentrantReadWriteLock 的最适场景是 读多于写
Tips: Full code is here and here .
synchronized 的性能之争 在低并发的情况下($threads \lt 4$),高版本的 JDK 里面 synchronized 实现同步的性能更高。超过 15 个线程之后,则建议使用 ReentrantLock 可重入锁进行并发控制
如果可以使用 ConcurrentHashMap / LongAdder (分段锁)实现的应用场景,则尽量避免使用 synchronized 进行实现
另一方面,synchonrized 方法适用于重复 “释放锁,又获取锁” 的场景。我们可以利用 synchronized 的方法块使得锁,一直被持有,从而提高性能。例如,下面这个 StringBuffer 的场景,增加了 synchronized 块之后,可以使得性能与 StringBuilder 几乎无异
1 2 3 4 5 6 7 StringBuffer buffer = new StringBuffer ();synchronized (buffer) { for (int i = 0 ; i < 9999999 ; i++) { buffer.append(i); buffer.delete(0 , buffer.length() - 1 ); } }
Tips: Full code is here .
参数调优层面 TimeSort 描述 这里,列举技术群(群号见本文末尾)里讨论过的一个问题:ResourceManager crash because TimSort [YARN-4743 ]
分析 依据报错信息,可定位出 Yarn 中 MergeSort 存在问题。随后,怀疑是 JDK7 中为了修复 JDK 本身的漏洞:比较器里面比较的两个值时,如果这两个值同时为空的话,则传入的顺序将决定比较的结果,因而破坏了比较器的 “传递性”。从而,使用 TimSort 替换了默认的 MergeSort 增强了 Comparator 的实现约束。更多可参见 Oracle 官网上已修复的 bugs 的归档列表:JDK-6804124 : Replace “modified mergesort” in java.util.Arrays.sort with timsort
方案 最快的解决方式,便是屏蔽 JDK7 中新增的 “传递性” 检查(其实是一种倒退)。具体方式为,在 JVM 中配置 java.util.Arrays.useLegacyMergeSort=true,或者,在程序中设置对应的环境变量 System.setProperty("java.util.Arrays.useLegacyMergeSort", "true")
补充 最终,该问题在 Hadoop3.x 中得到解决,官方修复了传递性问题,使其满足 TimSort 的规范
G1GC 详见:《ZooKeeper 原理与优化 - G1GC 》
LongAdder 详见:《ZooKeeper 原理与优化 - LongAdder 》
AlwaysPreTouch 详见:《ZooKeeper 原理与优化 - swappiness 》
语种层面 在不同应用场景下,我们要如何选择出合适的 JVM 语言,来满足各种各样的开发需求呢?
一方面,我们可能需要 Java、Scala 此类静态编译的语言,通过编译时检查,来保证代码的安全性和一致性;而另一方面,则希望能够借助 JPython、Groovy 此类的动态语言,快速开发出我们想要的功能。下面,我们举两个比较常见的场景
Scala 其一,利用 Scala 的表达性来编写 Scala Tester ,使得单元测试的代码,更具有可读性
1 2 3 4 5 6 7 8 9 10 11 12 13 14 15 16 17 18 19 20 21 object DefineA def main Array [String ]) { bigMistake() } @DefineAnnotation def bigMistake Unit = { println("bigMistake..." ) } } abstract class UnitTestStyle extends FlatSpec with Matchers with OptionValues with Inside with Inspectors class DefineATest extends UnitTestStyle "DefineA's bigMistake method" should "output a information" in { new DefineA } }
Tips: Full code is here .
Groovy 其二,利用 Groovy 的简洁语法、开放类特性等,来完成 DSL
1 2 3 4 5 6 7 8 9 10 11 12 13 14 15 16 17 18 19 20 21 22 23 24 25 26 27 28 29 30 31 32 33 34 def invokeMethod(String name, args) { print "<${name}" args.each { arg -> if (arg instanceof Map) { arg.each { print " ${it.key} ='${it.value}' " } } else if (arg instanceof Closure) { print '>' arg.delegate = this def value = arg.call() if (value) { print "${value}" } } } println "</${name}>" } html { head { meta { } } body { table(style: 'margin:2px;' ) { tr('class' : 'trClass' , style: 'padding:2px;' ) { td { 'http://' } td { 'yuzhouwan.' } td { 'com' } } } } }
内部机制 实时 GC 的原理 首先,需要明确定义什么是实时 GC(RTGC,Real-time Collection),即真正的 RTGC 要求对 GC 中 Mutator 赋值器的中断进行精确的控制
常见的回收器 和 实时 GC 调度策略,有如下实现:
回收器 Collector
工作机制
万物静止式回收器 Stop-the-world collector
Mutator 在内存分配,发现内存不足时,发起 GC
增量式回收器 Incremental collector
要求 Mutator 不仅在内存分配时,还需要在 访问堆(利用 “读写屏障” 的部分有序 来提高性能 )的时候检查是否需要发起 GC
并发回收器 Concurrent collector
GC 与 Mutator 的工作 并发执行
GC 调度 Scheduling
调度机制
基于工作的调度 Work-based scheduling
按照 Mutator 的每个工作单元分配 GC 任务
基于间隙的调度 Slack-based scheduling
实时任务的调度间隙完成 GC
基于时间的调度 Time-based scheduling
预留出独占式的 GC 时间
整合式的调度 税收与开支 策略 Tax-and-Spend
允许不同的线程可以有着不同的 Mutator 使用率,通过线程分配的弹性,尽可能地减少线程中断
实际上,对吞吐量的提高和时间窗口、延时的缩小,在 Tax-and-Spend 调度策略应用到 Metronome 回收器之后,得以证实
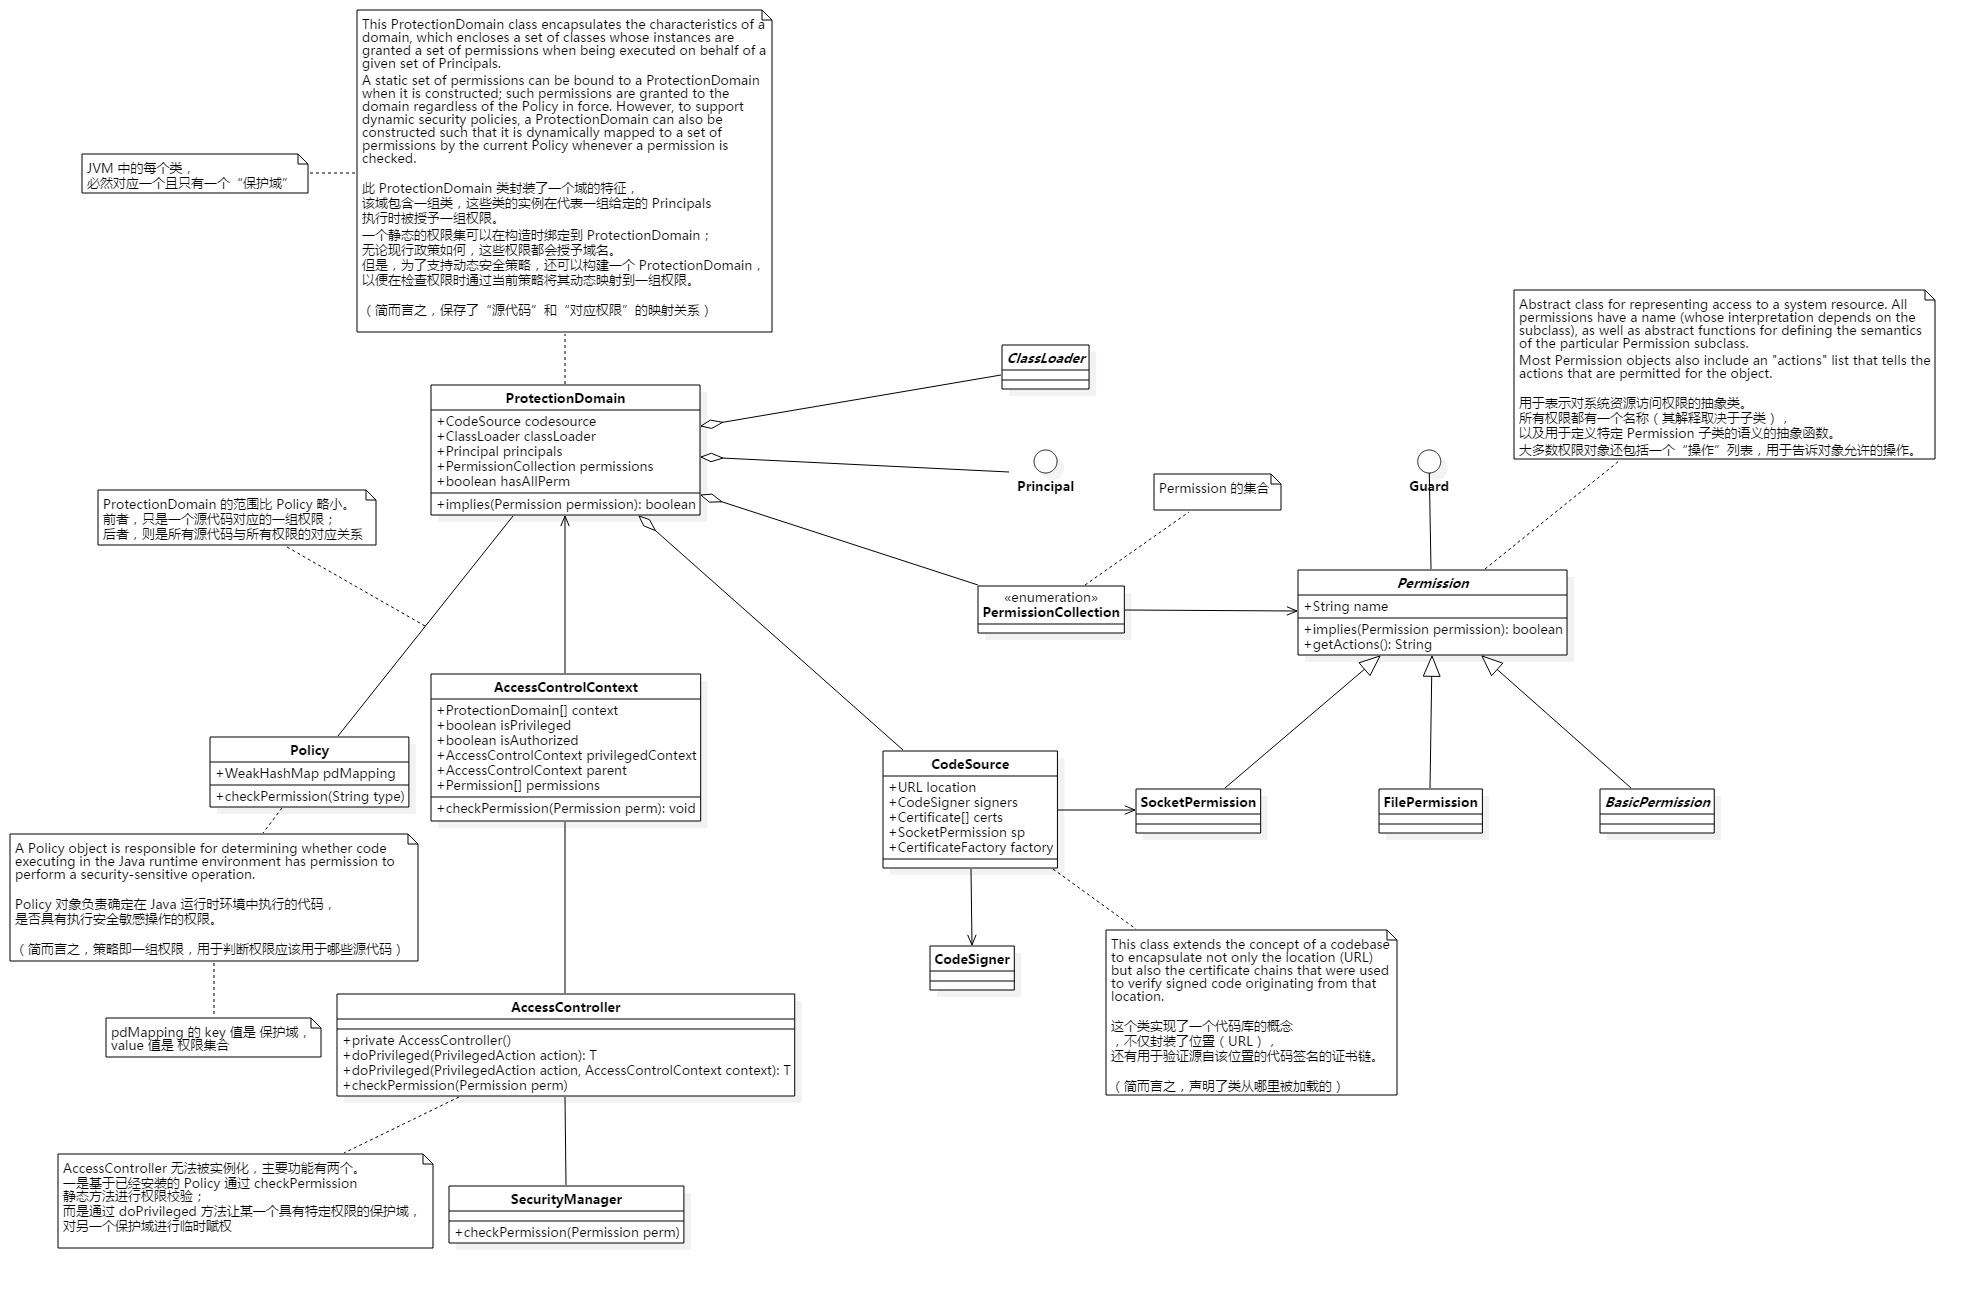
沙箱
(利用 StarUML ™ 绘制而成)
ClassLoader 隔离 初步了解 JVM 沙箱的原理之后,我们便可以尝试解决一些安全性相关的问题了。下面以大型项目中,经常会遇到的依赖冲突问题为例。介绍一种以 ClassLoader 隔离来解决该问题的方式
场景描述 Apache Druid 中 com.sun.jersey(1.19)和 Dataflow 中 org.glassfish.jersey(2.25.1)冲突问题
Tips: Dataflow 是自研的、类似于 Kafka Connect 的框架
解决方案 方案一 Apache Druid 中升级 Jersey(但是大面积改动开源社区的代码,不利于后期升级与维护)
方案二 降级 Dataflow 中的 Jersey(后续再接入其他的组件,Jersey 又不一样了,又该如何协调;降级后,可能部分功能不支持;改造的工作量也不小)
方案三 使用其他的 RESTful 组件(Dropwizard / Ninja / Play / RestExpress / Restlet / Restx / SpringBoot / RestEasy 等)
简单调研后,首选 RestEasy,不像 SpringBoot 那么重,比 Jersey 性能更好
方案四 把 Dataflow 里面的依赖,都用 shade 隐藏起来,可以彻底解决和其他接入组件的依赖冲突的问题,避免后续又发现除了 Jersey 其他的冲突
同时,因为 glassfish 里面存在类似 public static class Builder implements javax.ws.rs.client.Invocation.Builder 全限定名的写法,是无法被 shade 的,所以只能 shade 去隐藏 com.sun.jersey
Tips: Shade 插件的具体使用方法,详见《Maven 高级玩法 》
方案五 使用 ClassLoader 或者 OSGi 进行隔离(同时,还可以将 Dataflow 里面的 K2H / K2ES / K2D 组件做成 热部署 )
另外,前不久刚 release 的 Java 9 中的模块化,也可以完成组件隔离的工作。不过,考虑到需要保证生产级应用的 SLA 要求,暂不采用(截止 2018-6-5 JDK 9 最新 release 版本为 v9.0.4)
优缺点
优势
劣势
ClassLoader
实现简单
复杂功能,实现相对困难
OSGi
OSGi 规范有很多成熟的框架;
框架过重,容易引入风险
Java 9 Module
从 JVM 内核层面对模块化进行支持
目前尚未成熟
编码实战 组件拆分 Tips: 如何利用 assembly 插件对项目进行组件拆分,详见我的另一篇博客《Maven 高级玩法 》
判断是否为父子类关系 1 2 3 4 5 6 7 8 9 10 11 12 13 14 assertEquals(true , A.class.isAssignableFrom(B.class)); assertEquals(true , B.class.isAssignableFrom(C.class)); assertEquals(true , A.class.isAssignableFrom(C.class)); assertEquals(true , A.class.getClassLoader().equals(B.class.getClassLoader())); assertEquals(true , B.class.getClassLoader().equals(C.class.getClassLoader())); interface A {} abstract class B implements A {} class C extends B {}
Tips: Full code is here .
子类强转为父类 1 2 3 4 5 6 7 8 9 10 11 12 13 14 boolean failed = false ;try { B b = (B) C.class.newInstance(); } catch (Exception e) { failed = true ; } assertEquals(false , failed); failed = false ; try { C c = (C) B.class.newInstance(); } catch (Exception e) { failed = true ; } assertEquals(true , failed);
Tips: Full code is here .
对不同 ClassLoader 下的类进行类型强转 1 2 3 4 5 6 7 8 9 10 11 12 13 14 15 16 17 18 19 20 21 22 currentThread().setContextClassLoader(newClassLoader); try (ByteArrayOutputStream baos = new ByteArrayOutputStream (); ObjectOutputStream oos = new ObjectOutputStream (baos)) { oos.writeObject(clazz.newInstance()); try (ByteArrayInputStream bais = new ByteArrayInputStream (baos.toByteArray()); ObjectInputStream ois = new ObjectInputStream (bais) { @Override protected Class<?> resolveClass(ObjectStreamClass desc) { String name = desc.getName(); try { return Class.forName(name, false , newClassLoader); } catch (ClassNotFoundException ex) { throw new RuntimeException (ex); } } }) { return newClassLoader.loadClass(DataflowBase.class.getName()).cast(ois.readObject()); } }
自定义 ClassLoader 1 2 3 4 5 6 7 8 9 10 11 12 13 14 15 16 17 18 19 20 21 22 23 24 25 26 27 28 29 30 31 32 33 34 35 36 37 38 39 40 41 42 43 44 45 46 47 48 49 50 51 52 53 54 55 56 57 58 59 60 61 import java.io.File;import java.net.URL;import java.net.URLClassLoader;public class PluginClassLoader extends URLClassLoader { private static final String JAR_POSTFIX = ".jar" ; private static final String URL_PROTOCOL_FILE = "file" ; static { ClassLoader.registerAsParallelCapable(); } public PluginClassLoader (ClassLoader parent, String... jarPaths) { super (new URL []{}, parent); for (String jarPath : jarPaths) loadJar(jarPath); } public PluginClassLoader (String... jarPaths) { super (new URL []{}, null ); for (String jarPath : jarPaths) loadJar(jarPath); } @Override public Class<?> loadClass(String name) throws ClassNotFoundException { return super .loadClass(name); } @Override protected Class<?> findClass(String name) throws ClassNotFoundException { try { return super .findClass(name); } catch (ClassNotFoundException e) { return PluginClassLoader.class.getClassLoader().loadClass(name); } } private void loadJar (String dirPath) { File dir = new File (dirPath); if (!dir.exists() || !dir.isDirectory()) return ; File[] files; if ((files = dir.listFiles()) == null ) return ; for (File file : files) { if (file == null || !file.isFile() || !file.getName().endsWith(JAR_POSTFIX)) continue ; try { this .addURL(file); } catch (Exception e) { } } } private void addURL (File file) { try { super .addURL(new URL (URL_PROTOCOL_FILE, null , file.getCanonicalPath())); } catch (Exception e) { throw new RuntimeException (String.format("Cannot add url [%s]!" , file.getAbsolutePath()), e); } } }
主体逻辑 1 2 3 4 5 6 7 8 9 10 11 12 13 14 15 16 17 18 19 20 21 22 23 24 25 26 27 28 29 30 31 32 33 34 35 36 37 38 39 40 41 42 43 44 45 46 47 48 49 50 51 52 53 54 55 56 57 58 59 60 61 62 63 64 65 66 67 68 69 70 71 72 (String type) -> AccessController.<AbstractBean>doPrivileged( (PrivilegedAction) () -> { ClassLoader old = currentThread().getContextClassLoader(); try { Class<? extends AbstractBean > parse = (Class<? extends AbstractBean >) AbstractBean.parse(type); final PluginClassLoader plugin = PluginUtils.CLASSLOADERS.get(type); currentThread().setContextClassLoader(plugin); try (ByteArrayOutputStream baos = new ByteArrayOutputStream (); ObjectOutputStream oos = new ObjectOutputStream (baos)) { oos.writeObject(parse.newInstance()); try (ByteArrayInputStream bais = new ByteArrayInputStream (baos.toByteArray()); ObjectInputStream ois = new ObjectInputStream (bais) { @Override protected Class<?> resolveClass(ObjectStreamClass desc) { String name = desc.getName(); try { return Class.forName(name, false , plugin); } catch (ClassNotFoundException ex) { throw new FmException (ex); } } }) { Object readObj = ois.readObject(); return (AbstractBean) readObj; return plugin.loadClass(AbstractBean.class.getName()).cast(readObj); } } } catch (InstantiationException | IllegalAccessException | IOException | ClassNotFoundException e) { throw new RuntimeException (e); } finally { if (old != null ) currentThread().setContextClassLoader(old); } }); public static Class<?> parse(String type) throws FmException { Type subType = Type.OTHER; try { subType = Type.valueOf(type.toUpperCase(Locale.ENGLISH)); } catch (IllegalArgumentException ignored) { } String className = type; if (!Type.OTHER.equals(subType)) className = subType.getTypeName(); return PluginUtils.parseType(type, className, AbstractBean.class); } @SuppressWarnings("unchecked") public static <T> Class<?> parseType(String type, String className, Class<T> base) throws FmException { ClassLoader oldClassLoader = currentThread().getContextClassLoader(); ClassLoader systemClassLoader = ClassLoader.getSystemClassLoader(); try { PluginClassLoader pc; if (!CLASSLOADERS.containsKey(type)) pc = new PluginClassLoader (systemClassLoader, getPluginPathByTypeName(type), getCommonPath()); else pc = CLASSLOADERS.get(type); currentThread().setContextClassLoader(pc); Class<?> baseClazz = pc.loadClass(base.getName()); Class<?> subClazz = pc.loadClass(className); if (baseClazz.isAssignableFrom(subClazz)) { CLASSLOADERS.put(type, pc); return subClazz; } else throw new RuntimeException (String.format("Class %s is not a child of %s!" , className, base.getName())); } catch (ClassNotFoundException e) { throw new RuntimeException ("Unable to load type: " .concat(className), e); } }
Tips: Full code is here .
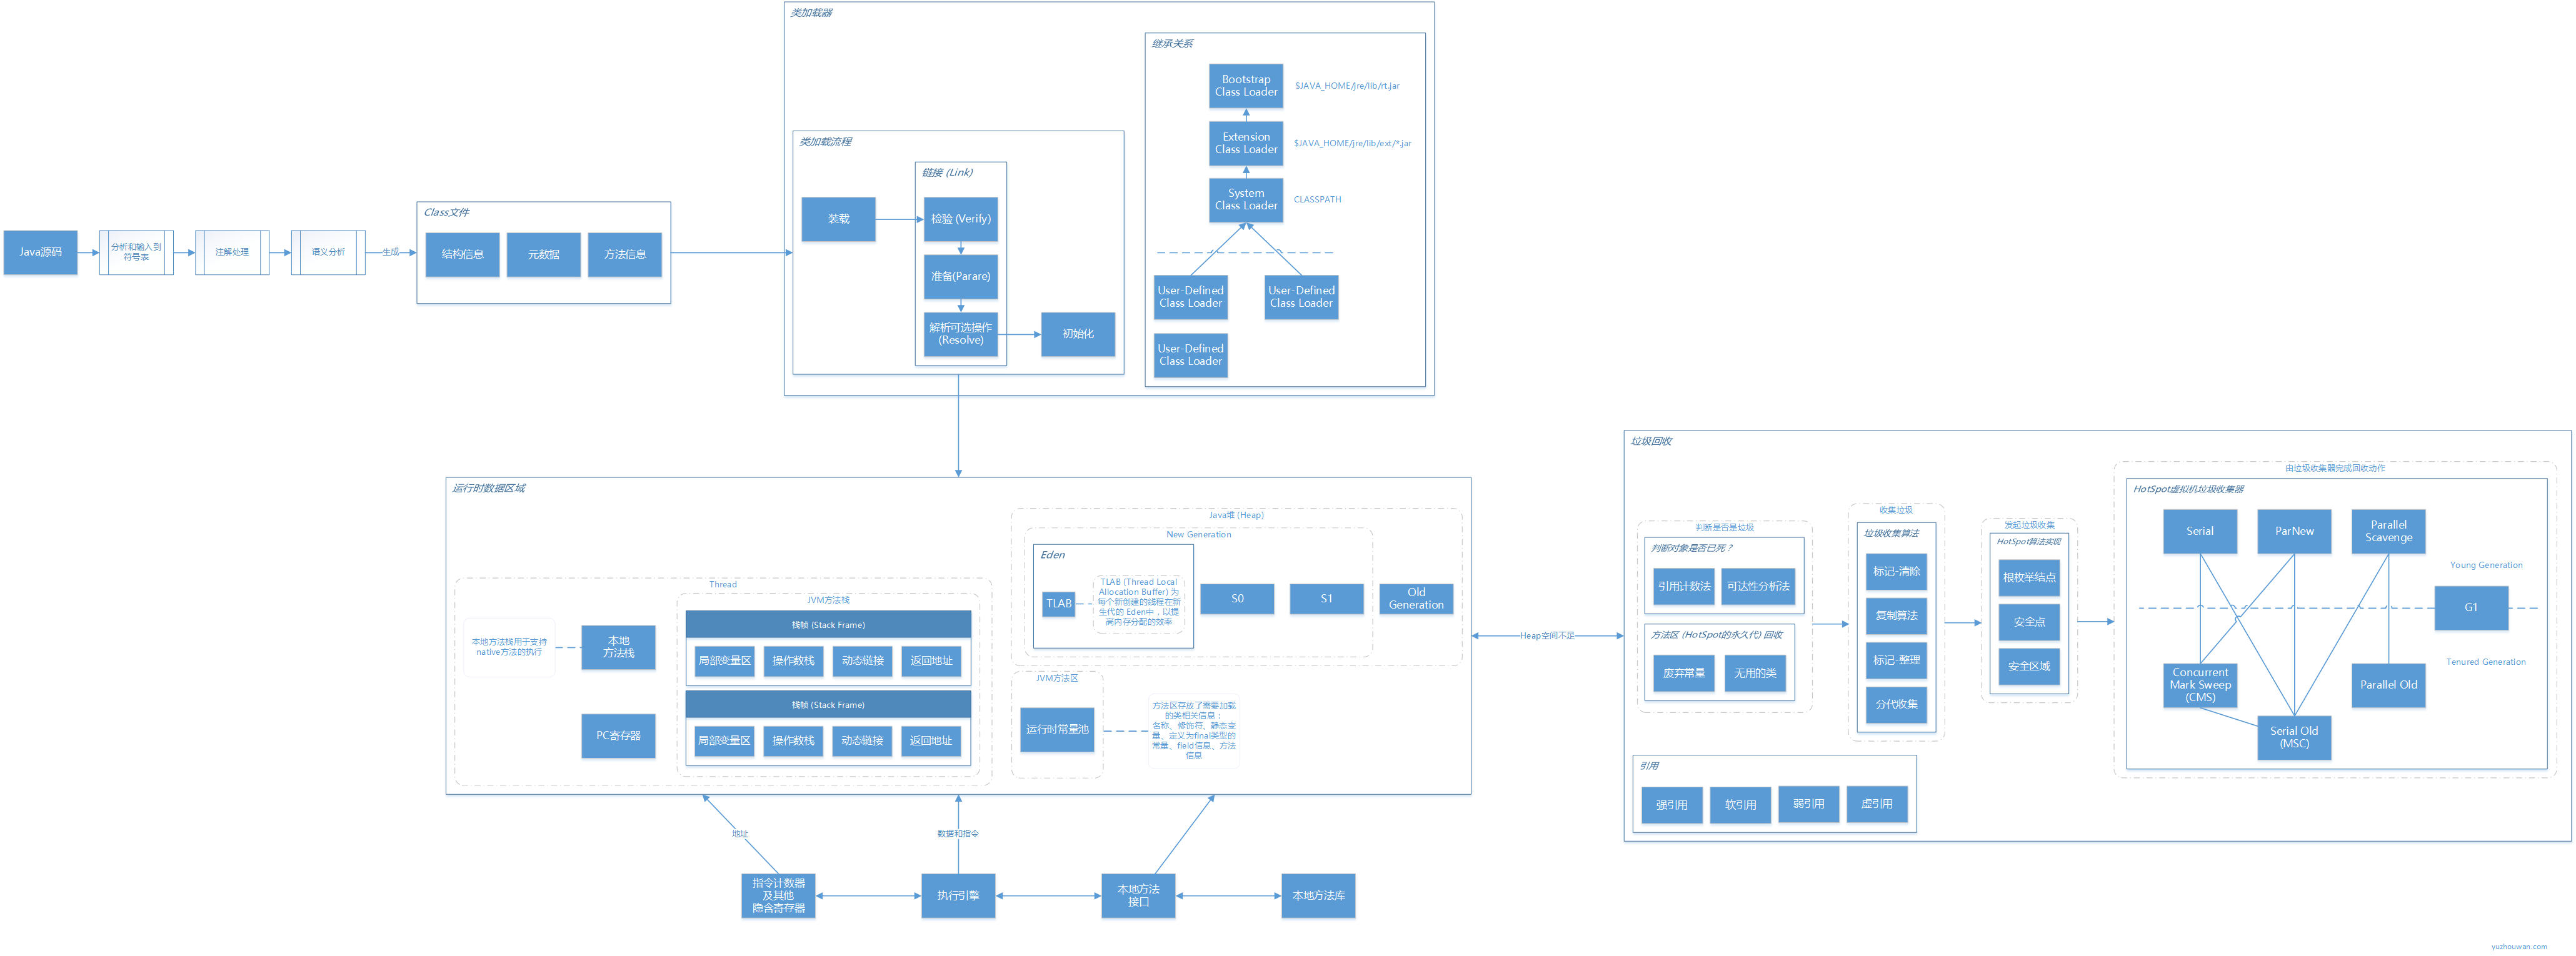
内存模型 内存模型中,主要的组成分为 主内存 和 工作内存 两部分(线程访问工作内存,工作内存通过 8 种原子性的操作,来和主内存交互),特性包括 原子性 、可见性 和 有序性 (其中,有序性 由 volatile / synchronized / happens-before 原则 来保证)
(利用 Visio ™ 绘制而成)
相信熟知 JVM 相关知识,对于提升日常编程水平,还有很多方面可以探索。限于本人有限的水平,暂时只能总结出以上几点。希望此文能起到抛砖引玉的作用,期待各位精彩的观点和建议 ^_^
群名称
群号
人工智能(高级)
人工智能(进阶)
大数据
算法
数据库