人工智能

什么是人工智能

 人工智能Artificial Intelligence, AI)亦称机器智能,是指由人工制造出来的系统所表现出来的智能。 — wikipedia.org

 从深蓝到 AlphaZero,再到 StyleGANGPT,人工智能的智力水平、学习能力和普适性,正在以爆炸式地速度快速发展;
 从棋类到医学,再到绘画和聊天,人工智能开始在各类应用领域大展身手;
 从 CPU 到 GPU,再到 TPU 和 IPU,人工智能的计算能力正向着无法穷举的极限不断逼近 …

 但是,我们并不浮躁,踏踏实实地点亮 AI 知识树的每个枝叶,才是我们每位富有科学精神的人所应该做的

关于本文

 我们将分为三块对 AI 进行诠释

 首先,将介绍人工智能的主流思想实用技巧,通过一些耳熟能详的有趣定理,我们可以对人工智能有些直观、初步的认识;随后,言归正传,我们将开始接触 AI 领域的几大理论支柱,由浅入深地学习 统计学微积分线性代数概率论 等知识体系;最后,落地到实践,我们需要紧跟人工智能的技术发展前沿,对重大的突破性项目进行了解、学习,以及运用。如此,对人工智能领域进行横向分层,可以很方便地找到我们学习的突破点

 不过,出于文章编排的考虑,可能部分编码就要放在其他博文中了,如有不便,还望见谅(Python、Prolog、R、Java)。本文持续更新中,若有不妥之处,还请不吝赐教哈 (^o^)/

主流思想

演绎法 & 溯因法 & 归纳法

(利用 Axure™ 绘制而成)

实用技巧

Occam 剃刀原理

 奥卡姆剃刀(Occam´s Razor),意为简约之法,是由 14 世纪逻辑学家、圣方济各会修士奥卡姆的威廉提出的一个解决问题的法则,即"切勿浪费较多资源,去做'用较少的资源,同样可以做好'的事情",相同思想见于郑板桥的删繁就简三秋树

 在机器学习中的解释,就是 在所有可能选择的模型中,能够很好地解释已知数据且十分简单的才是最好的模型。并由此引入了正则化的理念。正则化方法的思想是,处理最优化函数问题时,在目标函数中加入对参数的约束惩罚项,从而达到简化模型的目的。其中,L0,L1 和 L2 范数 指的就是三种不同惩罚函数的形式,用数学公式来表达就是 $L_p$ = $\mid\mid\beta\mid\mid_p$ = $(\mid \beta_1 \mid ^p + \mid \beta_2 \mid^p$ $+ \ldots +$ $\mid\,\beta_n \mid^p)^{\frac1p}$

  • L0 范数 是指向量中非 0 元素的个数(如果我们用 L0 范数来规则化一个参数矩阵 W 的话,就是希望 W 的大部分元素都是 0,即让参数矩阵 W 是稀疏的)
  • L1 范数 是指向量中各系数绝对值之和(又称为 LASSO
  • L2 范数 是指向量中各系数平方和的平方根(在计量经济学里面,它又被称为岭回归)

大数定律

 大数定律又称大数法则、大数律,是描述相当多次数重复实验的结果的定律。根据这个定律知道,样本数量越多,则其平均就越趋近期望值

 在概率论中,细分为弱大数定律强大数定律

前要定义

 独立同分布的随机变量序列:$X_1, X_2, \dots, X_n$

 样本均值:$M_n = \frac{ \sum_{i=1}^nX_i }n$

 当样本量很大的时候,从 $X$ 抽取的样本平均值:$E[X]$(可得,$E[M_n] = \mu$)

 设在某一试验中,$A$ 是一个事件,满足条件 $P(A) > 0$,又设 $X$ 和 $Y$ 是在同一个试验中的两个随机变量。若 $X$ 和 $Y$ 相互独立,则 $var(X + Y) =$ $var(X) + var(Y)$(可得,$var(M_n) = \frac{ \sigma^2 }n$)

弱大数定律

 设 $X_1, X_2, \dots, X_n$ 独立同分布,其公共分布的均值为 $\mu$,则对任意的 $\epsilon \gt 0$,当 $n \to +\infty$ 时,$P(\mid M_n - \mu \mid \ge \epsilon) = $ $P(\mid \frac{ \sum_{i=1}^n{X_i} }n - \mu\,\mid$ $ \ge \epsilon) \to 0$

 弱大数定律出给的结论是,$M_n$ 落在 $[\mu - \epsilon, \mu + \epsilon]$ 区间(即 $\mu$ 的 $\epsilon$ 邻域)内的概率会非常大(也可以表述为 “$M_n$ 收敛于 $\mu$”)。同时可以看出,随着 $n$ 值的增大,$M_n$ 落在 $\mu$ 邻域内的概率也会变大

强大数定律

 设 $X_1, X_2, \dots, X_n$ 是均值为 $\mu$ 的独立同分布随机变量序列,则样本均值 $M_n$ 以概率 $1$ 收敛于 $\mu$,即 $P(\lim_{n \to +\infty}M_n = \mu) = 1$

 在无穷序列中,弱大数定律无法给出到底存在多少元素显著性偏离了 $\mu$。而利用强大数定律则可得出,$M_n$ 以概率 $1$(即几乎处处)收敛于 $\mu$ 的结论,意味着对于任何 $\epsilon \gt 0$,偏离 $\mid M_n - \mu\mid$ 超过 $\epsilon$ 的元素只会存在有限多个

统计学

什么是统计学

统计学(Statistics)是一套用以收集数据分析数据由数据得出结论的概念、原则和方法。 — Gudmund R.Iversen

主要思想

随机性 & 规律性

 随机性,指不能预测某一特定事件的结果
 规律性,指从大量的收集数据中发现的模式

 可以说,统计就是在随机性中寻找规律性

数据集描述

数据分布中心

均值(Mean)

 算术平均值:$\mu = \frac{ \Sigma X }N$ 或 $\bar x = \frac{ \sum_{i=1}^n X_i }n$

中位数(Median)

 高偏斜分布(存在异常值)的情况下,中位数则能更好地反映数据的集中趋势

众数(Mode)

 平均分布的情况下,则无法得出众数

 另外,在正太分布的数据集中,均值、中位数、众数均相等

稳健统计

值域(Range)

 函数的值域(Range)是由定义域中一切元素所能产生的所有函数值的集合(也被称为函数的像

四分位数(Quartile)

 统计学分位数的一种,即把所有数值由小到大排列并分成四等份,处于三个分割点位置的数值就是四分位数

 数学表达式:$L_p = n \frac{ p }{100}$,其中,$p$ 为四分位的百分比值,$n$ 为样本总量

四分位距(IQR, Interquartile Range)

 第三四分位数和第一四分位数的差距,即 $Q_3 - Q_1$

 可以使用 $Q_1-1.5 \cdot IQR$ 和 $Q_3+1.5 \cdot IQR$ 区间,来判断离群值(Outlier)
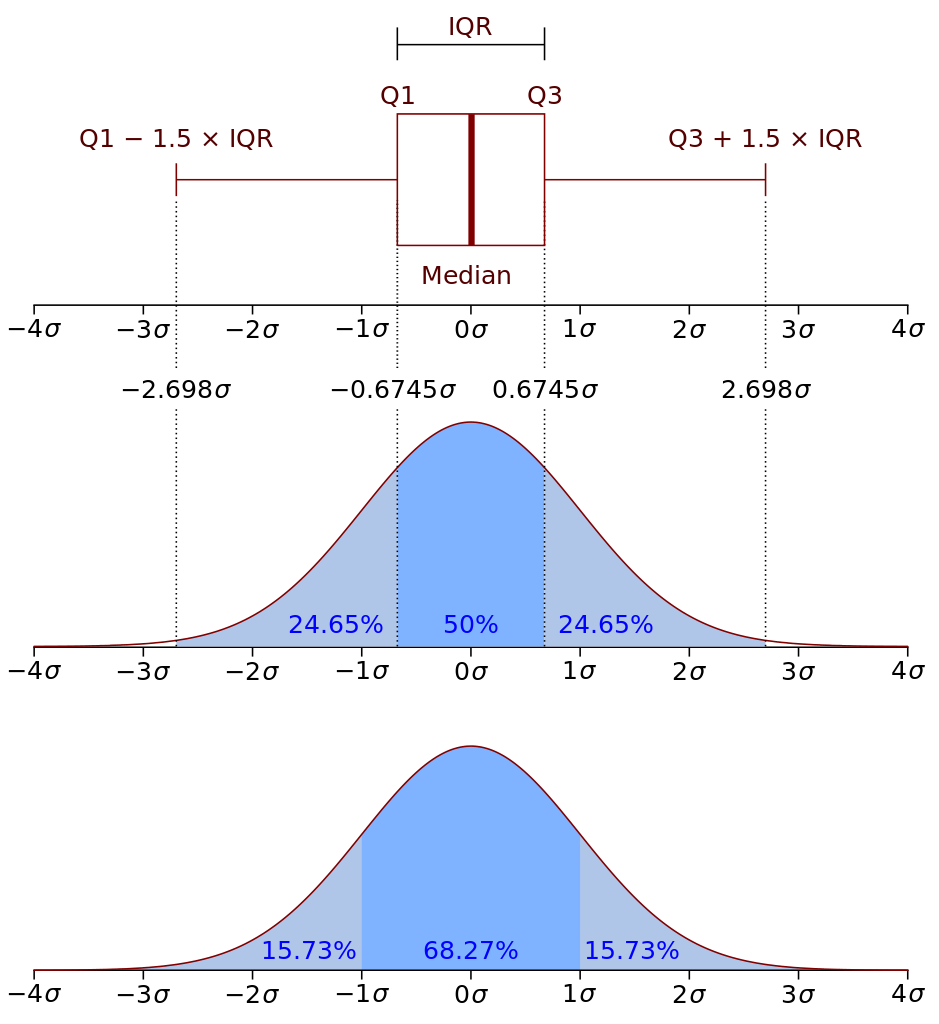
(图片来源:wikipedia.org™,已确认版权为 CC BY 2.5 协议)
四分位差(QD, Quartile Deviation)

 四分位差是指 $Q_1$ 和 $Q_3$ 的差距,即 $QD = Q_3 - Q_1$(这里单独提出来,是因为旧版教材中的公式为 $QD = \frac{ Q_3 - Q_1 }2$)

偏差

离均差(Deviation from Average)

 $x_i - \bar x$

平均偏差(Average Deviation)

 $\frac{ \sum_{i = 1}^n (x_i - \bar x) }n$

标准偏差(Standard Deviation)

 标准差的概念,由卡尔·皮尔逊引入到概率统计中,是测量离散程度最为常用的方法。公式是 $\sigma = \sqrt{\frac{ \sum_{i=1}^n(x_i - \bar x)^2 }n}$ = $\sqrt{\frac{ (x_1 - \bar x)^2 + (x_2 - \bar x)^2 + \ldots + (x_i - \bar x)^2 }n}$。该方法避免了负值的出现,并且能够保证得到的结果,具备和被测量数据一样的度量单位,方便进行比对

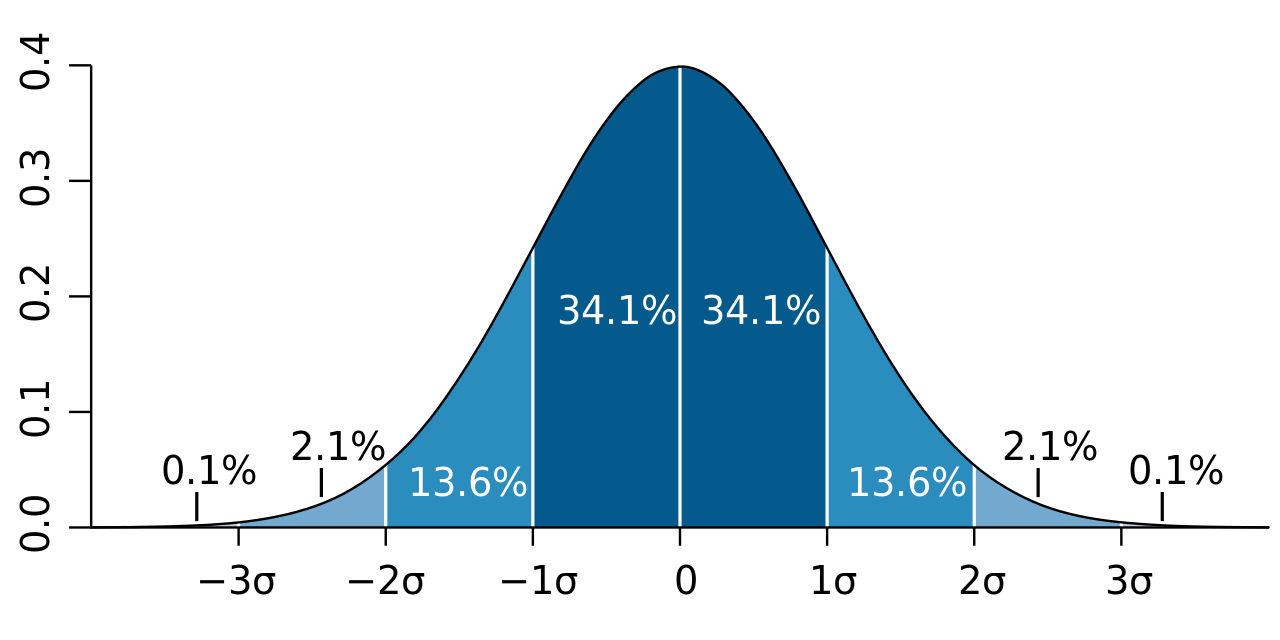
 标准差还可以用于判断数据集是否属于正态分布。若其符合正态概率分布,则如下图所示,约68.3% 的数值会分布在距离 平均值$\bar x$ 的 1个 标准差$\sigma$ 范围之内,约95.4% 的数值分布在距离 平均值$\bar x$ 的 2个 标准差$\sigma$ 范围之内,以及 约99.73% 的数值分布在距离 平均值$\bar x$ 的 3个 标准差$\sigma$ 范围之内。这一现象我们称之为 “68-95-99.7法则” 或 “经验法则

(图片来源:wikipedia.org™,已确认无版权)
贝塞尔校正

 又因为样本抽选的数据,很容易落入平均值附近,导致低估了整体数据集的偏差。因此引入了贝塞尔校正,使得标准差的值变大,来更好地表达样本标准差Sample Standard Deviation)

 $s = \sqrt {\frac{ \sum_{i=1}^n(x_i - \bar x)^2 }{n - 1}}$

回归分析

定义

 回归分析Regression Analysis)是一种确定两种或多个变量间相互依赖的定量关系的统计分析方法

组成

 包括未知参数 $\beta$(表示一个标量或者向量)、自变量 $X$ 和 因变量 $Y$
 回归模型则是将三者关联起来,表示为 $Y \approx f(X, \beta)$

种类

分类方式

 按照涉及的变量的多少,分为一元回归和多元回归分析
 按照因变量的多少,分为简单回归分析和多重回归分析
 按照自变量和因变量之间的关系类型,分为线性回归分析和非线性回归分析

常见类型
一元线性回归

 如果在回归分析中,只包括一个自变量和一个因变量,且二者的关系可用一条直线近似表示,这种回归分析称为一元线性回归分析

多重线性回归

 如果回归分析中包括两个或两个以上的自变量,且自变量之间存在线性相关,则称为多重线性回归分析

多元线性回归

 多元线性回归可表示为 $Y = a + b_1 X_1 + b_2 X_2 + e$,其中 $a$ 表示截距,$b$ 表示直线的斜率,$e$ 是误差项。多元线性回归可以根据给定的预测变量 $s$ 来预测目标变量的值

微积分

基本概念

增量

 点 $(x_1, y_1)$ 移动到 点 $(x_2, y_2)$,其坐标的增量为 $\Delta x = x_2 - x_1$ 和 $\Delta y = y_2 - y_1$

平行线 & 垂直线

 斜率 $m$ = $\frac{ \Delta y }{ \Delta x }$,直线 $L_1$ 和 $L_2$ 的斜率分别记作 $m_1$ 和 $m_2$
 如果 $m_1 = m_2$,则 $L_1$ 与 $L_2$ 平行或重合,记作 $L_1 \mid \mid L_2$;如果 $m_1m_2 = -1$,则两者互相垂直,记作 $L_1$ ⊥ $L_2$

函数

定义

 函数是将一个对象转化为另一个对象的规则 $f$。函数必须要给每个有效输入指定唯一的输出。这里我们输入的集合 $x$ 称之为定义域、输出的集合 $f(x)$ 称之为值域

常用集合

 $Z$ 整数集,$N$ 非负数集,$Q$ 有理数集

常用函数的定义域和值域
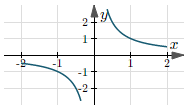
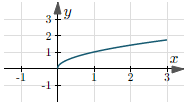
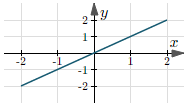
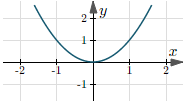
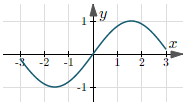
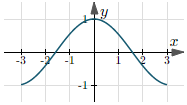
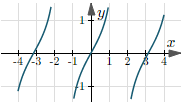
函数 定义域 值域 图形
$y = \frac{ 1 }{ x }$ $(-\infty, +\infty)$ $(-\infty, 0) \,\bigcup\, (0, +\infty)$
$y = \sqrt{x}$ $[0, +\infty)$ $[0, +\infty)$
$y = x$ $(-\infty, +\infty)$ $(-\infty, +\infty)$
$y = x^2$ $(-\infty, +\infty)$ $[0, +\infty)$
$y = \sin(x)$ $(-\infty, +\infty)$ $[-1, 1]$
$y = \cos(x)$ $(-\infty, +\infty)$ $[-1, 1]$
$y = \tan(x)$ $(-\frac{ \pi }{ 2 } + 2k\pi,$ $\frac{ \pi }{ 2 } + 2k\pi)$, $k \in Z$ $(-\infty, +\infty)$
(使用 intmath.com 绘制而成)

反函数

 对于 $y = f(x)$,如果将其逆转变换后,仍然满足 $f(x) = y$,则称新函数为 $f$ 的反函数,并记作 $f^{-1}$

函数复合

 $f(x) = h(g(x)) = h \circ g$

奇偶性

奇函数

 $f(x) = -f(-x)$

偶函数

 $f(x) = f(-x)$

线性函数

 $f(x) = mx + b$

点斜式

 直线通过一个点 $(x_0, y_0)$,斜率为 $m$,则方程可表示为 $y - y_0 = m (x - x_0)$
 直线通过两个点 $(x_1, y_1)$ 和 $(x_2, y_2)$,则斜率为 $m$ = $\frac{ y_2 - y_1 }{ x_2 - x_1 }$ = $\frac{ \Delta y }{ \Delta x }$,则方程式表示为 $y - y_1$= $\frac{ \Delta y }{ \Delta x }$ $(x - x_1)$
 已知斜率 $m$ 和截距 $b$,可以直接求得直线方程式 $y = m(x - 0) + b = mx + b$

多项式

 $p(x)$ = $a_nx^n + \ldots + a_2x^2 + a_1x + a_0$

二次函数

 二次函数是一个最高次为 $2$ 的多项式,表示为 $p(x) = ax^2 + bx + c$

 依据 $\Delta = b^2 - 4ac$ 判别式,可知:

  • 当 $\Delta \gt 0$ 时,$p(x)$ 有两个不同解,且解为 $\frac{ -b \pm \sqrt{b^2 - 4ac} }{ 2a }$;
  • 当 $\Delta = 0$ 时,$p(x)$ 有两个相同的解,即只有一个解
  • 当 $\Delta \lt 0$ 时,$p(x)$ 无解
实例
求解 $3x^2 -5x + 7 = 0$

 因为 $\Delta = (-5)^2 - 4 \cdot 3 \cdot 7$ $= -59 \lt 0$,所有该方程无解

 可以将方程拆解组合,进行证明:

 可见等式左边是恒为非负数的,因此,是不可能存在 $x$ 使等式成立的,即方程无解

有理函数

 若 $p$ 和 $q$ 均为多项式,则形如 $\frac{ p(x) }{ q(x) }$ 的函数,我们称之为 有理函数

指数函数

 $y = a^x$

对数函数

 将 指数函数 以 $y = x$ 做镜像,则得到 $y = \log_a(x)$ 指数函数

带绝对值的函数

求导

分数求导

 $f(x) = \frac{ g(x) }{ h(x) }$ 的导数为 $f^\prime(x) = \frac{ g^\prime(x)h(x)-h^\prime(x)g(x) }{ h(x)^2 }$

复合函数求导

 $(f \circ g)(x)$ 的导数为 $(f \circ g)^\prime(x) = f^\prime(g(x))g^\prime(x)$

极限

定义

邻域

 以点 $x_0$ 为中心的任何开区间,称之为点 $x_0$ 的邻域,记做 $U(x_0)$

  • $\delta$ 邻域

    设 $\delta$ 为正数,则称开区间 $(x_0 - \delta, \, x_0 + \delta)$ 为点 $x_0$ 的 $\delta$ 邻域,记做 $U(x_0, \, \delta)$ = $\{x \mid x_0 - \delta \lt x \lt x_0 + \delta\}$。其中,点 $x_0$ 称为邻域的中心,$\delta$ 为邻域的半径

  • $\delta$ 去心邻域

    $\mathring{U}(x_0, \delta)$ = $\{ x \mid 0 \lt \mid x - x_0 \mid \lt \delta \}$

  • 二维 $\delta$ 邻域

    设 $P_0(x_0, \, y_0)$ 为 $xOy$ 平面上的一个点,$\delta$ 为某个正数,与点 $P_0(x_0, \, y_0)$ 距离小于 $\delta$ 的点 $P(x, \, y)$ 的全体,称之为点 $P_0$ 的 $\delta$ 邻域,记做 $U(P_0, \delta)$ = $\{ x \mid \sqrt{(x - x_0)^2 + (y - y_0)^2} \lt \delta \}$

函数极限

 设函数 $f(x)$ 在点 $x_0$ 的某一去心邻域内有定义,若存在常数 $A$,对于任意给定的 $\epsilon \gt 0$(无论 $\epsilon$ 有多小),总存在正数 $\delta$,使得当 $0 \lt \mid x - x_0 \mid \lt \delta$ 时,对应函数的值 $f(x)$ 都满足不等式 $\mid f(x) - A \mid \lt \epsilon$,则 $A$ 就叫做函数 $f(x)$ 当 $x \to x_0$ 的极限,记做 $\lim_{x \to x_0}f(x)=A$,或 $f(x) \to A$(当 $x \to x_0$)

 换一种说法是,$\lim_{x \to x_0}f(x) = A \Leftrightarrow \forall \epsilon \gt 0$,$\exists \delta \gt 0$,当 $0 \lt \mid x - x_0 \mid \lt \delta$ 时,$\mid f(x) - A \mid \lt \epsilon$

线性代数

基本概念

行列式

 行列式Determinant)是数学中的一个将 $n \cdot n$ 的矩阵 $A$ 映射到一个标量的函数,记作 $det(A)$ 或 $\mid A \mid$。行列式可以看做是有向面积或体积的概念,在欧几里得空间中的推广。或者说,在 $n$ 维欧几里得空间中,行列式描述的是一个线性变换对体积所造成的影响

单位矩阵

 单位矩阵 是主对角线为 $1$,其余元素为 $0$ 的方形矩阵,记作 $I$ 或 $E$

$I_n = \begin{bmatrix} 1 & 0 & \cdots & 0 \\ 0 & 1 & \cdots & 0 \\ \vdots & \vdots & \ddots & \vdots \\ 0 & 0 & \cdots & 1 \\ \end{bmatrix}$

初等矩阵

 初等矩阵(又称为基本矩阵)是由一个 $n$ 阶单位矩阵 $E$,经过一次初等行列变换所得的矩阵。我们称之为 $n$ 阶初等矩阵

增广矩阵

 增广矩阵是由系数矩阵的右边,添上线性方程组等号右边的常数列 得到的矩阵
 方程 $AX=b$ 系数矩阵为 $A$,常数列为 $b$,则它的增广矩阵表示为 $(A \mid b)$,形式如下

 通过对增广矩阵进行初等行变换,可判断线性方程组是否有解,以及化简原方程组,方便求解

实用技巧

消元法

高斯-约当(Gauss-Jordan)消元法

 直接上一个例子,会比较直观一些

 化简到上三角形式方程组后,就可以一眼看出,当自由列取值为 $0$ 时,能得到一个特解:

克拉默法则(Gramer´s Rule)

 可以通过消元代入法,得到 $x_1 = \frac{ b_1a_{22} - b_2a_{12} }{a_{11}a_{22} - a_{12}a_{21}}$,$x_2 = \frac{b_2a_{11} - b_1a_{21}}{a_{11}a_{22} - a_{12}a_{21}}$,换成行列式表达式形式,则可表示为

概率论

集合

 将一些研究对象放在一起,形成集合,而这些对象就称为集合的元素

概率模型

 概率模型是对不确定现象的一种数学描述

主要构成

样本空间

 用 $\Omega$ 表示一个试验中所有可能结果的集合

概率律

 用一个非负数 $P(A)$ 表示某一个事件 $A$ 在试验结果中出现的概率

公理
  • 非负性
    对于一切事件 $A$,满足 $P(A) \geq 0$
  • 可加性
    对于 $A_1, A_2, \ldots, A_n$ 互不相交的集合,满足 $P(A_1 \bigcup A_2 \bigcup \ldots \bigcup A_n)$ = $P(A_1) + P(A_2) + \ldots + P(A_n)$
  • 归一化
    $P(\Omega) = 1$
    综合推导,可得 $P(\emptyset)$ = $1- P(\Omega) + P(\emptyset)$ = $1 - P(\Omega \bigcup \emptyset)$ = $1 - P(\Omega) = 0$
性质
  • 若 $A \subset B$,则 $P(A) \leq P(B)$
  • $P(A \bigcup B)$ = $P(A) + P(B) - P(A \bigcap B)$
  • $P(A \bigcup B)$ $\leq$ $P(A) + P(B)$
  • 由上式推广,可得 $P(A_1 \bigcup A_2 \bigcup \ldots \bigcup A_n)$ $\leq \sum_{i=1}^nP(A_i)$
  • $P(A \bigcup B \bigcup C)$ = $P(A) + P(A^c \bigcap B)$ $+ P(A^c \bigcap B^c \bigcap C)$

技术发展史

机器学习发展总图

To be continued...

深度学习发展总图

graph TD
start[Start] --> nerve_cell(生物神经元)
nerve_cell --> mp_model(MP 模型)
mp_model --> weight{自主学习权重}
weight --> |No| non_perceptron[参数权重需要人为设定]
weight --> |Yes| perceptron(感知器)

perceptron --> bp{BP 反向传播}
bp --> |No| non_mlp[无法解决最简单的线性不可分问题]
bp --> |Yes| mlp(多层感知器)

mlp --> pre_train{预训练 + 激活函数}
pre_train --> |No| no_dnn[局部最优解 + 指数梯度衰减]
pre_train --> |Yes| dnn(深度神经网络)

dnn --> kernal{卷积核}
kernal --> |No| non_cnn[过拟合 + 运算时间成本高]
kernal --> |Yes| cnn(卷积神经网络)

cnn --> directed{神经元间链成有向图}
directed --> |No| non_rnn[无法对事件序列建模]
directed --> |Yes| rnn(递归神经网络)

rnn --> cell{细胞状态}
cell --> |No| non_lstm[无法捕获间隔太长的事件间关系]
cell --> |Yes| lstm(长短期记忆网络)

lstm --> transformer{是否支持 Transformer}
transformer --> |No| non_transformer[无法实现并行处理序列]
transformer --> |Yes| llm(大语言模型)

llm --> e[End?]

麦卡洛克-皮茨神经元模型(McCulloch - Pitts Neuron Model)

 麦卡洛克-皮茨神经元模型McCulloch - Pitts Neuron Model)是模仿生物学神经元功能的简单线性模型,由心理学家 Warren McCulloch 和 数学家 Walter Pitts 在 1943 年提出。该模型针对输入的 $x_1, x_2, \dots, x_n$,分别赋予不同的权重 $w_1, w_2, \dots, w_n$,形成 $f(x, w) = \sum_{i = 1}^nx_iw_i$ 检验函数用以模仿生物神经元的膜电位,再通过 $o_j(t + 1)$ = $f\{[\sum_{i=1}^nw_{ij}x_i(t)] - T_j\}$ 模仿在每个 $t$ 时刻神经元细胞的输出(信号空间的求和与神经元阀值 $T_j$ 差值的正负),完成分类。同时 MP 模型也存在不足之处,即权重需要人为给定,一旦权重分配不合理,将无法得出期望的分类结果

感知器(Perceptron

 感知器Perceptron)是 Frank Rosenblatt 在 1957 年就职于 Cornell 航空实验室(Cornell Aeronautical Laboratory)时所发明的一种人工神经网络。它可以被视为一种最简单形式的前馈神经网络,是一种二元线性分类器。感知器,解决了 MP 模型的无法自主学习的问题,成为第一个能根据每个类别的输入样本来学习权重的模型。此外,Frank Rosenblatt 给出了相应的感知器学习算法,常用的有 感知器学习、最小二乘法和梯度下降法。譬如,感知器利用梯度下降法对损失函数进行极小化,求出可将训练数据进行线性划分的分离超平面,从而求得感知器模型。感知器也被称为 单层人工神经网络,以区别于较复杂的多层感知器Multilayer Perceptron)。尽管结构简单,感知器却能学习并解决相当复杂的问题。不过,感知器存在本质上的缺陷,就是无法处理线性不可分问题

多层感知器(MLP, Multilayer Perceptron)

 多层感知器MLP, Multilayer Perceptron)是一种前馈神经网络(Feedforward Neural Network),映射一组输入向量到一组输出向量。MLP 可以被看作是一个有向图,由多个的节点层所组成,每一层都全连接到下一层。除了输入节点,每个节点都是一个带有非线性激活函数的神经元(或称处理单元)。另外,MLP 是(单层)感知器的推广,摆脱了早期离散传输函数的束缚,使用 激活函数(Sigmoid / Tanh / ReLU / …)模拟神经元对激励的响应,在训练算法上则使用反向传播算法,解决了感知器不能对线性不可分数据进行处理的问题

深度神经网络(DNN, Deep Neural Networks)

 深度神经网络DNN, Deep Neural Networks)是一种判别模型,可以使用反向传播算法进行训练。DNN 通过 “预训练” 和 “ReLU、Maxout 等激活函数” 解决了 多层感知器 中的 “局部最优解” 和 “梯度衰减” 问题。不过,与其他神经网络模型类似,如果仅仅是简单地训练,深度神经网络可能会存在很多问题。常见的两类问题是过拟合(Overfiting)和过长的运算时间

 因为增加了隐藏层,会使得模型对训练数据中较为罕见的依赖关系进行建模,所以深度神经网络很容易出现过拟合现象。对此,可以利用 稀疏($L_1$ 正则化)或者 权重递减($L_2$ 正则化) 等方法在训练过程中减少过拟合现象。另外,还有一种叫做丢弃法(Dropout)的正则化方法,即在训练中随机丢弃一部分隐层单元,来避免对较为罕见的依赖进行建模

 反向传播算法梯度下降法由于其实现简单,并且相比其他方法,能够收敛到更好的局部最优值,因而成为神经网络训练的通行方法。但是,这些方法的计算代价很高,尤其是在训练 DNN 时,因为其规模(即层数和每层的节点数)、学习率、初始权重等众多参数都需要考虑。考虑到时间代价,想要扫描所有的参数是不可行的,因而考虑将多个训练样本组合进行 小批量训练(mini-batching),而非每次只使用一个样本进行训练,从而加速模型训练。而最显著地速度提升来自 GPU,因为矩阵和向量计算非常适合使用 GPU 实现。但使用大规模集群进行 DNN 训练仍然存在瓶颈,因而在并行化方面仍有很大的提升空间

卷积神经网络(CNN, Convolutional Neural Network)

 卷积神经网络CNN, Convolutional Neural Network)是一种前馈神经网络,由哈弗医学院生理学家 Hubel 和 Wiesel 通过对猫视觉皮层细胞的研究,在 1962 年提出了感受野(Receptive Field)的概念,随后在 1984 年日本学者 Fukushima 基于 RF 的概念,设计出了神经感知机(Neocognitron)。其人工神经元可以响应一部分覆盖范围内的周围单元,对于图像处理和语音识别有着出色的表现

 卷积神经网络由一个或多个卷积层和顶端的全连通层(对应经典的神经网络)组成,同时也包括关联权重和池化层(Pooling Layer)。这一结构使得 CNN 能够利用输入数据的二维结构,也可以使用反向传播算法进行训练。相比较其他的前馈神经网络,CNN 通过卷积核控制只在同一个核内的神经元进行全连接,使得需要估计的参数很少,从而在根本上解决了 DNN 的参数膨胀的问题。但是,CNN 仍然存在无法对时间序列进行建模的缺陷

递归神经网络(RNN, Recurrent Neural Networks)

 递归神经网络RNN, Recurrent Neural Networks)是两种人工神经网络的总称。一种是时间递归神经网络(Recurrent Neural Network),另一种是结构递归神经网络(Recursive Neural Network)。前者的神经元间连接构成有向图,而后者利用相似的 神经网络结构 递归构造更为复杂的深度网络。RNN 一般指代 时间递归神经网络。单纯递归神经网络因为无法处理随着递归,权重指数级爆炸或消失的问题(Vanishing Gradient Problem),所以难以捕捉长期时间的关联;而结合不同变种的 LSTM 网络 可以很好解决这个问题

长短期记忆网络(LSTM, Long Short Term Memory Networks

 长短期记忆LSTM, Long Short Term Memory Networks)是 时间递归神经网络(RNN) 的一种,论文首次发表于 1997 年。由于巧妙的设计结构,LSTM 适合于处理和预测时间序列中间隔和延迟非常长的重要事件。因为 时间递归神经网络 和 前馈神经网络(Feedforward Neural Network)接受较特定结构的输入不同,RNN 将状态(Cell State) 在自身网络中循环传递,使得 LSTM 可以接受更广泛的时间序列结构的输入,进而更好地描述动态时间行为

 一般的,LSTM 的表现会比 时间递归神经网络(RNN)及隐马尔科夫模型(HMM)更好,比如用在不分段连续手写识别上。在 2009 年,用 LSTM 构建的人工神经网络模型就赢过了 ICDAR 手写识别比赛冠军。同时,LSTM 还普遍应用于自主语音识别,2013 年运用 TIMIT 自然演讲数据库达成 17.7% 错误率的纪录。而作为非线性模型,LSTM 又可当作复杂的非线性单元用于构造更庞大的深度神经网络

机器学习

 其实将机器学习和深度学习分为两个章节来讲,会容易让人产生错觉,误以为机器学习和深度学习是两个不相干的领域。实际上,后者只是前者的一个子集。针对两者关系,更详细的描述可以参见后面 “AI 到底是什么” 部分

基础概念

分类与回归

 机器学习任务中,预测值为离散类型的,则称该任务为分类任务(Classification);反之,预测值为连续类型的,则称该任务为回归任务(Regression)

贝叶斯定理

描述

 其中,$P(A \mid B)$ 是在 $B$ 发生的情况下 $A$ 发生的可能性,称为 $A$ 的后验概率。相应的,$P(B \mid A)$ 则称为 $B$ 后验概率;$P(A)$ 是不考虑任何 $B$ 方面的因素下 $A$ 发生的可能性,称为 $A$ 的先验概率(或边缘概率)。相应的,$P(B)$ 则称为 $B$ 的先验概率

种类

特征独立性

 按照特征之间独立性的强弱,可以分为 朴素贝叶斯、半朴素贝叶斯、(一般的)贝叶斯 等

分布情况

 按照属性和特征的分布情况,又可以分为 高斯贝叶斯、多项式贝叶斯、伯努利贝叶斯 等

离散程度

 按照训练集的离散程度,还可以分为 离散型贝叶斯、连续型贝叶斯、混合型贝叶斯 等

编码实战

 The set A contains 30 a and 10 b, and the set B contains 20 a and 20 b, then what is the value of P(A|a)?

1
2
3
4
5
6
7
8
9
10
11
12
13
14
15
16
17
18
19
20
21
22
23
24
25
26
27
28
29
30
31
32
33
34
35
36
37
situations = dict()


def priori_probability(situation, probability):
situations[situation] = probability # P(A), P(B)


def posterior_probability(situation, probability):
old_prob = situations[situation]
situations[situation] = old_prob * probability # P(A)P(a|A), P(B)P(a|B)


def normalize():
count = 0
for situation in situations.values():
count += situation # P(A)P(a|A) + P(B)P(a|B)
for situation, probability in situations.items():
# P(A)P(a|A)/(P(A)P(a|A) + P(B)P(a|B)), P(B)P(a|B)/(P(A)P(a|A) + P(B)P(a|B))
situations[situation] = situations[situation] / count


def prob(hypothis):
return situations[hypothis] # P(A|a), P(B|a)


priori_probability('A', 0.5) # P(A)=1/2
priori_probability('B', 0.5) # P(B)=1/2

posterior_probability('A', 0.75) # P(a|A)=3/4
posterior_probability('B', 0.5) # P(a|B)=1/2

normalize()
prob = prob('A') # P(A|a)
print('The probability of getting `a` that belongs to set `A`: %s' % prob)
# P(a|A): 从 A 中获取 a
# P(A|a): 获取 a,并且 a 恰巧是属于 A 的
# 这两个描述的场景完全不同,对应的概率也因而不同

补充

 当存在多个特征变量时,表达式可扩展为

 其中,$\frac{1}{Z}$ 是一个只与 $F_i$ 相关的缩放因子,且当特征变量的值固定时,$\frac{1}{Z}$ 为常量

深度学习

深度网络概要

激活函数(Activation Function)

定义

 激活函数 就是在神经网络的神经元上运行的函数,负责将神经元的输入映射到输出端。主要解决线性不可分问题,如 XOR 异或

种类
Sigmoid

 Sigmoid 激活函数的表达式为 $f(x)$ = $\frac{e^x}{e^x + 1}$ = $\frac{1}{1 + e^{-x}}$
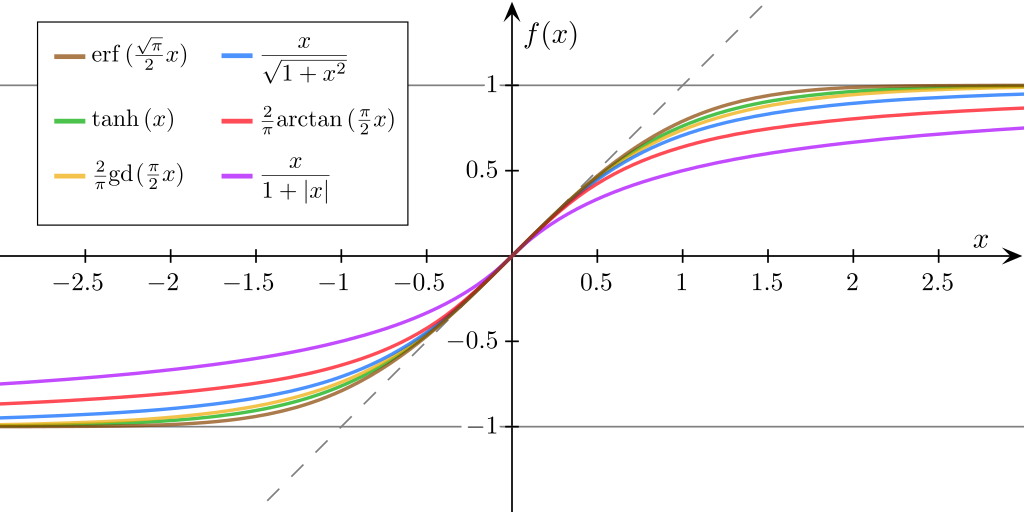
(图片来源:wikipedia.org,已确认版权为 CC BY-SA 3.0 协议)
TanHyperbolic(Tanh)

 Tanh 激活函数的表达式为 $f(x)$ = $\frac{e^x - e^{-x}}{e^x + e^{-x}}$,属于双曲正切函数,如下图表示
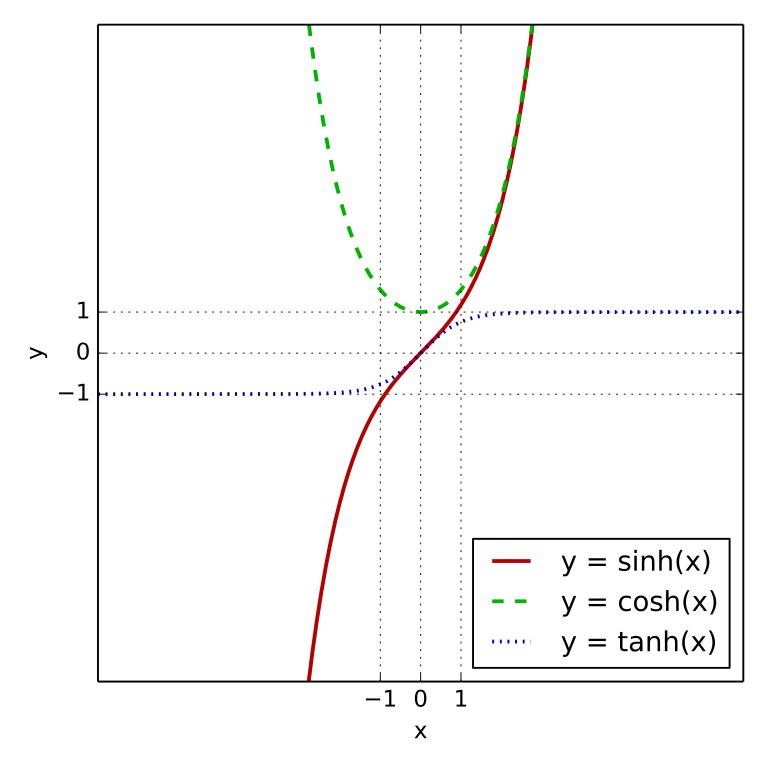
(图片来源:wikipedia.org,已确认无版权)
ReLU & Softplus

 ReLU 激活函数表达式为 $f(x)$ = $max(0, x)$

 Softplus 激活函数表达式为 $f(x)$ = $\log(1+e^x)$
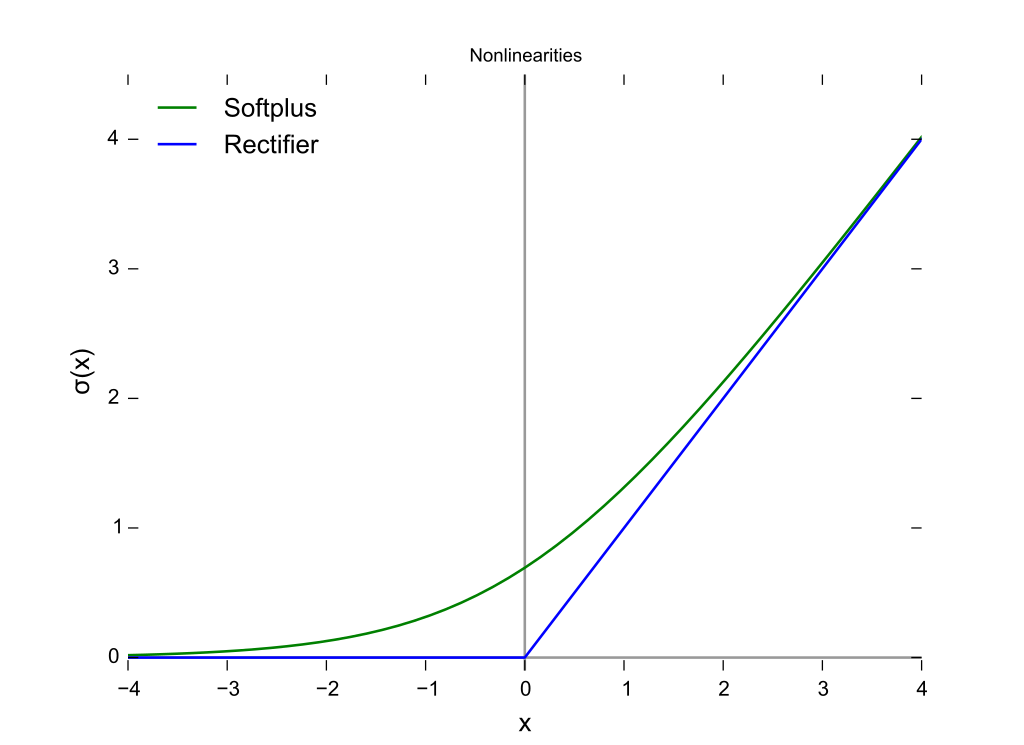
(图片来源:wikipedia.org,已确认版权为 CC0 1.0 协议)
LReLU & PReLU & RReLU

(图片来源:stackexchange.com,已确认版权为 CC BY-SA 3.0 协议)
Maxout

 Maxout 激活函数表达式为 $f(x)$ = $max_{j\in[1, k]}z_{ij}$,其中,$x \in R$,$z_{ij}$ = $x^TW_{\dots ij} + b_{ij}$,$W \in R^{d \cdot m \cdot k}$,$b \in R^{m \cdot k}$

Swish

 Swish 激活函数表达式为 $f(x)$ = $x \cdot sigmoid(x)$

代价函数(Cost Function)

定义

 代价函数(又称为 损失函数成本函数)用来估量模型预测值 $f(x)$ 与 真实值 $Y$ 的偏差程度,通常表示为 $L(Y, f(x))$。代价函数的值越小,说明模型的鲁棒性越好。在特定的领域中,代价函数又会被称为 回报函数利润函数效用函数适应度函数

种类
二次代价函数(Quadratic Cost)

 二次代价函数表达式为 $C$ = $\frac{1}{2n}\sum\mid\mid y(x)$ - $a^L(x)\mid\mid^2$,其中 $x$ 代表样本,$y$ 代表实际值,$a$ 代表输出值,$n$ 代表样本的总量

 当 $n = 1$ 时,样本集中只有一个样本,则二次代价函数可表示为 $C = \frac{1}{2}(((y - a)^1)^{\frac{1}1})^2$ = $\frac{(y - a)^2}{2}$,其中信号总量表示为 $z = \sum{W_jX_j} + b$, 激活函数表示为 $a = \sigma(z)$,则 $C = \frac{(y - \sigma(\sum{W_jX_j} + b))^2}{2}$。此时,我们对 $C$ 分别求 权重值 $w$ 和 偏置量 $b$ 的偏导,则得到 $\frac{\partial C}{\partial w}$ = $(a - y)\sigma^\prime(z) x$ 和 $\frac{\partial C}{\partial b}$ = $(a - y)\sigma^\prime(z)$。由此可见,$w$ 和 $b$ 的梯度和 $\sigma$ 的梯度成正比,$\sigma$ 的梯度越大,$w$ 和 $b$ 的调整速度越快,训练收敛便越快(推导过程相对比较简单,只用到了 度量空间求向量距离复合函数求偏导

交叉熵(Cross Entropy)

 交叉熵代价函数表达式为 $C = -\frac{1}{n}\sum_{x=1}^{n}[y\ln a + (1 - y)\ln(1 - a)]$,其中 $x$ 代表样本,$y$ 代表实际值,$a$ 代表输出值,$n$ 代表样本的总量

 和二次代价函数一样,不改变其激活函数,信号总量表示为 $z = \sum{W_jX_j} + b$, 激活函数表示为 $a = \sigma(z)$,则 $\sigma^\prime(z) = \sigma(x)(1 - \sigma(z))$。再次对 $C$ 求 $w$ 和 $b$ 的偏导分别为 $\frac{\partial C}{\partial w_j} = \frac{1}n\sum_{x=1}^nx_j(\sigma(z)-y)$ 和 $\frac{\partial C}{\partial b} = \frac{1}n\sum_{x=1}^n(\sigma(z) - y)$。由此可见,$w$ 和 $b$ 的调整与 $\sigma^\prime(z)$ 无关,并且,当 $\sigma(z) - y$ 预测值与实际值误差越大,$C$ 的梯度(求导)也就越大,训练的收敛速度也就越大。因此,$sigmoid$ 此类 $S$ 形激活函数,则不适合使用上文中介绍的二次代价函数;不过如果激活函数是线性的,则可能二次代价函数的表现更佳

对数似然代价函数(Log-likelihood Cost)

 对数似然代价函数常用于 Softmax 归一化指数函数,可以有效地解决学习速度变慢的问题;但是,如果输出层神经元是 Sigmoid,则建议采用交叉熵代价函数

优化器(Optimizer)

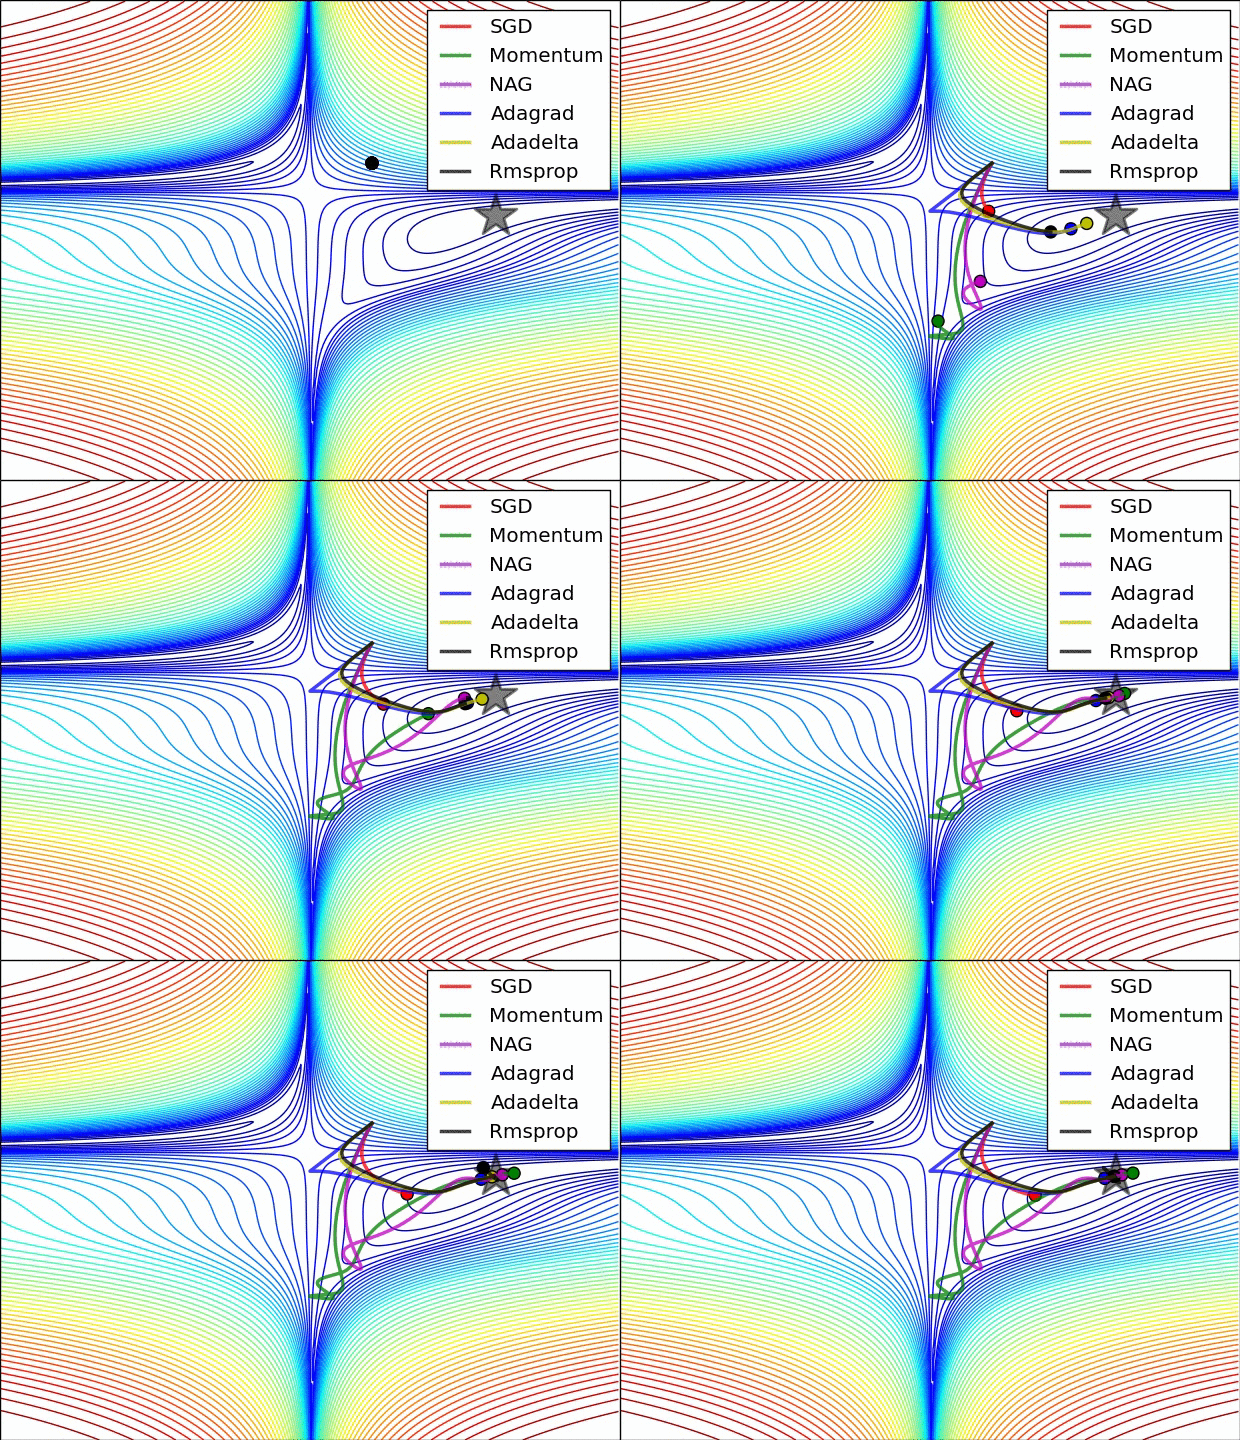
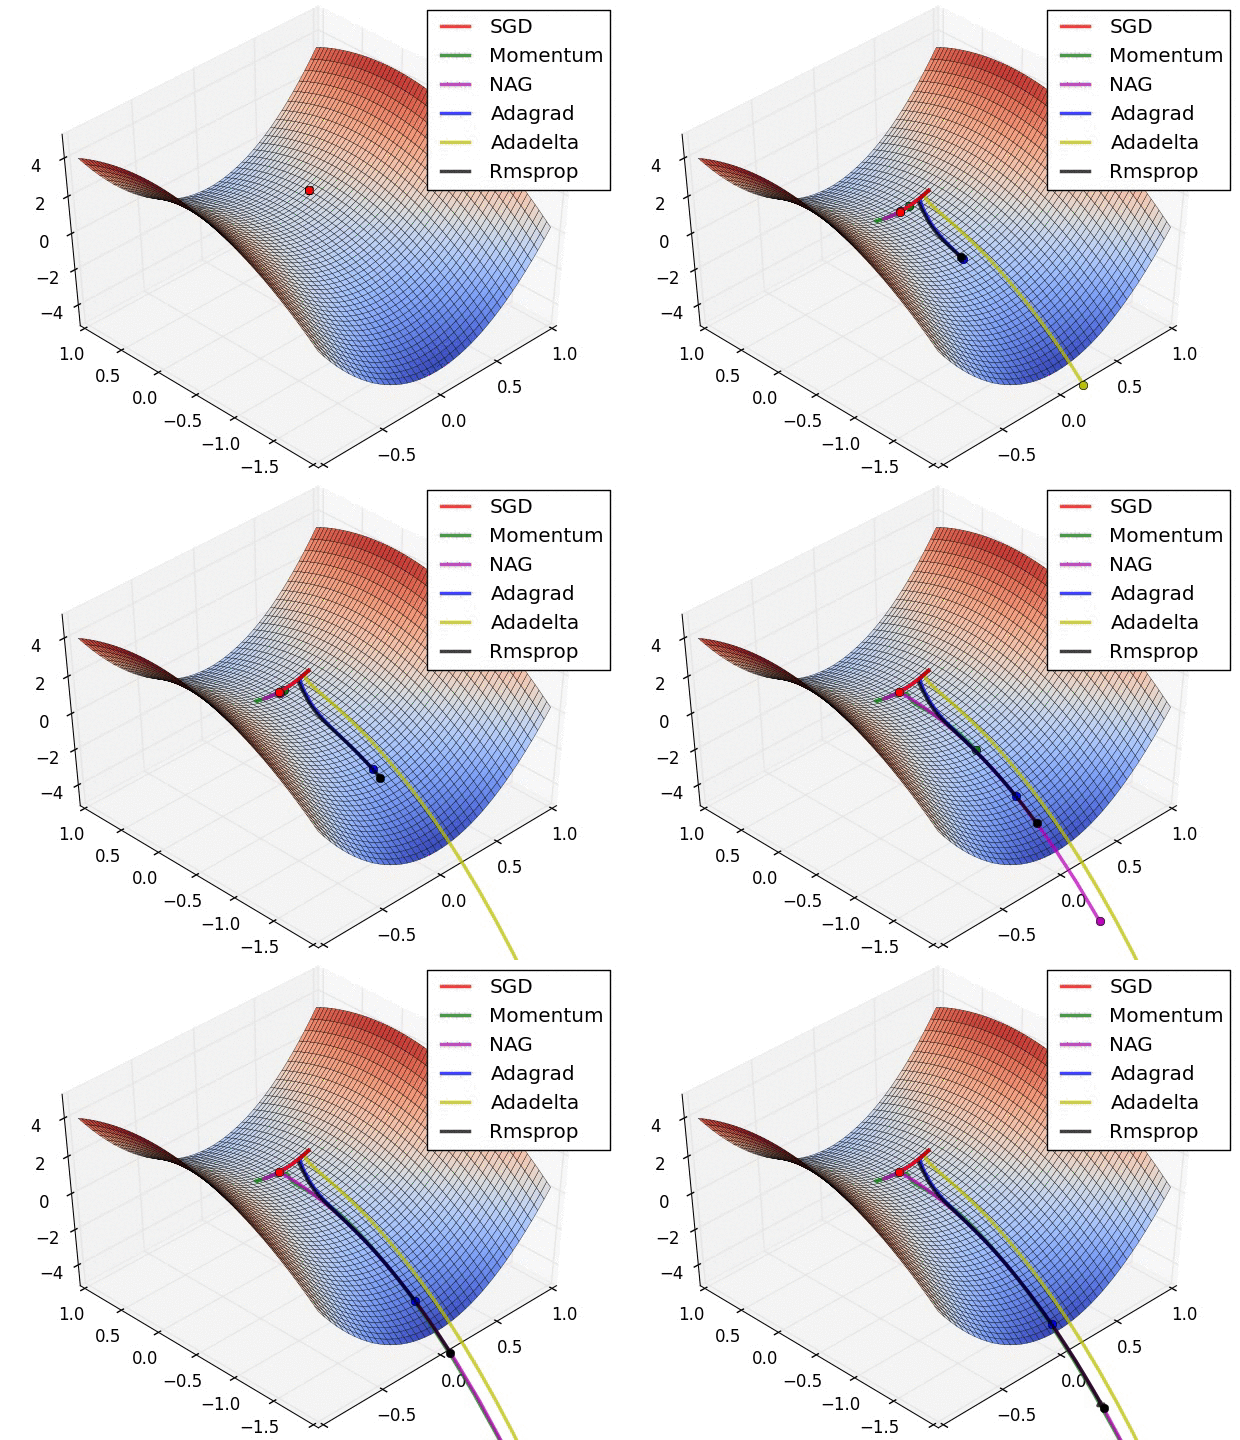
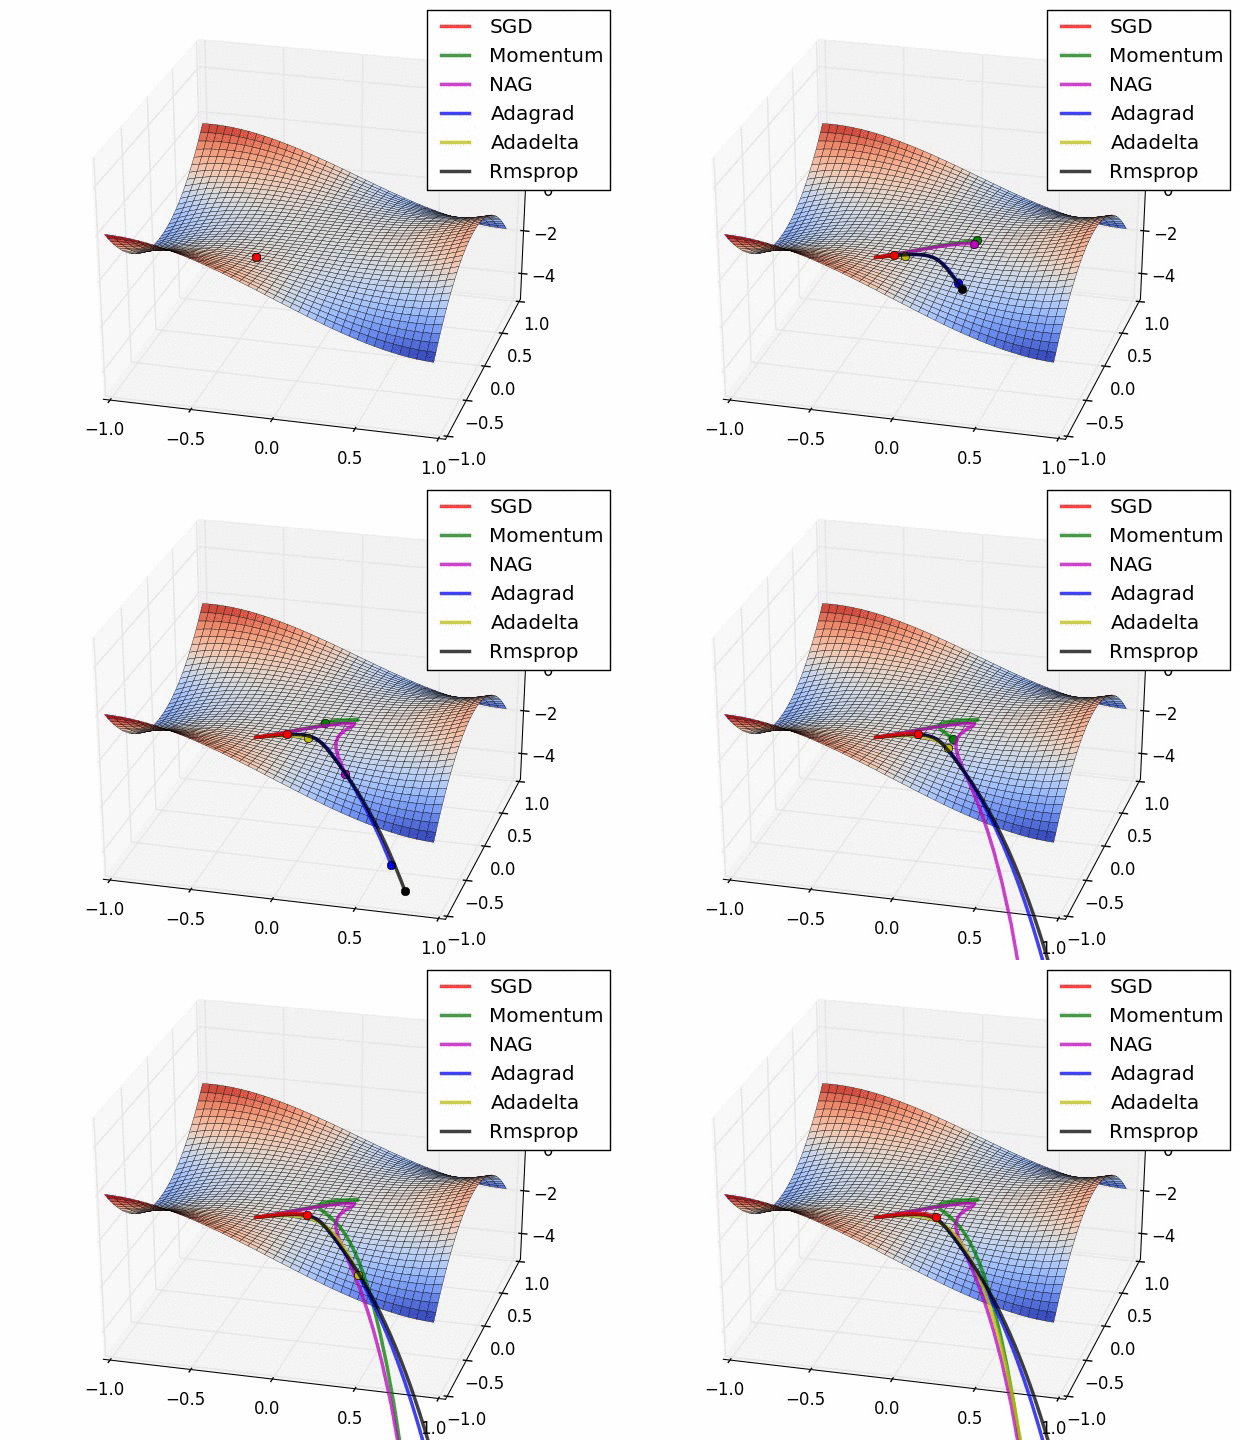
 SGD, Momentum, NAG, Adagrad, Adadelta, RMSprop
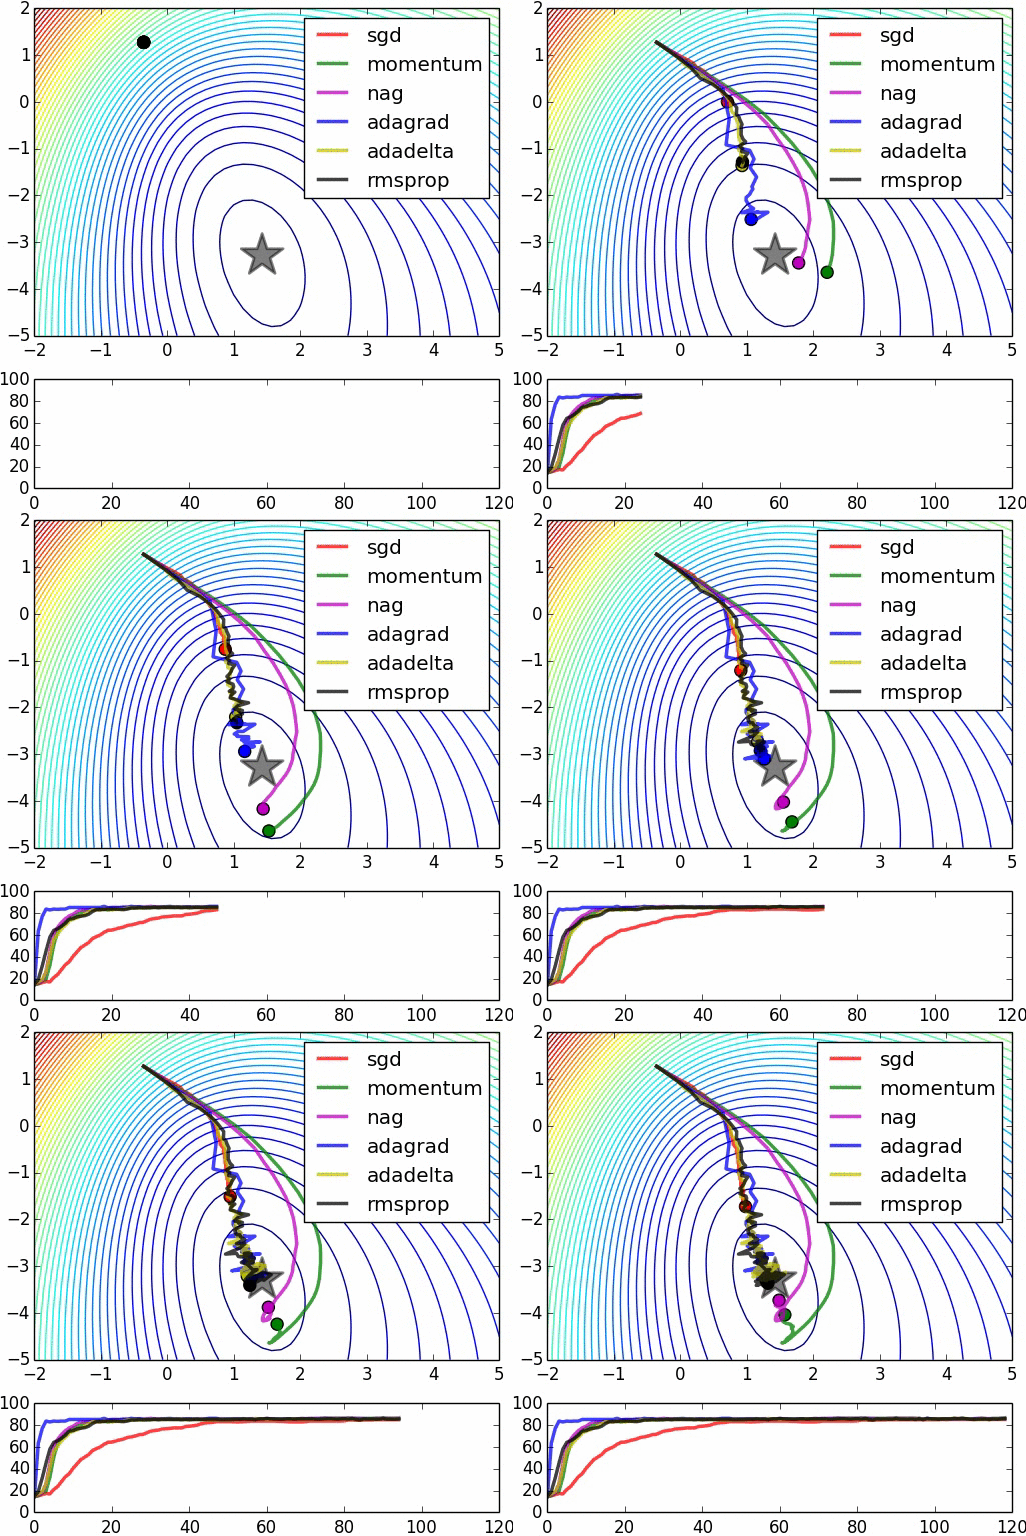
(图片来源:denizyuret.com,已询问作者)

卷积神经网络

卷积

池化

常见类型
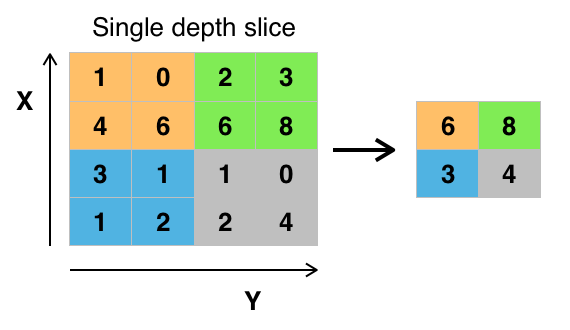
Max Pooling

(图片来源:wikipedia.org,已确认版权为 CC BY-SA 4.0 协议)
Mean Pooling
L2-norm pooling
Down Pooling

Padding

Same Padding

 给采样平面外部补 $0$,使得卷积窗口采样之后,可以得到一个与被采样平面,大小一样的结果平面

Valid Padding

 不会超出采样平面,卷积窗口采样之后,会到得到一个比原来平面小的结果平面

开源项目

Tensorflow / Tensorflow

介绍

 TensorFlow™ 是一个端到端开源机器学习平台。它拥有一个全面而灵活的生态系统,其中包含各种工具、库和社区资源,可助力研究人员推动先进机器学习技术的发展,并使开发者能够轻松地构建和部署由机器学习提供支持的应用。 — tensorflow.org

特性
  • 高度的灵活性
  • 可移植性
  • 极大地提高了科研产出率
  • 自动求微分
  • 多语言支持(Python / C++ / Java / Golang)
  • 最大化硬件的性能
基本概念
  • 使用 (Graph)来表示计算任务
  • 在被称之为 会话(Session)的上下文(Context)中执行图
  • 使用 Tensor 表示数据
  • 通过 变量(Variable)维护状态
  • 使用 feedfetch 可以为任意的操作(Arbitrary Operation)赋值或从中获取数据

安装

Python

 需要注意的是,如果是在 Windows 环境下,只能安装 Python3.5+ 版本。详细安装步骤见《Python - 环境部署

Anaconda3

 下载地址:Download Page

 启动程序的快捷链接,都自动创建在了 C:\ProgramData\Microsoft\Windows\Start Menu\Programs\Anaconda3 (64-bit) 目录下

 在运行 Jupyter 之前,需要简单设置下,文件的存放路径(如果只想使用 Jupyter,相关安装步骤见《Python - 科学分析工具》)

1
2
3
4
5
6
$ jupyter notebook --generate-config
Writing default config to: C:\Users\Benedict Jin\.jupyter\jupyter_notebook_config.py

$ vim jupyter_notebook_config.py
## The directory to use for notebooks and kernels.
c.NotebookApp.notebook_dir = 'E:\Jupyter\TensorFlow'
TensorFlow
1
2
3
4
5
6
7
8
9
10
11
12
13
14
15
16
17
18
19
## 安装
# cpu
$ pip3 install tensorflow
# gpu
$ pip3 install tensorflow-gpu

## 升级
# cpu
$ pip3 install --upgrade tensorflow
# gpu
$ pip3 install --upgrade tensorflow-gpu

## 测试
$ python
>>> import tensorflow as tf
>>> hello = tf.constant('Hello, TensorFlow!')
>>> sess = tf.Session()
>>> print(sess.run(hello))
b'Hello, TensorFlow!'

Tips: 当然还有其他的方式,可以帮助我们更方便地使用这些科学分析库,包括 WinPythonEnthought Canopy etc.

编程实战

变量
加减
1
2
3
4
5
6
7
8
9
10
11
12
13
14
15
16
17
18
19
20
import tensorflow as tf

# 创建变量
a = tf.Variable([1, 0])
b = tf.Variable([0, 1])
# sub/add 两个 operation
sub = tf.subtract(a, b)
add = tf.add(a, b)

# 初始化变量
init = tf.global_variables_initializer()

# 执行 Session
with tf.Session() as sess:
sess.run(init)
print(sess.run(sub))
print(sess.run(add))

#[1 -1]
#[1 1]
累计
1
2
3
4
5
6
7
8
9
10
11
12
13
14
15
16
17
# Counter
counter = tf.Variable(0, name = "counter")
add_one = tf.add(counter, 1)
assign = tf.assign(counter, add_one)
init = tf.global_variables_initializer()

with tf.Session() as sess:
sess.run(init)
for _ in range(5):
sess.run(assign)
print(sess.run(counter))

1
2
3
4
5

Tips: Full code is here.

矩阵积
1
2
3
4
5
6
7
8
9
10
11
12
13
14
15
16
17
18
19
20
21
22
23
24
25
import tensorflow as tf

# 一行两列
matrix1 = tf.constant([[1, 0]])
# 两行一列
matrix2 = tf.constant([[1], [0]])
# 矩阵相乘
matmul = tf.matmul(matrix1, matrix2)

# 打印结果(Tensor 而不是结果 2)
print(matmul)

Tensor("MatMul:0", shape = (1, 1), dtype = int32)

# 定义会话
sess = tf.Session()
# 真正开始执行
print(sess.run(matmul))
sess.close()

[[1]]

# 改写成 `with ... as ...`,则可以保证 Session 会自动关闭
with tf.Session() as sess:
print(sess.run(matmul))

Tips: Full code is here.

Fetch & Feed
Fetch
1
2
3
4
5
6
7
8
9
10
11
12
# Fetch
a = tf.constant(1.0)
b = tf.constant(2.0)
c = tf.constant(3.0)
multiply = tf.multiply(a, b)
add = tf.add(matmul, c)

# Fetch 可以运行多个 Op
with tf.Session() as sess:
print(sess.run([add, multiply]))

#[5.0, 2.0]
Feed
1
2
3
4
5
6
7
8
9
10
# Feed
ph1 = tf.placeholder(tf.float32)
ph2 = tf.placeholder(tf.float32)
m = tf.multiply(ph1, ph2)

# 在真正执行的时候,再将数据以字典的形式传入
with tf.Session() as sess:
print(sess.run(m, feed_dict={ph1: [1.0], ph2: [2.0]}))

#[ 2.]

Tips: Full code is here.

二次代价函数 & 梯度下降
1
2
3
4
5
6
7
8
9
10
11
12
13
14
15
16
17
18
19
20
21
22
23
24
25
26
27
28
29
30
31
32
import tensorflow as tf
import numpy as np

x_data = np.random.rand(100)
y_data = x_data * 0.1 + 0.2

# 线性模型的斜率 & 偏置量
k = tf.Variable(0.)
b = tf.Variable(0.)
y = k * x_data + b

# 二次代价函数
loss = tf.reduce_mean(tf.square(y_data - y))
# 梯度下降
optimizer = tf.train.GradientDescentOptimizer(0.2)
# 最小化代价函数
train = optimizer.minimize(loss)

# 线性模型中,k、b 作为变量,会在梯度下降法的作用下不断变化,以使得 loss 函数越来越小
with tf.Session() as sess:
tf.global_variables_initializer().run()
for step in range(501):
sess.run(train)
if step % 100 == 0:
print("Step: ", step, "[k, b]", sess.run([k, b]))

Step: 0 [k, b] [0.054201454, 0.10031855]
Step: 100 [k, b] [0.10048652, 0.19973609]
Step: 200 [k, b] [0.10003704, 0.1999799]
Step: 300 [k, b] [0.10000283, 0.19999847]
Step: 400 [k, b] [0.10000023, 0.19999987]
Step: 500 [k, b] [0.10000023, 0.19999987]

Tips: Full code is here.

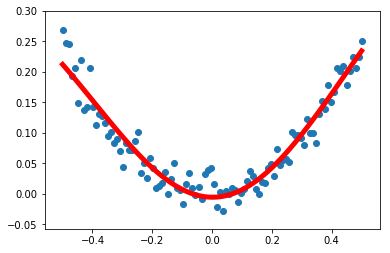
非线性回归
1
2
3
4
5
6
7
8
9
10
11
12
13
14
15
16
17
18
19
20
21
22
23
24
25
26
27
28
29
30
31
32
33
34
35
36
37
38
39
40
41
42
import tensorflow as tf
import numpy as np
import matplotlib.pyplot as plt

# 在 [-0.5, 0.5] 区间内生成随机数
x_data = np.linspace(-0.5, 0.5, 100)[:, np.newaxis]
# 在 100 个随机数基础上,增加噪音
noise = np.random.normal(0, 0.02, x_data.shape)
y_data = np.square(x_data) + noise

x = tf.placeholder(tf.float32, [None, 1])
y = tf.placeholder(tf.float32, [None, 1])

# 神经网络 中间层
weight_L1 = tf.Variable(tf.random_normal([1, 10]))
biase_L1 = tf.Variable(tf.zeros([1, 10]))
w_plus_b_L1 = tf.matmul(x, weight_L1) + biase_L1
# 激活函数
L1 = tf.nn.tanh(w_plus_b_L1)

# 神经网络 输出层
wegith_L2 = tf.Variable(tf.random_normal([10, 1]))
biase_L2 = tf.Variable(tf.zeros([1, 1]))
w_plus_b_L2 = tf.matmul(L1, wegith_L2) + biase_L2
prediction = tf.nn.tanh(w_plus_b_L2)

# Loss Function
loss = tf.reduce_mean(tf.square(y - prediction))
train = tf.train.GradientDescentOptimizer(0.1).minimize(loss)

with tf.Session() as sess:
tf.global_variables_initializer().run()
for _ in range(1500):
sess.run(train, feed_dict = {x: x_data, y: y_data})

# 使用训练好的模式进行预测
prediction_result = sess.run(prediction, feed_dict = {x: x_data})

plt.figure()
plt.scatter(x_data, y_data)
plt.plot(x_data, prediction_result, 'r-', lw = 5)
plt.show()

(使用 Matplotlib 绘制而成)

Tips: Full code is here.

手写数字识别
1
2
3
4
5
6
7
8
9
10
11
12
13
14
15
16
17
18
19
20
21
22
23
24
25
26
27
28
29
30
31
32
33
34
35
36
37
38
39
40
41
42
43
44
45
46
47
48
49
50
51
52
53
54
55
56
57
58
59
60
61
62
63
64
65
66
67
68
69
70
71
72
73
74
75
76
77
78
79
80
81
82
83
84
85
86
87
88
89
90
91
92
93
94
95
96
97
98
99
100
101
102
103
104
105
106
107
108
# Download MNIST datasource
# 6w 个 28*28 个像素的手写数字图片集
# 用 [60000, 784] 的张量表示 [图片索引,图片像素点索引]
from tensorflow.examples.tutorials.mnist import input_data

# `one-hot vectors`:向量中只有一个数据为 1,其余维度只能为 0
# 转化为 [60000, 10] 的张量表示 [图片索引,图片表示的数值]
mnist = input_data.read_data_sets("MNIST_data/", one_hot = True)

# 28 * 28 = 784 的占位符
# None 表示可能是任何数值
x = tf.placeholder(tf.float32, [None, 784])
y = tf.placeholder(tf.float32, [None, 10])
z = tf.placeholder(tf.float32) # 用于 drop_out 操作时的依据(0.8:80% 的神经元在工作)
lr = tf.Variable(0.001, dtype = tf.float32) # 用于不断递减的学习率,使得梯度下降到最低点时,能更好地命中

# 权重值(截断的随机正太分布)和 偏置量(0.1)
W1 = tf.Variable(tf.truncated_normal([784, 600], stddev = 0.1))
b1 = tf.Variable(tf.zeros([600]) + 0.1)
L1 = tf.nn.tanh(tf.matmul(x, W1) + b1)
L1_drop = tf.nn.dropout(L1, z)

# 隐藏层
W2 = tf.Variable(tf.truncated_normal([600, 400], stddev = 0.1))
b2 = tf.Variable(tf.zeros([400]) + 0.1)
L2 = tf.nn.tanh(tf.matmul(L1_drop, W2) + b2)
L2_drop = tf.nn.dropout(L2, z)

W3 = tf.Variable(tf.truncated_normal([400, 10], stddev = 0.1))
b3 = tf.Variable(tf.zeros([10]) + 0.1)

# softmax 回归模型
prediction = tf.nn.softmax(tf.matmul(L2_drop, W3) + b3)

# 二次 Loss Func
# loss = tf.reduce_mean(tf.square(y - prediction))
# 交叉熵 Loss Func
# loss = tf.reduce_mean(- tf.reduce_sum(y * tf.log(prediction), reduction_indices = [1]))
loss = tf.reduce_mean(tf.nn.softmax_cross_entropy_with_logits(labels = y, logits = prediction))

# 梯度下降
# train_step = tf.train.GradientDescentOptimizer(0.2).minimize(loss)
train_step = tf.train.AdamOptimizer(lr).minimize(loss)

# 评估模型
# 判断 一维张量 y、prediction 中最大值的位置是否相等
correct_prediction = tf.equal(tf.argmax(y, 1), tf.argmax(prediction, 1))
# 准确率
# 将 布尔型列表 corrent_prediction 转化为 float32 类型
# [true, false, false, ...] => [1.0, 0., 0., ...]
accuracy = tf.reduce_mean(tf.cast(correct_prediction, tf.float32))

with tf.device('/gpu:0'):
with tf.Session() as sess:
tf.global_variables_initializer().run()

batch_size = 100
batch = (int) (60000 / batch_size)
# batch = mnist.train.num_examples

for _ in range(101):
sess.run(tf.assign(lr, 0.001 * (0.95 ** _)))
for batch_step in range(batch):
batch_xs, batch_ys = mnist.train.next_batch(batch_size)
sess.run(train_step, feed_dict = {x: batch_xs, y: batch_ys, z: 0.9973})

if (_ % 10) == 0:
test_accuracy = sess.run(accuracy, feed_dict = {x: mnist.test.images, y: mnist.test.labels, z: 1.0})
train_accuracy = sess.run(accuracy, feed_dict = {x: mnist.train.images, y: mnist.train.labels, z: 1.0})
print("Batch: ", _, "Accuracy: [", test_accuracy, ",", train_accuracy, "]")


# 二次 Loss Func
Batch: 0 Accuracy: 0.8394
Batch: 10 Accuracy: 0.9067
Batch: 20 Accuracy: 0.9142
Batch: 30 Accuracy: 0.9187
Batch: 40 Accuracy: 0.9199
Batch: 50 Accuracy: 0.9219

# 交叉熵 Loss Func
Batch: 0 Accuracy: 0.8262
Batch: 10 Accuracy: 0.9183
Batch: 20 Accuracy: 0.9224
Batch: 30 Accuracy: 0.9232
Batch: 40 Accuracy: 0.9273
Batch: 50 Accuracy: 0.9274

# 隐藏层 + DropOut
Batch: 0 Accuracy: [ 0.9176 , 0.915527 ]
Batch: 10 Accuracy: [ 0.9565 , 0.963182 ]
Batch: 20 Accuracy: [ 0.9669 , 0.975236 ]
Batch: 30 Accuracy: [ 0.9718 , 0.982 ]
Batch: 40 Accuracy: [ 0.9737 , 0.984836 ]
Batch: 50 Accuracy: [ 0.9768 , 0.987036 ]

# AdamOptimizer + GPU
Batch: 0 Accuracy: [ 0.9573 , 0.962128 ]
Batch: 10 Accuracy: [ 0.9803 , 0.994455 ]
Batch: 20 Accuracy: [ 0.9795 , 0.997073 ]
Batch: 30 Accuracy: [ 0.9816 , 0.997709 ]
Batch: 40 Accuracy: [ 0.9828 , 0.997946 ]
Batch: 50 Accuracy: [ 0.9823 , 0.998128 ]
Batch: 60 Accuracy: [ 0.9828 , 0.998237 ]
Batch: 70 Accuracy: [ 0.9828 , 0.998309 ]
Batch: 80 Accuracy: [ 0.9831 , 0.998346 ]
Batch: 90 Accuracy: [ 0.9828 , 0.9984 ]
Batch: 100 Accuracy: [ 0.9831 , 0.9984 ]

Tips: Softmax 公式为:$softmax(x)_i$ = $\frac{exp(x_i)}{\sum_j{exp(x_j)}}$ = $\frac{e^{x_i}}{\sum_j{e^{x_j}}}$
Tips: Full code is here.

TensorBoard 可视化

Scalar & NameScope & Embedding
1
2
3
4
5
6
7
8
9
10
11
12
13
14
15
16
17
18
19
20
21
22
23
24
25
26
27
28
29
30
31
32
33
34
35
36
37
38
39
40
41
42
43
44
45
46
47
48
49
50
51
52
53
54
55
56
57
58
59
60
61
62
63
64
65
66
67
68
69
70
71
72
73
74
75
76
77
78
79
80
81
82
83
84
85
86
87
88
89
90
91
92
93
94
95
96
97
98
99
100
101
102
103
104
105
106
107
108
109
110
111
112
113
114
115
116
117
118
119
120
121
122
123
124
125
126
127
128
129
130
131
132
133
134
135
136
137
138
139
140
141
142
143
144
import tensorflow as tf
# Download MNIST datasource
# 6w 个 28*28 个像素的手写数字图片集
# 用 [60000, 784] 的张量表示 [图片索引,图片像素点索引]
from tensorflow.examples.tutorials.mnist import input_data
from tensorflow.contrib.tensorboard.plugins import projector

# `one-hot vectors`:向量中只有一个数据为 1,其余维度只能为 0
# 转化为 [60000, 10] 的张量表示 [图片索引,图片表示的数值]
mnist = input_data.read_data_sets("MNIST_data/", one_hot = True)

image_num = 10000
embedding = tf.Variable(tf.stack(mnist.test.images[:image_num]), trainable = False, name = 'embedding')

# 定义求统计指标的方法
def summaries(var):
# 申明一个命名空间
with tf.name_scope('summaries'):
tf.summary.scalar('max', tf.reduce_max(var)) # 最大值
tf.summary.scalar('min', tf.reduce_min(var)) # 最小值
mean = tf.reduce_mean(var)
tf.summary.scalar('mean', mean) # 平均值
with tf.name_scope('stddev'):
stddev = tf.sqrt(tf.reduce_mean(tf.square(var - mean)))
tf.summary.scalar('stddev', stddev) # 标准差
tf.summary.histogram('histogram', var) # 直方图

with tf.name_scope('input'):
# 28 * 28 = 784 的占位符
# None 表示可能是任何数值
x = tf.placeholder(tf.float32, [None, 784], name = 'x_input')
y = tf.placeholder(tf.float32, [None, 10], name = 'y_input')
# 用于 drop_out 操作时的依据(0.8:80% 的神经元在工作)
z = tf.placeholder(tf.float32, name = 'drop_output_input')
lr = tf.Variable(0.001, dtype = tf.float32) # 用于不断递减的学习率,使得梯度下降到最低点时,能更好地命中

with tf.name_scope('layer'):
with tf.name_scope('layer_1'):
# 权重值(截断的随机正太分布)和 偏置量(0.1)
W1 = tf.Variable(tf.truncated_normal([784, 600], stddev = 0.1), name = 'W1')
b1 = tf.Variable(tf.zeros([600]) + 0.1, name = 'b1')
# 调用函数求权重、偏置值的统计指标
summaries(W1)
summaries(b1)
L1 = tf.nn.tanh(tf.matmul(x, W1) + b1)
L1_drop = tf.nn.dropout(L1, z)

with tf.name_scope('layer_2'):
# 隐藏层
W2 = tf.Variable(tf.truncated_normal([600, 400], stddev = 0.1), name = 'W2')
b2 = tf.Variable(tf.zeros([400]) + 0.1, name = 'b2')
summaries(W2)
summaries(b2)
L2 = tf.nn.tanh(tf.matmul(L1_drop, W2) + b2)
L2_drop = tf.nn.dropout(L2, z)

with tf.name_scope('layer_output'):
W3 = tf.Variable(tf.truncated_normal([400, 10], stddev = 0.1), name = 'W3')
b3 = tf.Variable(tf.zeros([10]) + 0.1, name = 'b3')
summaries(W3)
summaries(b3)

with tf.name_scope('softmax'):
# softmax 回归模型
prediction = tf.nn.softmax(tf.matmul(L2_drop, W3) + b3)

with tf.name_scope('loss'):
# 二次 Loss Func
# loss = tf.reduce_mean(tf.square(y - prediction))
# 交叉熵 Loss Func
# loss = tf.reduce_mean(-tf.reduce_sum(y * tf.log(prediction), reduction_indices=[1]))
loss = tf.reduce_mean(tf.nn.softmax_cross_entropy_with_logits(labels = y, logits = prediction))
tf.summary.scalar('loss', loss)

with tf.name_scope('train'):
# 梯度下降
# train_step = tf.train.GradientDescentOptimizer(0.2).minimize(loss)
train_step = tf.train.AdamOptimizer(lr).minimize(loss)

with tf.name_scope('accuracy'):
with tf.name_scope('correct_prediction'):
# 评估模型
# 判断 一维张量 y、prediction 中最大值的位置是否相等
correct_prediction = tf.equal(tf.argmax(y, 1), tf.argmax(prediction, 1))
with tf.name_scope('accuracy'):
# 准确率
# 将 布尔型列表 corrent_prediction 转化为 float32 类型
# [true, false, false, ...] => [1.0, 0., 0., ...]
accuracy = tf.reduce_mean(tf.cast(correct_prediction, tf.float32))
tf.summary.scalar('accuracy', accuracy)

# 获得所有定义的 Summary
summary_all = tf.summary.merge_all()

# 配置运行资源
session_config = tf.ConfigProto(device_count={"CPU": 8}, inter_op_parallelism_threads = 32, intra_op_parallelism_threads = 48)

with tf.Session(config = session_config) as sess:
tf.global_variables_initializer().run()

# 产生 MetaData 文件 [注意,这里只能使用绝对路径]
base_path = 'E:/Jupyter/_drafts/ipython/TensorFlow/tensorboard/'
metadata_path = base_path + 'metadata.tsv'
if tf.gfile.Exists(metadata_path):
tf.gfile.DeleteRecursively(metadata_path)
with open(metadata_path, 'w') as f:
labels = sess.run(tf.argmax(mnist.test.labels[:], 1))
for i in range(image_num):
f.write(str(labels[i]) + '\n')

writer = tf.summary.FileWriter(base_path, sess.graph)

saver = tf.train.Saver()
config = projector.ProjectorConfig()
embed = config.embeddings.add()
embed.tensor_name = embedding.name
embed.metadata_path = metadata_path
embed.sprite.image_path = base_path + 'data/mnist_10k_sprite.png'
embed.sprite.single_image_dim.extend([28, 28])
projector.visualize_embeddings(writer, config)

batch_size = 100
batch = (int) (60000 / batch_size)
# batch = mnist.train.num_examples

# 这里主要是为了测试 TensorBoard,所以只训练 5 次
summary_count = 0
for _ in range(5):
sess.run(tf.assign(lr, 0.001 * (0.95 ** _)))
for batch_step in range(batch):
batch_xs, batch_ys = mnist.train.next_batch(batch_size)
# 真正开始生成 metadata
run_options = tf.RunOptions(trace_level = tf.RunOptions.FULL_TRACE)
run_metadata = tf.RunMetadata()
summary_, result = sess.run([summary_all, train_step], feed_dict = {x: batch_xs, y: batch_ys, z: 0.997}, options = run_options, run_metadata = run_metadata)
summary_count = summary_count + 1
writer.add_run_metadata(run_metadata, 'step%03d' % summary_count)
writer.add_summary(summary_, summary_count)

test_accuracy = sess.run(accuracy, feed_dict = {x: mnist.test.images, y: mnist.test.labels, z: 1.0})
train_accuracy = sess.run(accuracy, feed_dict = {x: mnist.train.images, y: mnist.train.labels, z: 1.0})
print("Batch: ", _, "Accuracy: [", test_accuracy, ",", train_accuracy, "]")

saver.save(sess, base_path + 'minst_model.ckpt', global_step = summary_count)

Tips: Full code is here.

启动
1
2
3
4
5
6
7
# 执行完,会在程序中指定的目录下生成文件 events.out.tfevents.1502692143.BENEDICT_JIN
$ tensorboard --logdir=E:\Jupyter\_drafts\ipython\TensorFlow\tensorboard
Starting TensorBoard b'54' at http://Benedict_Jin:6006
(Press CTRL+C to quit)

# 这里 windows 用户需要注意,使用 `cmd` 而不要使用 `git bash` 等工具,同时,还需要切换盘符
# 第二次执行,需要删除生成的文件,使用 `Kernel` - `Restart & Run all` 清理缓存
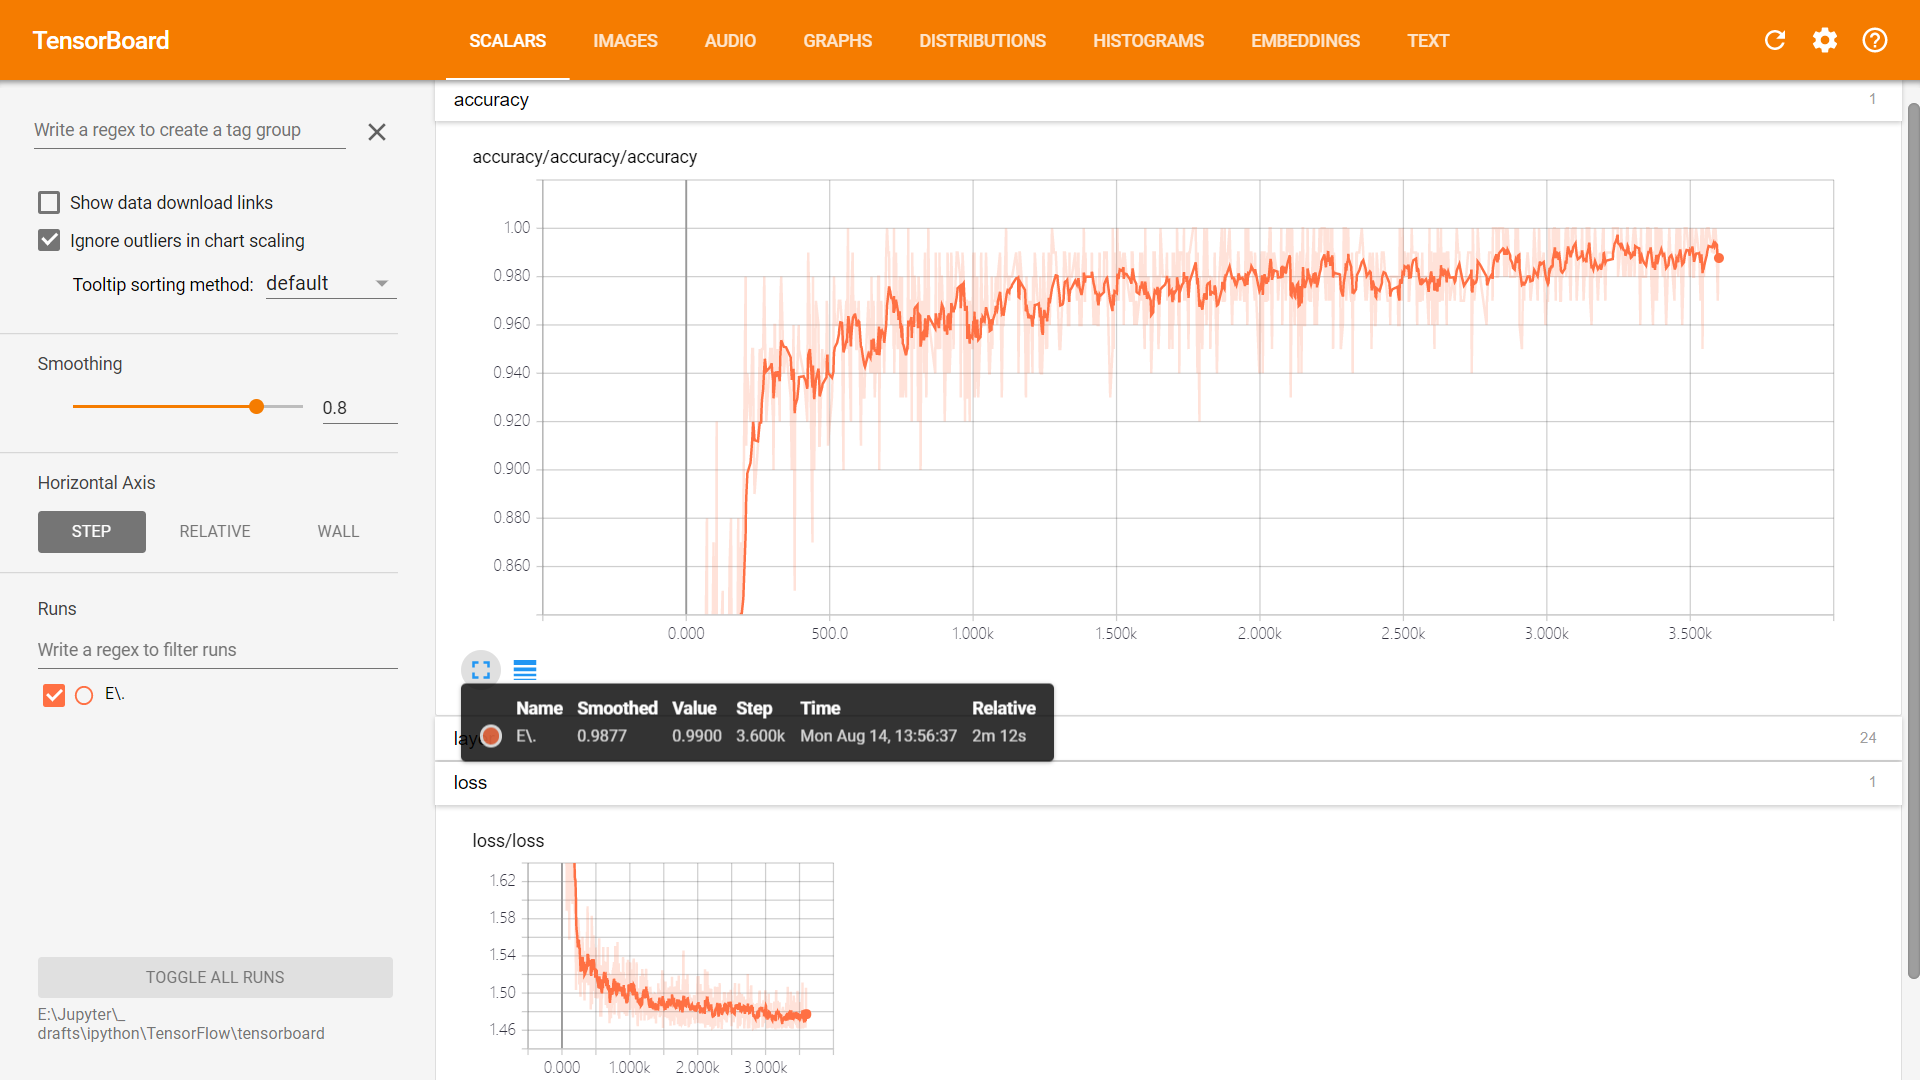
Scalars

(对 TensorBoard 可视化界面的截图)
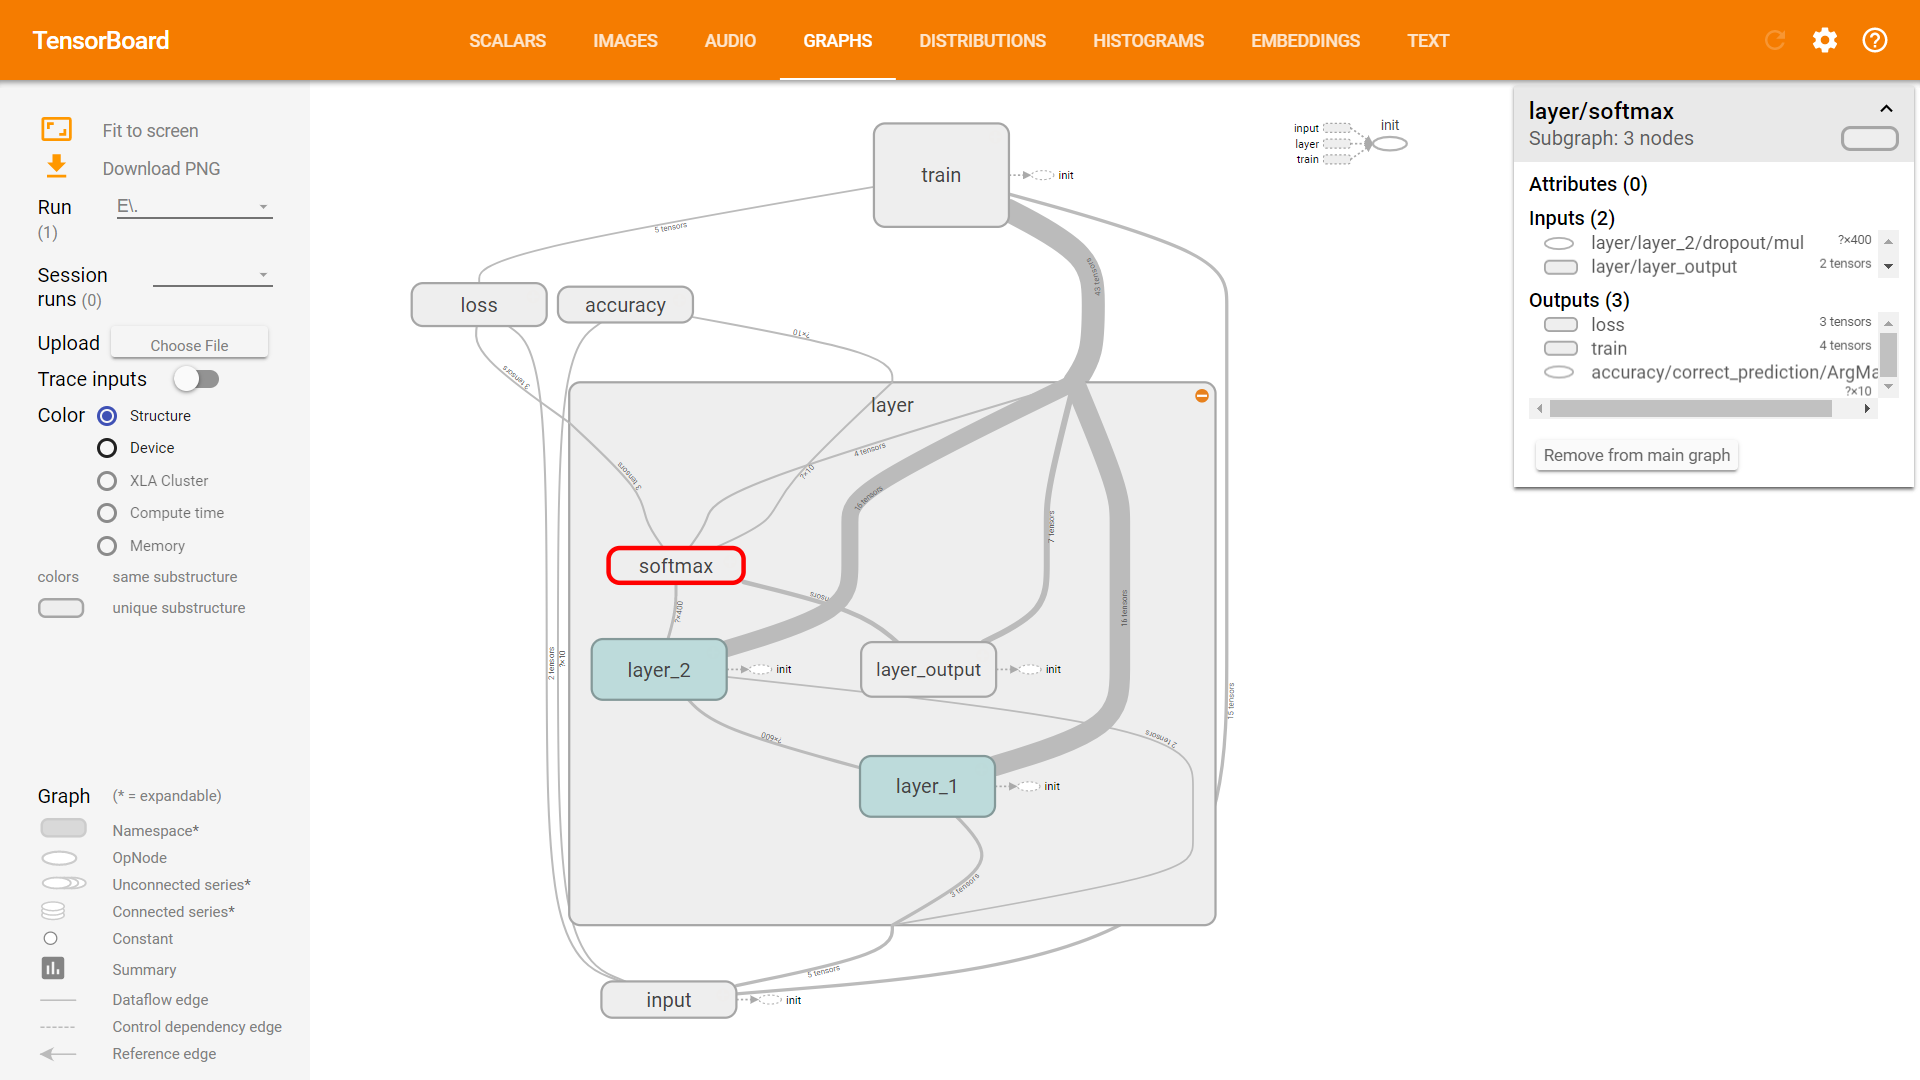
Graphs

(对 TensorBoard 可视化界面的截图)
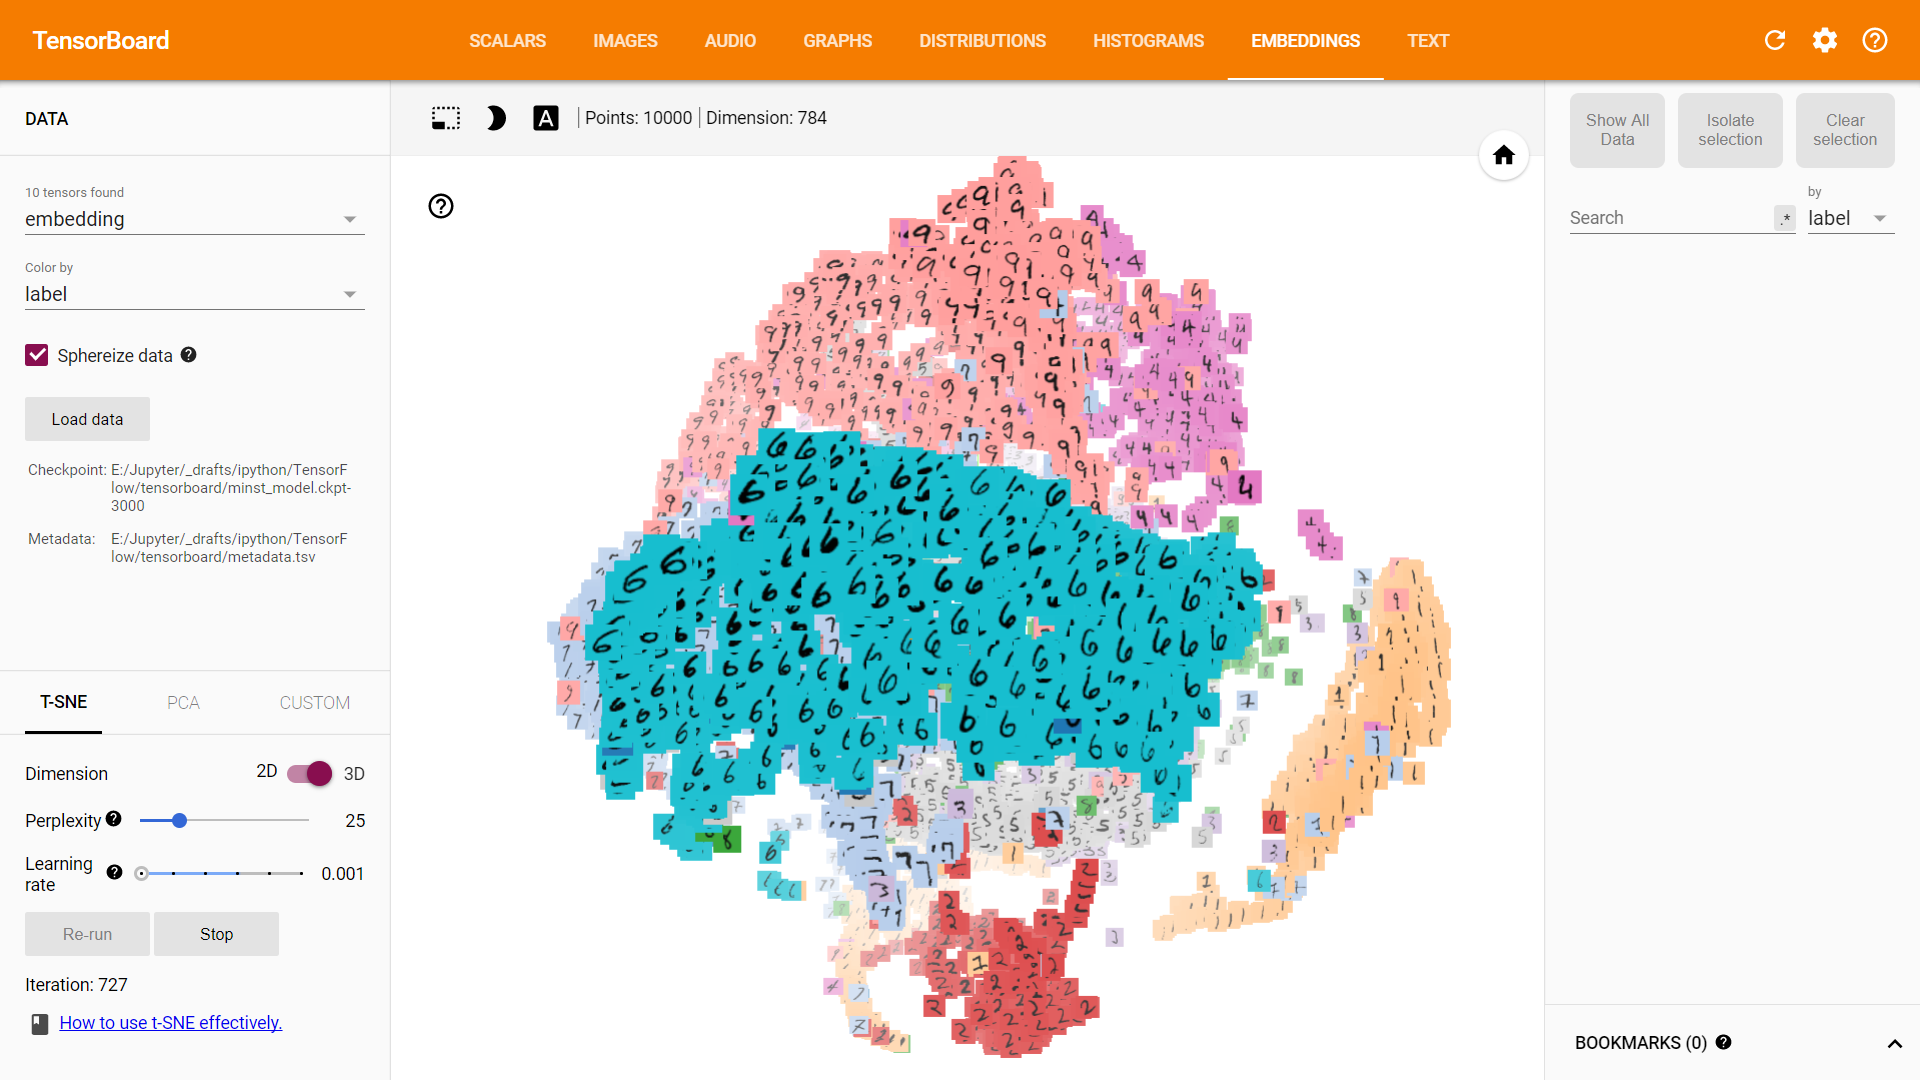
Embedding

(对 TensorBoard 可视化界面的截图)

GPU 加速

准备 NVIDIA 显卡
1
2
3
4
5
6
7
8
显卡2详情
显卡名称 NVIDIA GeForce GTX 960M
显卡厂商 英伟达
显存大小 4095 MB
内核名称 GeForce GTX 960M
内核频率 324 MHz
显存频率 405 MHz
驱动版本 21.21.13.7651
CUDA(Compute Unified Device Architecture)

 在 下载地址 找到系统对应的版本进行下载安装(Windows - x86_64 - 10 - exe - cuda_8.0.61_win10.exe

 安装成功后,将 binlib/x64 添加到系统 PATH 环境变量中

cuDNN

 在 登陆页面 注册好 Nvidia 的账户后,下载对应 CUDA 版本的 cuDNN 即可(cudnn-8.0-windows10-x64-v5.1.zip

 将压缩包中 bin / include / lib 中的文件,拷贝到 C:\Program Files\NVIDIA GPU Computing Toolkit\CUDA\v8.0 下对应目录中。最后,将 C:\Program Files\NVIDIA GPU Computing Toolkit\CUDA\v8.0\extras\CUPTI\libx64\cupti64_80.dll 文件复制到 C:\Program Files\NVIDIA GPU Computing Toolkit\CUDA\v8.0\bin

tensorflow-gpu
1
2
3
4
$ pip uninstall tensorflow
$ pip install tensorflow-gpu
# 如果只有一颗 gpu,程序是不需要修改的,默认会直接使用该 gpu 进行运算
# 如果有多个,可以使用 with tf.device('/gpu:1'): 进行指定
nvidia-smi 命令
1
2
3
4
5
6
7
8
9
10
11
12
13
14
15
16
17
18
19
# nvidia-smi 可以查看 GPU 的资源、监控 GPU 运行状态、设置 GPU 超频 等等
$ "C:\Program Files\NVIDIA Corporation\NVSMI\nvidia-smi.exe"
Tue Sep 19 23:33:29 2017
+-----------------------------------------------------------------------------+
| NVIDIA-SMI 385.41 Driver Version: 385.41 |
|-------------------------------+----------------------+----------------------+
| GPU Name TCC/WDDM | Bus-Id Disp.A | Volatile Uncorr. ECC |
| Fan Temp Perf Pwr:Usage/Cap| Memory-Usage | GPU-Util Compute M. |
|===============================+======================+======================|
| 0 GeForce GTX 960M WDDM | 00000000:02:00.0 Off | N/A |
| N/A 55C P8 N/A / N/A | 30MiB / 4096MiB | 0% Default |
+-------------------------------+----------------------+----------------------+

+-----------------------------------------------------------------------------+
| Processes: GPU Memory |
| GPU PID Type Process name Usage |
|=============================================================================|
| No running processes found |
+-----------------------------------------------------------------------------+

CNN

CNN 版手写数字识别
1
2
3
4
5
6
7
8
9
10
11
12
13
14
15
16
17
18
19
20
21
22
23
24
25
26
27
28
29
30
31
32
33
34
35
36
37
38
39
40
41
42
43
44
45
46
47
48
49
50
51
52
53
54
55
56
57
58
59
60
61
62
63
64
65
66
67
68
69
70
71
72
73
74
75
76
77
78
79
80
81
82
83
84
85
86
87
88
89
90
91
92
93
94
95
96
97
98
99
100
101
102
103
104
105
106
107
108
109
110
111
112
113
114
115
116
117
118
119
120
121
122
123
124
125
126
127
128
import tensorflow as tf
from tensorflow.examples.tutorials.mnist import input_data

mnist = input_data.read_data_sets('MNIST_data', one_hot=True)

# 权值
def weight_variable(shape):
initial = tf.truncated_normal(shape=shape, stddev=0.1)
return tf.Variable(initial_value=initial)

# 偏置值
def bias_variable(shape):
initial = tf.constant(0.1, shape=shape)
return tf.Variable(initial_value=initial)

# 卷积层
def conv2d(x, W):
# x: ` [batch, in_height, in_width, in_channels]`
# [批次大小,输入图片的长和宽,通道数(黑白:2;彩色:3)]
# W: `[filter_height, filter_width, in_channels, out_channels]`
# [滤波器长,宽,输入通道数,输出通道数]
# strides: `[1, stride, stride, 1]`
# [固定为 1,x/y 方向的步长,固定为 1]
# padding: 是否在外部补零
return tf.nn.conv2d(x, W, strides=[1, 1, 1, 1], padding='SAME')

# 池化层
def max_pool_2x2(x):
# x: ` [batch, in_height, in_width, in_channels]`
# [批次大小,输入图片的长和宽,通道数(黑白:2;彩色:3)]
# ksize: [固定为 1,窗口大小,固定为 1]
# strides: `[1, stride, stride, 1]`
# [固定为 1,x/y 方向的步长,固定为 1]
# padding: 是否在外部补零
return tf.nn.max_pool(x, ksize=[1, 2, 2, 1], strides=[1, 2, 2, 1], padding='SAME')

# Place Holder
x = tf.placeholder(tf.float32, [None, 784])
y = tf.placeholder(tf.float32, [None, 10])
# Learn Rate 学习率
lr = tf.Variable(0.001, dtype = tf.float32)

# 将 x 的转化为 4D 向量
# [batch, in_height, in_width, in_channels]
x_image = tf.reshape(x, [-1, 28, 28, 1])

# 初始化第一个卷积层 权值和偏置值
# 5*5 的采样窗口,32 个卷积核(输出 channels 数)从 1 个平面(输入 channels 数)抽取特征,获得 32 个特征平面
W_conv1 = weight_variable([5, 5, 1, 32])
# 32 个卷积核,每个卷积核对应一个偏置值
b_conv1 = bias_variable([32])

# 执行卷积采样操作,并加上偏置值
conv2d_1 = conv2d(x_image, W_conv1) + b_conv1
# ReLU 激活函数,获得第一个卷积层,计算得到的结果
h_conv1 = tf.nn.relu(conv2d_1)
# 执行 pooling 池化操作
h_pool1 = max_pool_2x2(h_conv1)

# 第二个卷积层 + 激活函数 + 池化层
W_conv2 = weight_variable([5, 5, 32, 64])
b_conv2 = bias_variable([64])
conv2d_2 = conv2d(h_pool1, W_conv2) + b_conv2
h_conv2 = tf.nn.relu(conv2d_2)
h_pool2 = max_pool_2x2(h_conv2)

# 第一次卷积操作后,28 * 28 图片仍然是 28 * 28
# 第一次池化之后,因为 2 * 2 的窗口,所以变成了 14 * 14
# 第二次卷积之后,仍然保持 14 * 14 的平面大小
# 第二次池化之后,因为 2 * 2 的窗口,所以变成了 7 * 7

# 全连接层一共有 1000 个神经元,连接上一层的 7 * 7* 64 = 3136 个神经元
W_fc1 = weight_variable([7 * 7 * 64, 1000])
b_fc1 = bias_variable([1000])

# 把上一层的池化层,转化为 1 维(-1 代表任意值)
h_pool2_flat = tf.reshape(h_pool2, [-1, 7 * 7 * 64])
# 矩阵相乘,并加上偏置值
wx_plus_b1 = tf.matmul(h_pool2_flat, W_fc1) + b_fc1
# ReLU 激活函数
h_fc1 = tf.nn.relu(wx_plus_b1)

# dropout 正则化
keep_prob = tf.placeholder(tf.float32)
h_fc1_drop = tf.nn.dropout(h_fc1, keep_prob)

# 第二个全连接层
W_fc2 = weight_variable([1000, 10])
b_fc2 = bias_variable([10])

# 计算输出
wx_plus_b2 = tf.matmul(h_fc1_drop, W_fc2) + b_fc2
prediction = tf.nn.softmax(wx_plus_b2)

# 交叉熵 Loss Function
cross_entropy = tf.reduce_mean(tf.nn.softmax_cross_entropy_with_logits(labels=y, logits=prediction))
# Adam 优化器,配合一个不断下降的学习率
train_step = tf.train.AdamOptimizer(lr).minimize(cross_entropy)

# argmax 方法,会返回一维张量中最大值所在的位置
# 计算正确率
correct_prediction = tf.equal(tf.argmax(prediction, 1), tf.argmax(y, 1))
accuracy = tf.reduce_mean(tf.cast(correct_prediction, tf.float32))

with tf.device('/gpu:0'):
with tf.Session() as sess:
tf.global_variables_initializer().run()

batch_size = 100
batch = (int) (60000 / batch_size)

for _ in range(101):
sess.run(tf.assign(lr, 0.0001 * (0.95 ** _)))
for batch_step in range(batch):
batch_xs, batch_ys = mnist.train.next_batch(batch_size)
sess.run(train_step, feed_dict={x: batch_xs, y: batch_ys, keep_prob: 0.68})

if _ % 20 == 0:
test_acc = sess.run(accuracy,feed_dict={x: mnist.test.images, y: mnist.test.labels, keep_prob: 1.0})
print("Iterator: ", _, "Accuracy:", test_acc)


Iterator: 0 Accuracy: 0.954
Iterator: 20 Accuracy: 0.9912
Iterator: 40 Accuracy: 0.9916
Iterator: 60 Accuracy: 0.9924
Iterator: 80 Accuracy: 0.9924
Iterator: 100 Accuracy: 0.9926

Tips: Full code is here, and Kaggle competition is here.

RNN

LSTM 版手写数字识别
1
2
3
4
5
6
7
8
9
10
11
12
13
14
15
16
17
18
19
20
21
22
23
24
25
26
27
28
29
30
31
32
33
34
35
36
37
38
39
40
41
42
43
44
45
46
47
48
49
50
51
52
53
54
55
import tensorflow as tf
from tensorflow.examples.tutorials.mnist import input_data

mnist = input_data.read_data_sets("MNIST_data/", one_hot=True)

# 输入的图片,每张 28*28 个像素
n_inputs = 28 # 输入的每行有 28 个数据,输入层 神经元的个数
max_time = 28 # 输入的次数为 28 次
lstm_size = 100 # 隐藏层 block 单元
n_classes = 10 # 分类个数
batch_size = 50 # 单批次的样本数量
n_batch = mnist.train.num_examples / batch_size # 一共会分成多少批次

x = tf.placeholder(tf.float32, [None, 784])
y = tf.placeholder(tf.float32, [None, 10])
weights = tf.Variable(tf.truncated_normal([lstm_size, n_classes], stddev=0.1))
biases = tf.Variable(tf.constant(0.1, shape=[n_classes]))

def LSTM(x, weights, biases):
inputs = tf.reshape(x, [-1, max_time, n_inputs])
# 定义隐藏层 block 单元
lstm_cell = tf.contrib.rnn.BasicLSTMCell(lstm_size)
# final_state[0]: cell state
# final_state[1]: hidden_state
outputs, final_state = tf.nn.dynamic_rnn(lstm_cell, inputs, dtype=tf.float32)
return tf.nn.softmax(tf.matmul(final_state[1], weights) + biases)

prediction = LSTM(x, weights, biases)
cross_entropy = tf.reduce_mean(tf.nn.softmax_cross_entropy_with_logits(logits=prediction, labels=y))
train_step = tf.train.AdamOptimizer(1e-4).minimize(cross_entropy)
correct_prediction = tf.equal(tf.argmax(y, 1), tf.argmax(prediction, 1))
accuracy = tf.reduce_mean(tf.cast(correct_prediction, tf.float32))
init = tf.global_variables_initializer()

with tf.Session() as sess:
sess.run(init)
for epoch in range(101):
for batch in range(int(n_batch)):
batch_xs, batch_ys = mnist.train.next_batch(batch_size)
sess.run(train_step, feed_dict={x: batch_xs, y: batch_ys})
if epoch % 10 == 0:
acc = sess.run(accuracy, feed_dict={x:mnist.test.images, y:mnist.test.labels})
print("Iterator:", str(epoch), ", Accuracy:", str(acc))

Iterator: 0 , Accuracy: 0.7244
Iterator: 10 , Accuracy: 0.946
Iterator: 20 , Accuracy: 0.9646
Iterator: 30 , Accuracy: 0.9696
Iterator: 40 , Accuracy: 0.9717
Iterator: 50 , Accuracy: 0.9764
Iterator: 60 , Accuracy: 0.9776
Iterator: 70 , Accuracy: 0.9801
Iterator: 80 , Accuracy: 0.9814
Iterator: 90 , Accuracy: 0.9793
Iterator: 100 , Accuracy: 0.9814

Tips: Full code is here.

pyTorch / pyTorch

介绍

 PyTorch™ is a Python package that provides two high-level features: Tensor computation (like NumPy) with strong GPU acceleration and Deep neural networks built on a tape-based autograd system

安装

 到 pytorch-scripts 项目中,下载当前最新的 release 版本 torch-0.3.0b0+591e73e-cp35-cp35m-win_amd64.whl,并安装

1
$ pip install "torch-0.3.0b0+591e73e-cp35-cp35m-win_amd64.whl"

Tips: Full code is here.

编程实战

Hello-world
1
2
3
4
5
6
7
8
import torch

t = torch.Tensor(1, 0)
print(t)

# 1.00000e-29 *
# 2.7413
# [torch.FloatTensor of size 1]

BVLC / Caffe

介绍

 Caffe™ (Convolutional Architecture for Fast Feature Embedding) is a deep learning framework made with expression, speed, and modularity in mind. It is developed by Berkeley AI Research (BAIR) and by community contributors. Yangqing Jia created the project during his PhD at UC Berkeley. Caffe is released under the BSD 2-Clause license.

dmlc / xgboost

介绍

 XGBoost™ is an optimized distributed gradient boosting library designed to be highly efficient, flexible and portable. It implements machine learning algorithms under the Gradient Boosting framework. XGBoost provides a parallel tree boosting (also known as GBDT, GBM) that solve many data science problems in a fast and accurate way. The same code runs on major distributed environment (Hadoop, SGE, MPI) and can solve problems beyond billions of examples.

Apache / PredictionIO

介绍

 Apache PredictionIO™ is an open source Machine Learning Server built on top of a state-of-the-art open source stack for developers and data scientists to create predictive engines for any machine learning task.

Numenta / NuPIC

介绍

 NuPIC(Numenta Platform for Intelligent Computing, Numenta 智能计算平台) 是一个与众不同的开源人工智能平台,它基于一种脑皮质学习算法,即 “层级实时记忆”(Hierarchical Temporal Memory, HTM)。该算法旨在模拟新大脑皮层的工作原理,将复杂的问题转化为模式匹配与预测,而传统的 AI算法大多是针对特定的任务目标而设计的
 NuPIC 聚焦于分析实时数据流,可以通过学习数据之间基于时间的状态变化,对未知数据进行预测,并揭示其中的非常规特性

特性
  • 持续的在线学习(根据快速变化的数据流进行实时调整
  • 时间和空间分析(可以同时模拟时间空间的变化
  • 通过通用性的大脑皮层算法,进行预测和建模
  • 强大的异常检测能力(实时检测数据流的扰动,不依靠僵化的阈值设置和过时的算法)
  • 层级实时存储算法

安装

Windows
1
2
3
4
5
6
$ yum install glibc-devel.i686 gcc -y
$ python -V
Python 2.7.12
$ pip -V
pip 9.0.1 from /usr/local/lib/python2.7/site-packages (python 2.7)
$ pip install nupic
Linux

 可能部分版本不支持,需要结合 Nupic 的 ReleasePyPi 平台找到合适的版本

1
2
$ pip install https://s3-us-west-2.amazonaws.com/artifacts.numenta.org/numenta/nupic.core/releases/nupic.bindings/nupic.bindings-0.4.5-cp27-none-linux_x86_64.whl
$ pip install nupic==0.4.5

openai / gpt-3

介绍

 GPT-3 是一种由 OpenAI 开发的大规模语言模型,它拥有 1750 亿个参数,是目前最大的自然语言处理模型之一。GPT-3 使用了深度学习技术,通过训练来学习自然语言的语法、语义和逻辑等特征。该模型可以用于自然语言生成、文本分类、机器翻译、对话系统等各种自然语言处理任务

 GPT-3 模型采用了 Transformer 模型结构,通过使用大规模的数据集进行训练,使其可以产生高质量的文本生成结果,并且在许多自然语言处理任务中都取得了令人瞩目的表现。它可以生成各种类型的文本,如新闻报道、小说、诗歌、代码和对话等。同时,GPT-3 也引发了对于自然语言处理技术的更多讨论和探索,尤其是对于大型预训练语言模型的可解释性和伦理问题的关注

-- 来源:ChatGPT 的回答

如何训练一个大语言模型

  1. 数据收集

    • 来源选择:确定从哪里获取数据,例如开放的文本数据库、互联网抓取、社交媒体等。
    • 数据清洗:去除重复、错误或不相关的信息。例如,可能要删除由网页抓取中产生的 HTML 标签。
    • 数据选择:确保数据代表了各种语言风格和领域,以实现广泛的覆盖。
  2. 数据预处理

    • 标记化:使用工具(如 Spacy 或 Tokenizers 库)将文本分割成词、子词或字符级别的标记。
    • 序列化:转化标记为整数或其他表示形式,方便模型处理。
    • 创建数据批次:将数据分组成大小适中的批次,以便于模型进行并行计算。
  3. 模型架构

    • 选择架构:决定使用哪种模型架构,如 Transformer、LSTM 等。GPT 系列使用的是 Transformer 架构。
    • 定义超参数:设置模型的大小、层数、注意力头数等。
  4. 模型初始化

    • 权重初始化:使用方法(如 Xavier 或 He 初始化)随机设定模型权重的初始值,确保不会过大或过小。
  5. 模型训练

    • 损失函数:定义损失函数,例如交叉熵损失,以衡量模型的预测与真实数据之间的差距。
    • 优化器选择:如 Adam、SGD 等,它决定了如何基于损失更新模型权重。
    • 正则化:可能使用如 Dropout、权重衰减等技术来避免过拟合。
    • 学习率调整:如学习率衰减、余弦退火或使用学习率调度器。
  6. 评估和验证

    • 分割数据:确保有一个独立的验证集或测试集,用于评估模型性能。
    • 指标计算:计算诸如困惑度、准确率等指标。
    • 早停:如果在验证集上的性能停止提高,则可能提前结束训练。
  7. 微调(可选):

    • 选择微调数据:针对特定任务收集数据。
    • 微调训练:在微调数据上进行训练,但通常使用更小的学习率,以避免大幅改变原始模型。
  8. 部署

    • 模型压缩:使用技术如模型剪枝、知识蒸馏等,以减小模型大小或提高推理速度。
    • 部署环境:将模型部署到服务器、边缘设备或云服务上。

Error from OpenAI: You exceeded your current quota

1
Error from OpenAI: You exceeded your current quota, please check your plan and billing details. For more information on this error, read the docs: https://platform.openai.com/docs/guides/error-codes/api-errors.

如果出现这样的报错,需要访问 https://platform.openai.com/settings/organization/billing/overview 进行充值

facebookresearch / llama

介绍

 LLaMA 是一组具有 70 亿到 650 亿参数规模的基础语言模型集合。其使用了数万亿的标记对模型进行训练,并证实了仅使用公开可用的数据集的情况下,就可以训练出最先进的大语言模型。根据 Meta 论文所声称的,LLaMA-13B 在大多数基准测试中已经优于 GPT-3(175B)模型,而 LLaMA-65B 与最佳模型 Chinchilla70B 和 PaLM-540B 也旗鼓相当

ollama / ollama

介绍

 Get up and running with large language models locally.

安装

MacOS
1
$ ollama run llama3
1
2
3
4
5
6
7
8
9
pulling 00e1317cbf74... 100% ▕██████████████████████████████████████████████████████████████████████████████████████████████████████████████████▏ 4.7 GB
pulling 4fa551d4f938... 100% ▕██████████████████████████████████████████████████████████████████████████████████████████████████████████████████▏ 12 KB
pulling 8ab4849b038c... 100% ▕██████████████████████████████████████████████████████████████████████████████████████████████████████████████████▏ 254 B
pulling 577073ffcc6c... 100% ▕██████████████████████████████████████████████████████████████████████████████████████████████████████████████████▏ 110 B
pulling ad1518640c43... 100% ▕██████████████████████████████████████████████████████████████████████████████████████████████████████████████████▏ 483 B
verifying sha256 digest
writing manifest
removing any unused layers
success

使用

帮助手册
1
>>> /?
1
2
3
4
5
6
7
8
9
10
11
Available Commands:
/set Set session variables
/show Show model information
/load <model> Load a session or model
/save <model> Save your current session
/clear Clear session context
/bye Exit
/?, /help Help for a command
/? shortcuts Help for keyboard shortcuts

Use """ to begin a multi-line message.
1
>>> /show
1
2
3
4
5
6
7
Available Commands:
/show info Show details for this model
/show license Show model license
/show modelfile Show Modelfile for this model
/show parameters Show parameters for this model
/show system Show system message
/show template Show prompt template
1
>>> /show info
1
2
3
4
Model details:
Family llama
Parameter Size 8B
Quantization Level Q4_0
1
>>> /show system
1
No system message was specified for this model.
1
>>> show template
1
2
3
4
5
6
7
8
9
10
11
12
13
14
15
16
17
18
19
20
21
22
23
24
25
26
27
28
29
30
31
32
Here is a basic template for creating a conversation:

**Introduction**

* Start with a friendly greeting or question to break the ice.
* Introduce yourself and establish a connection with the user.

**Understanding the User's Needs**

* Ask open-ended questions to understand what the user is looking for.
* Listen actively and show empathy to build trust.
* Clarify any misunderstandings or concerns.

**Providing Value**

* Offer helpful information, advice, or solutions related to the user's needs.
* Use examples, analogies, or storytelling to make complex concepts more relatable.
* Highlight key takeaways and next steps.

**Engaging and Building Rapport**

* Ask follow-up questions to show interest and build rapport.
* Share personal experiences or anecdotes to create a connection.
* Use humor or light-hearted moments to keep the conversation engaging.

**Closing and Follow-Up**

* Summarize the key points and reiterate your value proposition.
* Encourage the user to take action or seek further assistance.
* End with a friendly closing or next steps, leaving the door open for future conversations.

This is just one example of a template. Feel free to adapt it to fit your specific needs and goals!
对话
1
>>> What is AI?
1
2
3
4
5
6
7
8
9
10
11
12
13
14
15
16
17
18
19
20
21
22
23
24
25
26
AI stands for Artificial Intelligence, which refers to the development of computer systems that can perform tasks that would typically require human intelligence, such as:

1. **Learning**: AI systems can learn from data and improve their performance over time.
2. **Reasoning**: AI can make decisions based on logic and rules, just like humans do.
3. **Perceiving**: AI can interpret and understand the world around it, including images, speech, and text.

AI uses various techniques to achieve these capabilities, including:

1. **Machine learning**: AI systems can learn from data without being explicitly programmed.
2. **Deep learning**: A subset of machine learning that uses neural networks to analyze complex patterns in data.
3. **Natural Language Processing (NLP)**: AI can understand and generate human-like language.
4. **Computer vision**: AI can interpret and understand visual data from images and videos.

AI has many applications across industries, including:

1. **Robotics**: AI-powered robots can perform tasks that require human-like dexterity and intelligence.
2. **Customer service**: AI-powered chatbots can provide personalized support to customers.
3. **Healthcare**: AI can help diagnose diseases, analyze medical images, and develop personalized treatment plans.
4. **Finance**: AI can analyze financial data, detect fraudulent transactions, and make investment decisions.
5. **Gaming**: AI-powered game engines can create immersive experiences with realistic NPCs (non-player characters).
6. **Research**: AI can aid in scientific discovery by analyzing large datasets, identifying patterns, and making predictions.

The term "Artificial Intelligence" was coined in the 1950s, but the concept of creating intelligent machines dates back to ancient Greece. Today, AI is a rapidly growing
field with immense potential to transform industries and improve our lives.

Would you like to know more about AI or its applications?
1
>>> Yes
1
2
3
4
5
6
7
8
9
10
11
12
13
14
15
16
17
18
19
20
21
22
23
24
25
26
27
28
29
30
31
32
33
34
35
36
37
38
39
40
41
Let's dive deeper into AI!

**What are the benefits of AI?**

1. **Automation**: AI can automate repetitive tasks, freeing up humans for more creative and high-value work.
2. **Improved accuracy**: AI can analyze vast amounts of data quickly and accurately, reducing errors and improving decision-making.
3. **Enhanced customer experience**: AI-powered chatbots and virtual assistants can provide personalized support to customers 24/7.
4. **Increased efficiency**: AI can optimize processes, reduce waste, and streamline operations, leading to cost savings and increased productivity.
5. **New insights and discoveries**: AI can analyze complex data sets, identify patterns, and make predictions, leading to new scientific breakthroughs and innovations.

**What are some exciting AI applications?**

1. **Self-driving cars**: AI-powered vehicles can navigate roads safely and efficiently, reducing accidents and traffic congestion.
2. **Medical diagnosis**: AI-powered algorithms can analyze medical images, detect diseases, and develop personalized treatment plans.
3. **Virtual assistants**: AI-powered virtual assistants like Siri, Alexa, and Google Assistant can help with daily tasks, answer questions, and provide entertainment.
4. **Cybersecurity**: AI-powered systems can detect and prevent cyberattacks in real-time, protecting sensitive data and networks.
5. **Gaming and entertainment**: AI-powered game engines can create realistic NPC characters, generate immersive stories, and even compose music.

**What are some of the challenges and concerns surrounding AI?**

1. **Job displacement**: The automation of jobs may displace certain workers, requiring retraining and upskilling.
2. **Bias and ethics**: AI systems can perpetuate biases and discriminatory behaviors if not designed with ethical considerations in mind.
3. **Data privacy**: AI requires access to vast amounts of data, which raises concerns about personal privacy and security.
4. **Unintended consequences**: The complexity of AI systems means that unintended consequences can arise from their use.

**How are governments and organizations addressing the challenges surrounding AI?**

1. **Regulations**: Governments are developing regulations and guidelines for the development and deployment of AI systems.
2. **Ethics frameworks**: Organizations are establishing ethics frameworks to ensure AI systems are designed with fairness, transparency, and accountability in mind.
3. **Training and education**: Governments and organizations are investing in training and education programs to help workers develop skills for an AI-driven economy.

**What can you do to stay ahead of the curve in AI?**

1. **Stay informed**: Follow reputable sources and industry leaders to stay up-to-date on AI trends, applications, and breakthroughs.
2. **Develop transferable skills**: Focus on developing skills that are relevant across industries, such as data analysis, programming, or creative problem-solving.
3. **Explore AI-powered tools**: Experiment with AI-powered tools and platforms to understand their capabilities and limitations.
4. **Pursue AI-related education**: Consider pursuing higher education or certifications in AI-related fields, such as machine learning, data science, or computer vision.

I hope this information helps you better understand AI and its potential impact on your life and career!

Do you have any specific questions about AI that I can help with?

AI 到底是什么?

套娃

 从体系组成成分的角度来讲,人工智能,包含机器学习。而机器学习,又包含了深度学习

四象限

 从 “是否类人类”、“是否产生动作” 两个方向,又可以将人工智能化分为四个象限

 在 $x$ 轴正方向上,我们希望 AI 系统只需给出某类问题的最优解,并不用考虑是否会和人类一样去思考这个问题,例如地图导航系统,只需要算出两点的最佳路径即可。而 $x$ 轴的负方向上,则希望 AI 系统能表现出人类的思想活动,比如能听着音乐点头、摇摆的机器人,能去享受旋律;另一方面,在 $y$ 轴的正方向上,AI 系统更侧重于思考,譬如 类似 Siri™ 助理系统,可以处理人们通过语音输入的指令,并能思考出最为合理的反应。而 $y$ 轴的负方向上,则会偏向于动作的产生,比方说流水线上完成材料加工、处理工作的工业机器人
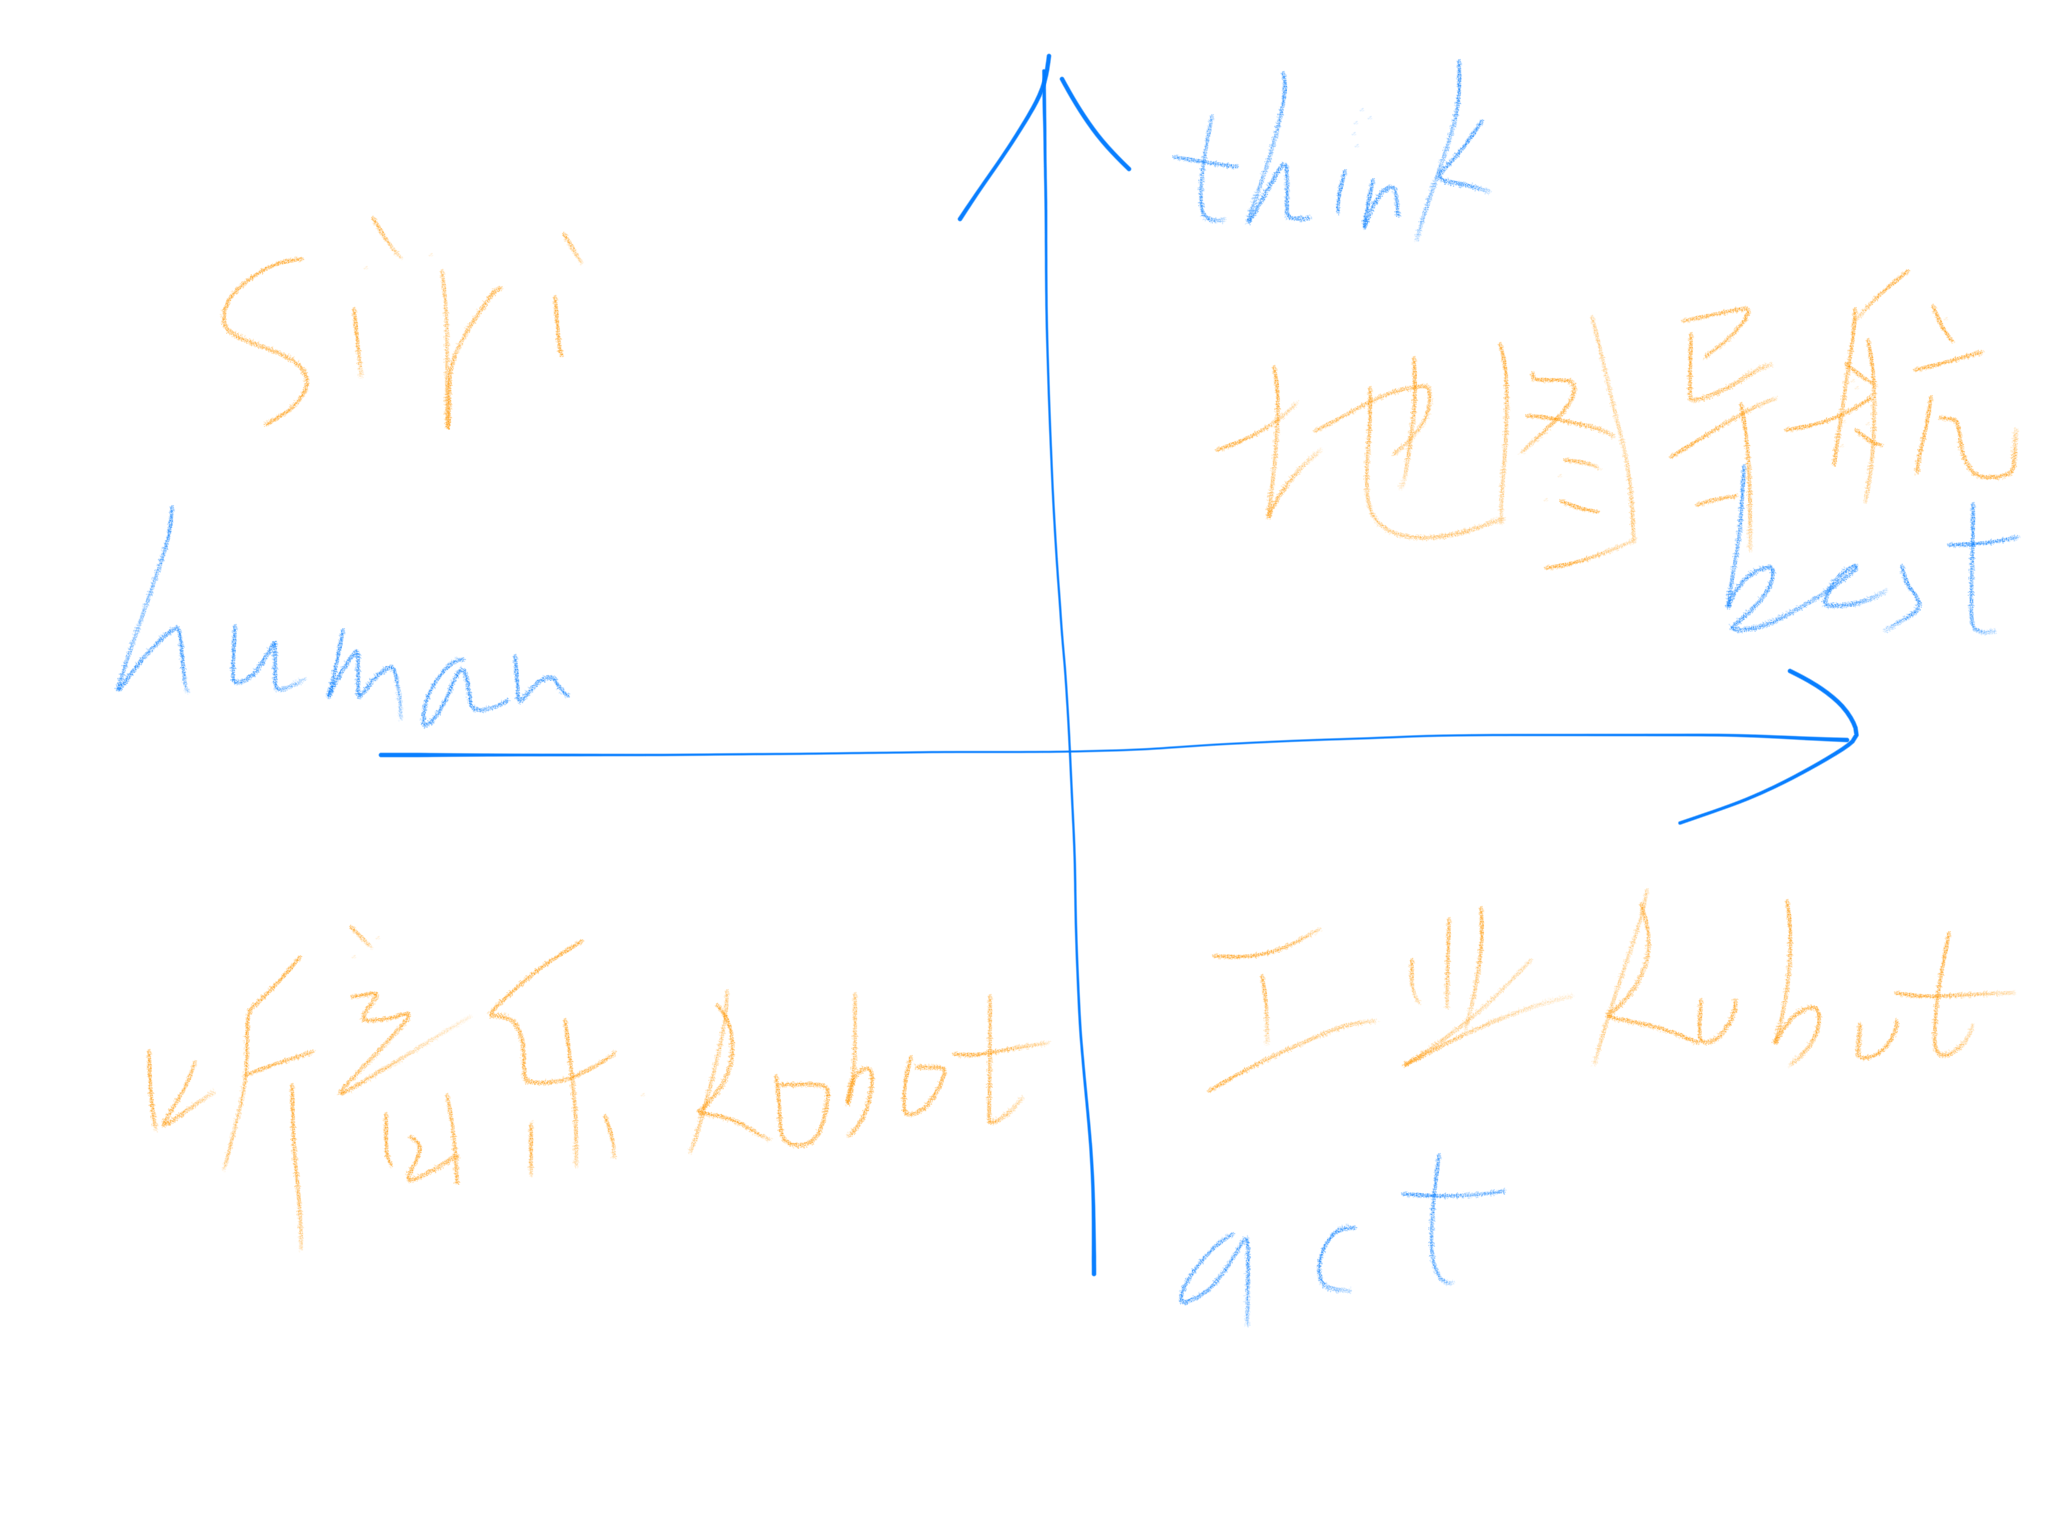
(使用 iPad™ 手绘而成)

常见误区

OverSamplingData Augmentation 的区别

Transfer Learning 和 Fine-tuning 的区别

资料

Doc

Blog

机器学习

人工智能

强化学习

胶囊网络

Book

统计学

微积分

概率论

机器学习

人工智能

强化学习

Code

Course

Data

Resource

Markdown

Paper

Video

Tool

欢迎加入我们的技术群,一起交流学习

群名称 群号
人工智能(高级)
人工智能(进阶)
大数据
算法
数据库